Organizations worldwide are adopting Kubernetes and cloud native technologies at breakneck pace. Containers have become the new norm of packaging applications and Kubernetes is at the forefront, orchestrating and running containers at scale. App modernization has increasingly become one of the top priorities in IT. This has been accelerated in the wake of the pandemic with industries shifting quickly to meet emerging demands. In fact, Gartner states that 69% of Boards of Directors accelerated their Digital Business Initiatives following COVID-19 disruption.
However, this shift is easier said than done. Most organizations have invested heavily in VMs and the practice of maintaining them across their lifecycle. The legacy applications that run on virtualized compute platforms will have to be refactored or replatformed in order to take advantage of the new cloud native environment. This is time-consuming and has to be done carefully with minimal impact to the business. Being able to maintain the same quality and performance is another significant challenge.
From our partners:
Enter KubeVirt. KubeVirt is an open-source project that enables VMs to be managed by Kubernetes alongside containers. This is particularly great in scenarios where an application may include a service that has to be run in a VM. The point here is that VMs are treated as first-class citizens using native Kubernetes tools. Operators have the option of using a single platform, reducing the complexities involved in managing two stacks and multiple management planes.
Nutanix has been consistently recognised as an industry leader for its ability to run virtualized workloads. Nutanix also enables containerized workloads to run via its managed Kubernetes solution, Nutanix Karbon. With KubeVirt, customers now have the freedom to migrate VM workloads across them, whilst continuing to benefit from Nutanix’s distributed scale-out storage.
The recent announcement of Nutanix’s strategic partnership with Red Hat is even more promising on this front as Red Hat offers OpenShift Virtualization, a solution that leverages KubeVirt. OpenShift further enhances the user experience with advanced operational and monitoring capabilities.
Let’s take a look at how to run and manage VMs using Nutanix Karbon.
Download the sample files provided to guide you along with this article.
git clone https://github.com/nkunnath/kubevirt-karbon.git && cd kubevirt-karbon Install KubeVirt
Since KubeVirt is a Virtual Machine management add-on for Kubernetes, a cluster should have already been deployed using Nutanix Karbon. At its core, KubeVirt extends Kubernetes by adding a new “VM” object through Kubernetes’s Custom Resource Definitions API. This allows the Kubernetes API to manage the VM just like the other native objects.
The following steps will install KubeVirt in your cluster.
export RELEASE=v0.35.0

kubectl apply -f https://github.com/kubevirt/kubevirt/releases/download/${RELEASE}/kubevirt-operator.yaml         # Deploy the KubeVirt operator

kubectl apply -f https://github.com/kubevirt/kubevirt/releases/download/${RELEASE}/kubevirt-cr.yaml   # Create the KubeVirt CR which triggers the actual installation

kubectl -n kubevirt wait kv kubevirt --for condition=Available --timeout=-1s   # Wait until all KubeVirt components are up
By default, KubeVirt attempts to enable hardware emulation. Since the Karbon Kubernetes worker nodes do not support hardware virtualization today, we will be using software emulation.
Enabling software emulation is done by editing the KubeVirt CR as follows:
kubectl edit -n kubevirt kubevirt kubevirt

```
Add the following snippet to spec.configuration
```
    spec:
      configuration:
        developerConfiguration:
          useEmulation: true
The hostPath in Karbon is different – /var/nutanix/var/lib/kubelet/pods. To accommodate this, we will be modifying the KubeVirt DaemonSet that is deployed for the volume mounts to work correctly. Let’s perform a live change on the object as there are no VMs running yet.
kubectl edit daemonsets.apps virt-handler -n kubevirt

```
Change the spec.template.spec.volumes[].hostPath from /var/lib/kubelet/pods to /var/nutanix//var/lib/kubelet/pods. The final change would be as seen below.
```

- name: kubelet-pods-shortened
  hostPath:
    path: /var/nutanix/var/lib/kubelet/pods
    type: ''
- name: kubelet-pods
  hostPath:
    path: /var/nutanix/var/lib/kubelet/pods
    type: ''
This should restart the virt-handler pods which are responsible for handling VM operations to meet the required state.
Install CDI
When creating a virtual machine, there are multiple ways to provide persistent storage. We will be using DataVolumes here provided by the Containerized Data Importer (CDI) project . DataVolumes are a way to automate import virtual machine disks onto PVCs from a web server or container registry. We will be importing a running Ubuntu VM’s disk from the Nutanix cloud here.
Similar to KubeVirt, the subsequent steps will install the CDI operator and Custom Resource.
VERSION=$(curl -s https://github.com/kubevirt/containerized-data-importer/releases/latest | grep -o "v[0-9]\.[0-9]*\.[0-9]*")

kubectl create -f https://github.com/kubevirt/containerized-data-importer/releases/download/$VERSION/
cdi-operator.yaml

kubectl create -f https://github.com/kubevirt/containerized-data-importer/releases/download/$VERSION/cdi-cr.yaml
We will be deploying the VMs and disks in a namespace vm-objects.
kubectl create namespace vm-objectsTo allow the DataVolume to be imported into Kubernetes, we will need to provide the access credentials for Prism Central. Prism Central, with its v3 REST API endpoints, will be the primary touchpoint for all external traffic.
Create a secret with the template below, changing the username and password as per your requirements:
cat <<EOF > pc-secret.yaml
apiVersion: v1
kind: Secret
metadata:
  name: pc-access-secret
  namespace: vm-objects
type: Opaque
data:
  accessKeyId: "YWRtaW4="       # Prism Central user name, base64 encoded>
  secretKey: "TnV0YW5peC8xMjM0" # Prism Central password, base64 encoded>
EOF
We will also need to specify custom TLS certificates for the data import. An additional requirement is that the Prism Central certificate should have a Subject Alternative Name specified. This is primarily due to the underlying Go library mandating the use of SANs in SSL certs. If the certificates used in your environment already have a SAN extension, you will have to add the certificate as a ConfigMap which should be used when accessing the PC (see below).
If the certificates do not have SAN, please work with your security team in getting them replaced.
In my demo below, I replace the self signed SSL certificate on my lab server to include the IP address as SAN . Feel free to use the template and update the fields (san.cnf) to match your organisation’s security best practices.
Generate the new certificate as follows:
openssl req -x509 -nodes -days 3652 -newkey rsa:2048 -keyout pckey.pem -out pccert.pem -config san.cnfCreate a ConfigMap object from the new certificate that will be used later when importing the DataVolume:
kubectl create configmap pc-config-map -n vm-objects --from-file=pccert.pemAlso make sure that the new certificates are uploaded to Nutanix Prism Central and that the browser reflects the change. For more details on this workflow, please go here.
- If replacing or modifying the certificates is not an option, then you may have to download the disk and upload it on your local system.
Now we are ready to create volumes and VMs.
Create DataVolume
We will be using Prism Central’s REST API v3 to grab the disk image we need. A running Ubuntu VM’s disk has been uploaded as a ready-to-use image for this demo. We can quickly query the list of images and their respective UUID’s against the v3/images endpoint (install jq before running this command):
curl -k -s -u admin:<password> -X POST --header "Content-Type: application/json" --header "Accept: application/json" -d '{"kind": "image", "length": 25}' "https://10.63.19.14:9440/api/nutanix/v3/images/list" | python -mjson.tool | jq .'entities[].spec.name' | cat -n
     1 "karbon-ntnx-1.0"
     2 "cirros"
     3 "Bionic Beaver - UEFI---SCSI disk image"
     4 "Bionic Beaver---SCSI disk image"
     5 "Virt IO"
     6 "SQL Server 2014"


curl -k -s -u admin:<password> -X POST --header "Content-Type: application/json" --header "Accept: application/json" -d '{"kind": "image", "length": 25}' "https://10.63.19.14:9440/api/nutanix/v3/images/list" | python -mjson.tool | jq .'entities[].metadata.uuid' | cat -n
     1 "6a43a6f6-3474-493e-ae83-8565f5824725"
     2 "a98e24d4-8502-48df-8fd0-0f9ba78407a0"
     3 "d69dcf69-7117-438e-9745-72529f323815"
     4 "c6987acd-27b8-474b-99e1-0bacf488af59"
     5 "575b94bd-021f-4d77-9406-ffec6f0ab171"
     6 "cdddfdd6-6347-4cb2-9f4f-d5c282e80356"
Item 4 is our disk image of choice. We now create the DataVolume with the config file below:
cat <<EOF > bionic-image-dv.yaml
apiVersion: cdi.kubevirt.io/v1beta1
kind: DataVolume
metadata:
  name: bionic-image-dv
  namespace: vm-objects
spec:
  source:
      http:
         url: "https://10.63.19.14:9440/api/nutanix/v3/images/c6987acd-27b8-474b-99e1-0bacf488af59/file"
         secretRef: "pc-access-secret"
         certConfigMap: "pc-config-map"
  pvc:
    storageClassName: virtual-machine-sc
    accessModes:
      - ReadWriteOnce
    resources:
      requests:
        storage: "4Gi"
EOF
Verify that the DV and the corresponding PVC are created successfully. This may take a few minutes depending on the size of the source disk and the network bandwidth:
kubectl get datavolumes -n vm-objects
NAME              PHASE              PROGRESS   RESTARTS   AGE
bionic-image-dv   ImportInProgress   N/A        1          48s
kubectl describe datavolumes -n vm-objects bionic-image-dv
.
.
Events:
Type Reason Age From Message
---- ------ ---- ---- -------
Normal Pending 3m1s datavolume-controller PVC bionic-image-dv Pending
Normal Bound 2m57s datavolume-controller PVC bionic-image-dv Bound
Normal ImportScheduled 2m1s (x2 over 2m57s) datavolume-controller Import into bionic-image-dv scheduled
Normal ImportInProgress 118s (x2 over 2m37s) datavolume-controller Import into bionic-image-dv in progress
Normal ImportSucceeded 81s datavolume-controller Successfully imported into PVC bionic-image-dvkubectl get pvc -n vm-objects
NAME STATUS VOLUME CAPACITY ACCESS MODES STORAGECLASS AGE
bionic-image-dv Bound pvc-55f3d5fb-ff5d-426c-9cc8-c000b3079f0a 4Gi RWO virtual-machine-sc 3m23sOnce the disk is imported successfully, we can proceed with creating the VM.
Create VM
Change the cloud-init config with your password/SSH key as required. Also note that the worker nodes should have enough CPU/RAM to allocate the resources requested.
cat <<EOF > bionic-image-vm.yaml
apiVersion: kubevirt.io/v1alpha3
kind: VirtualMachineInstance
metadata:
  labels:
    kubevirt.io/vm: bionic-image-vm
  name: bionic-image-vm
  namespace: vm-objects
spec:
  domain:
    cpu:
      cores: 2
    devices:
      disks:
      - disk:
          bus: virtio
        name: datavolumedisk1
      - disk:
          bus: virtio
        name: cloudinitdisk
      interfaces:
      - name: default
        bridge: {}
    resources:
      requests:
        memory: 2048M
  networks:
  - name: default
    pod: {}
  volumes:
  - dataVolume:
      name: bionic-image-dv
    name: datavolumedisk1
  - cloudInitNoCloud:
      userData: |-
        #cloud-config
        password: nutanix/4u
        ssh_pwauth: True
        chpasswd: { expire: False }
    name: cloudinitdisk
EOF
Confirm that the VM instance was created:
kubectl get virtualmachineinstance -n vm-objects
NAME              AGE   PHASE     IP              NODENAME
bionic-image-vm   48s   Running   172.20.152.142   karbon-nk-krbn-kubevirt-107bb6-k8s-worker-0
You could also directly define the DataVolume spec within the VM spec. Look at the samples for a UEFI enabled VM and modify it as you wish:
kubectl create -f vm/uefi-vm.yaml
VM access
Now that the VM is running in Kubernetes, we need a way to access it. KubeVirt provides a websocket API for VNC access. Deploy it with a single command below:
kubectl create -f vnc/vnc.yaml# Get the NodePort of virtvnc service
kubectl get service -n kubevirt virtvnc
NAME TYPE CLUSTER-IP EXTERNAL-IP PORT(S) AGE
virtvnc NodePort 172.19.48.180 <none> 8001:30952/TCP 3m2sTo access the VNC consoles, browse to http://NODE_IP:VNC_NODE_PORT. The query parameter namespace allows you to filter the VM’s by namespace:
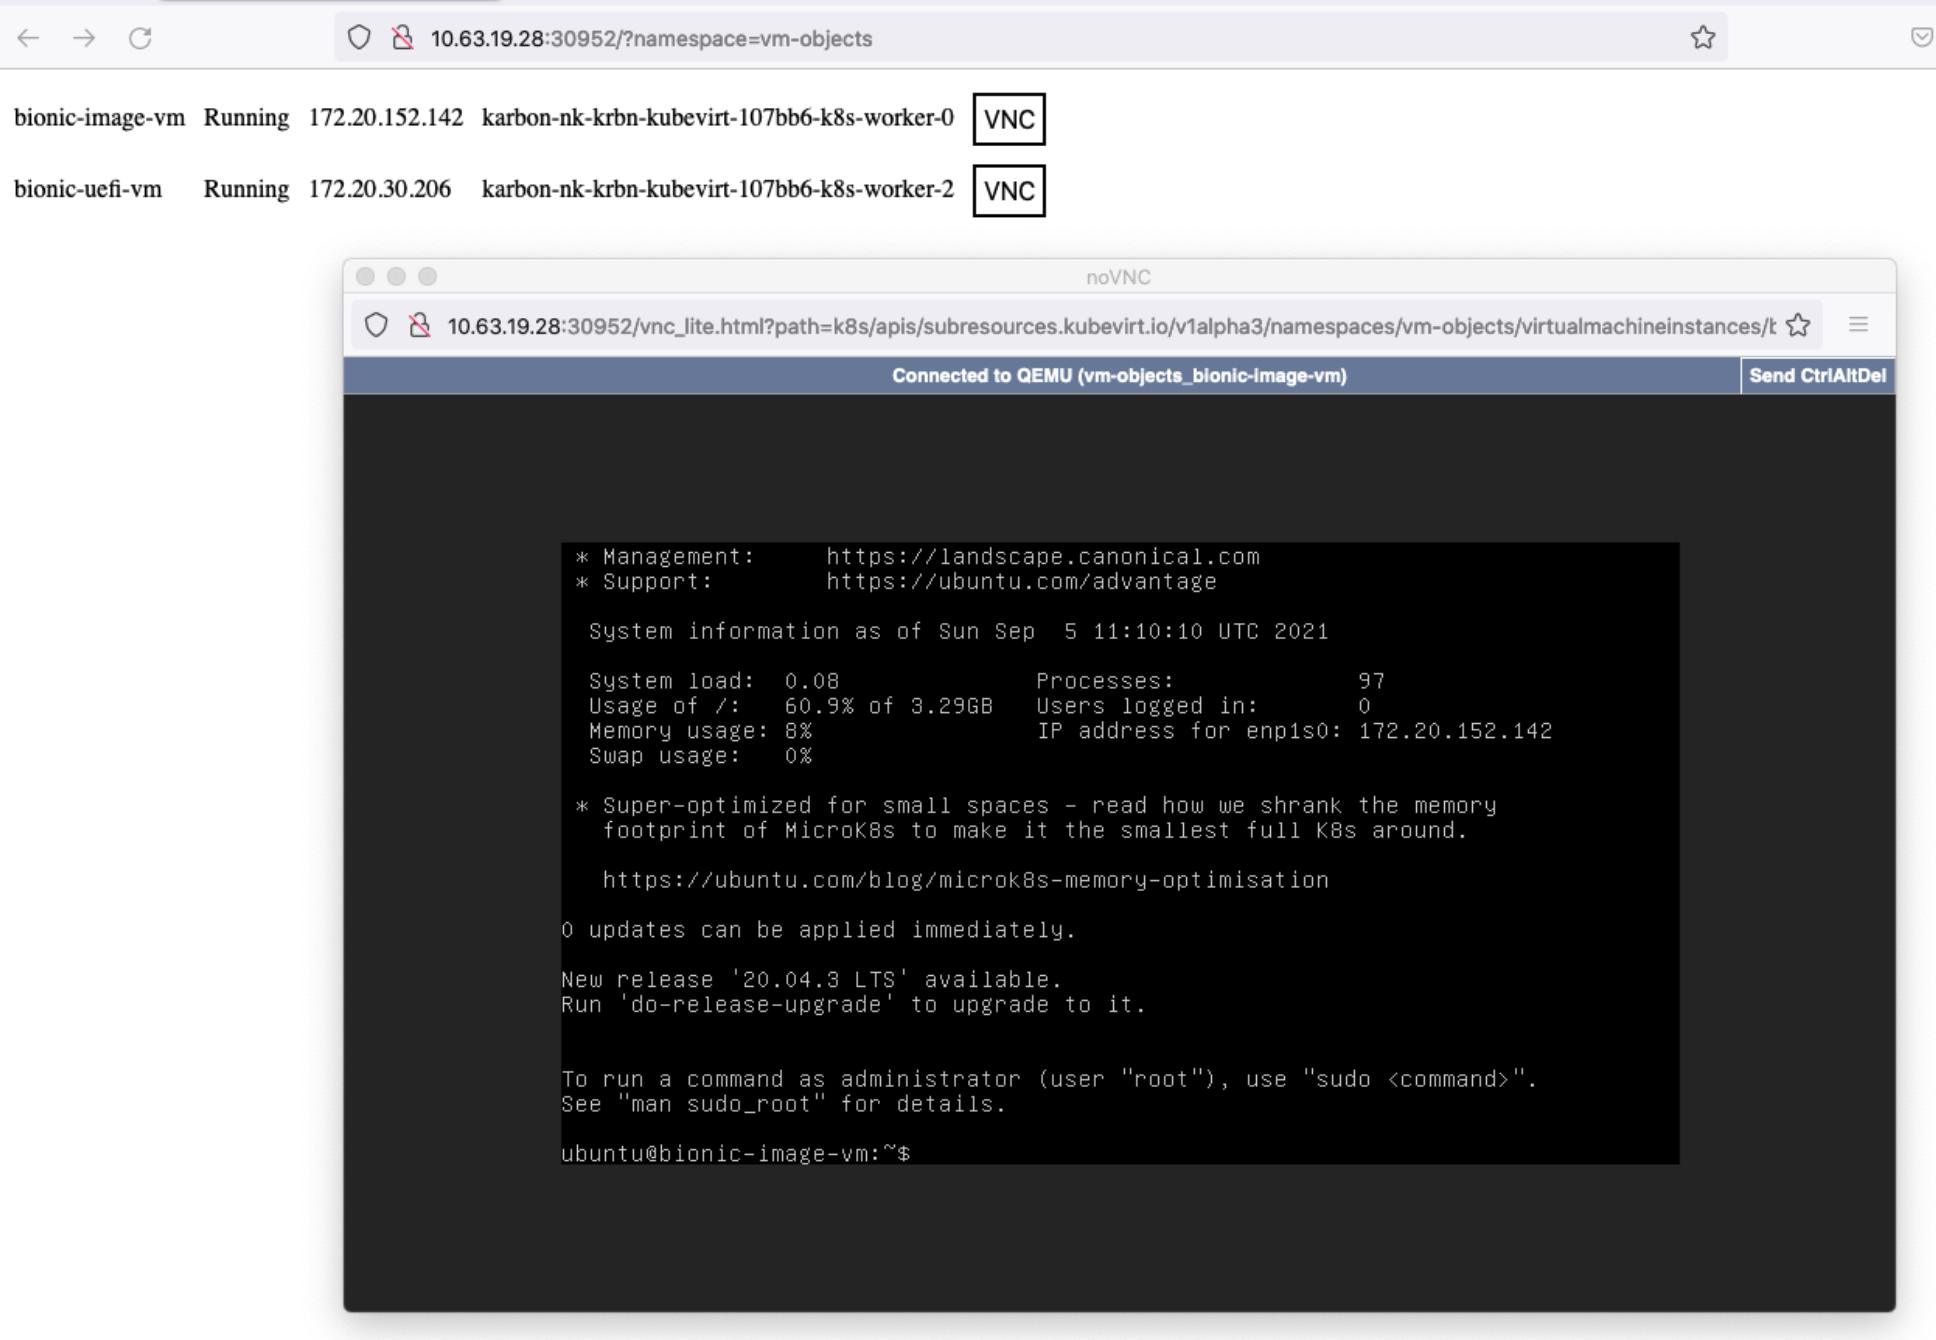
You could also access the VM’s from outside the cluster by creating a Service NodePort:
cat <<EOF > bionic-svc.yaml
apiVersion: v1
kind: Service
metadata:
  name: bionic-vm-ssh
  namespace: vm-objects
spec:
  ports:
  - name: bionic-vm-ssh
    nodePort: 30120
    protocol: TCP
    port: 22
    targetPort: 22
  selector:
    kubevirt.io/vm: bionic-image-vm
  type: NodePort
EOF
Connect to the VM using the NodePort created in the previous step.
The demo files created earlier inside the VM still exist in the filesystem. We can also verify networking by pinging outside the cluster to www.nutanix.com.
ssh [email protected] -p 30120

The authenticity of host '[10.63.19.28]:30120 ([10.63.19.28]:30120)' can't be established.
ECDSA key fingerprint is SHA256:p9cz7RBCymP8A5RS0Yq5xOS+zGUY9Qf3eOW9Yerzo3g.
Are you sure you want to continue connecting (yes/no/[fingerprint])? yes
Warning: Permanently added '[10.63.19.28]:30120' (ECDSA) to the list of known hosts.
[email protected]'s password:
Welcome to Ubuntu 18.04.5 LTS (GNU/Linux 4.15.0-154-generic x86_64)
.
.
.
ubuntu@bionic-image-vm:~$
ubuntu@bionic-image-vm:~$ ls -lh *
-rw-rw-r-- 1 ubuntu ubuntu 500M Sep  4 14:58 demofile.img

demo-dir:
total 301M
-rw-rw-r-- 1 ubuntu ubuntu 300M Sep  4 14:58 another-demofile.img
ubuntu@bionic-image-vm:~$


ubuntu@bionic-image-vm:~$ ifconfig
enp1s0: flags=4163<UP,BROADCAST,RUNNING,MULTICAST>  mtu 1440
        inet 172.20.152.142  netmask 255.255.255.255  broadcast 0.0.0.0
        inet6 fe80::bc63:cdff:fe42:81c3  prefixlen 64  scopeid 0x20<link>
        ether be:63:cd:42:81:c3  txqueuelen 1000  (Ethernet)
        RX packets 11139  bytes 22950392 (22.9 MB)
        RX errors 0  dropped 0  overruns 0  frame 0
        TX packets 1524  bytes 112378 (112.3 KB)
        TX errors 0  dropped 0 overruns 0  carrier 0  collisions 0

lo: flags=73<UP,LOOPBACK,RUNNING>  mtu 65536
        inet 127.0.0.1  netmask 255.0.0.0
        inet6 ::1  prefixlen 128  scopeid 0x10<host>
        loop  txqueuelen 1000  (Local Loopback)
        RX packets 202  bytes 15746 (15.7 KB)
        RX errors 0  dropped 0  overruns 0  frame 0
        TX packets 202  bytes 15746 (15.7 KB)
        TX errors 0  dropped 0 overruns 0  carrier 0  collisions 0


ubuntu@bionic-image-vm:~$ ping www.nutanix.com
PING e9966.g.akamaiedge.net (23.196.2.132) 56(84) bytes of data.
64 bytes from a23-196-2-132.deploy.static.akamaitechnologies.com (23.196.2.132): icmp_seq=1 ttl=57 time=60.2 ms
64 bytes from a23-196-2-132.deploy.static.akamaitechnologies.com (23.196.2.132): icmp_seq=2 ttl=57 time=58.1 ms
64 bytes from a23-196-2-132.deploy.static.akamaitechnologies.com (23.196.2.132): icmp_seq=3 ttl=57 time=58.2 ms
64 bytes from a23-196-2-132.deploy.static.akamaitechnologies.com (23.196.2.132): icmp_seq=4 ttl=57 time=58.2 ms

^C--- e9966.g.akamaiedge.net ping statistics ---
Further, we can also verify that the VM can be accessed from another Pod in the cluster:
kubectl get pods -o wide
NAME     READY   STATUS    RESTARTS   AGE   IP             NODE                                         NOMINATED NODE   READINESS GATES
centos   1/1     Running   0          125s   172.20.72.199   karbon-nk-krbn-kubevirt-107bb6-k8s-worker-1   <none>           <none>

kubectl exec -it centos -- /bin/ping 172.20.152.142
PING 172.20.152.142 (172.20.152.142) 56(84) bytes of data.
64 bytes from 172.20.152.142: icmp_seq=1 ttl=62 time=3.38 ms
64 bytes from 172.20.152.142: icmp_seq=2 ttl=62 time=1.11 ms
64 bytes from 172.20.152.142: icmp_seq=3 ttl=62 time=1.05 ms
If you would like to perform more advanced functions to interact with VMs, it is recommended to install the virtctl tool.
Conclusion
Moving towards containers and microservices architecture is inevitable. As hybrid and multi-cloud environments are more widely adopted , IT leaders have to ensure the resiliency, scalability and flexibility that modern applications demand. With KubeVirt, users have an immediate path toward app modernization. It provides the much-needed time organizations require to redesign existing applications into cloud native deployments. By leveraging Karbon for Kubernetes management, Nutanix users can start their journey confidently, with the advantage of having one less management tool to learn. As the interoperability of Red Hat OpenShift and Nutanix AHV evolves, we will likely see more advances in this area.
For enquiries, product placements, sponsorships, and collaborations, connect with us at [email protected]. We'd love to hear from you!
Our humans need coffee too! Your support is highly appreciated, thank you!