
Cloud SQL is Google Cloud’s fully managed relational database service for MySQL, PostgreSQL and SQL Server workloads. Cloud SQL enables customers to implement horizontal scaling of read-only workloads using read replicas. In this blog post, we will demonstrate a single-endpoint read scaling and load balancing solution using Cloud SQL for PostgreSQL and HAProxy, with automatic replica detection.
Key building blocks:
From our partners:
- Cloud SQL for PostgreSQL database with one or more read replicas.
- Google Compute Engine (GCE) instance running HAProxy and client programs.
- Shell scripts to facilitate automatic HAProxy configuration updates when read replicas are added or removed from the Cloud SQL instance.
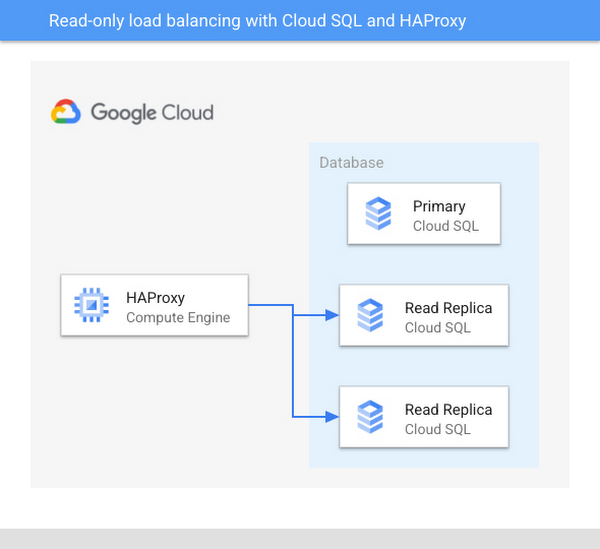
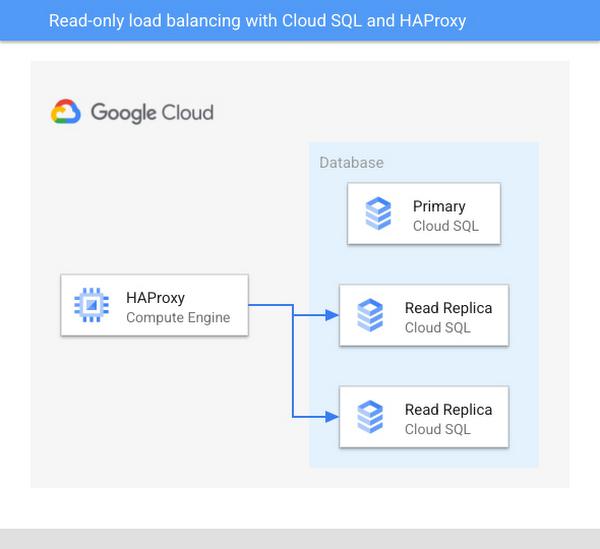
Architecture diagram of the test setup:
Key characteristics
This section discusses the key characteristics of the solution.
Load balancer mode of operation
We will configure the HAProxy load balancer to operate in TCP mode. It can be thought of as a “pass through” mode from a database connection perspective. The load balancer doesn’t store database credentials (except for the health check user), and it doesn’t pool or decrypt/re-encrypt database connections. A single client connection in HAProxy translates to a single client connection in Postgres.
This approach is suitable when the workload is constrained by the database’s processing capacity, and not by the number of client connections. You may require an additional connection pooling component (e.g. PgBouncer) if the number of clients becomes an issue, for example, when the database instances exhibit performance or stability issues due to the sheer number of simultaneous database connections.
Query vs. connection load balancing
Our HAProxy setup will use connection-level load balancing, that is:
- All queries executed through a particular database connection will reach the same read replica.
- A client must disconnect and reconnect in order to potentially reach a different replica.
HAProxy will be configured to use the “leastconn” connection routing algorithm instead of the default “roundrobin” algorithm. The default “roundrobin” algorithm allocates new connections quasi-randomly and without considering the number of existing connections on each replica. This can lead to workload imbalance due to some replicas receiving more connections than others. By contrast, the “leastconn” algorithm works by routing each new connection to the replica with the least number of existing connections, effectively trying to keep the number of connections equal on all replicas. This approach helps spread the query load more evenly among the replicas.
Note that in this context, “existing connections” are the client sessions handled by the load balancer itself. HAProxy has no knowledge of other connections that may have been opened directly against the replicas (bypassing the load balancer).
Read/write splitting
The solution provides load balancing for read-only connections, but not read/write connections. The read/write traffic separation must be handled by the application at a connection level. Read-only connections can connect to the HAProxy load balancer instance, whereas the connections that intend to execute read/write queries should connect directly to the Cloud SQL primary instance.
High availability
PostgreSQL layer
HAProxy will execute SQL-level health checks against each read replica in the Cloud SQL instance, and new client connections will be distributed among the healthy replicas. When a replica becomes unhealthy/unresponsive, connections that exist on that replica will not be automatically migrated or re-balanced onto the remaining replicas. Upon detecting a connection failure, the client should be able to reach one of the remaining healthy replicas simply by reconnecting to HAProxy.
Clients executing write queries should connect directly to the Cloud SQL primary instance. If those clients require high availability, using the Cloud SQL high availability (HA) configuration as described in Cloud SQL documentation.
HAProxy layer
In this demonstration, the HAProxy instance itself is not configured for high availability. Production applications should consider deploying the load balancer instances in a highly available configuration such as an instance group behind a Google Cloud load balancer. See Google Compute Engine documentation for details.
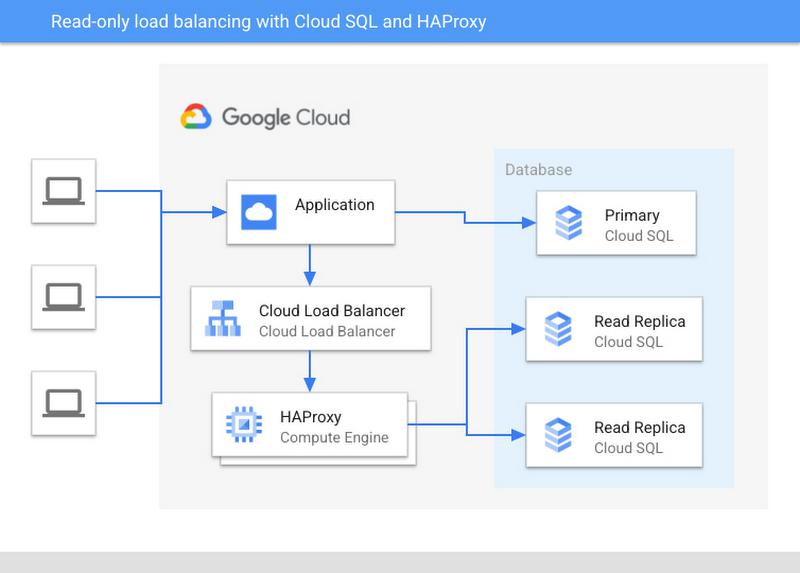
Example architecture diagram of a real-world deployment:

Instance topology changes
Cloud SQL allows customers to add and remove read replicas quickly and easily. Correspondingly, this demonstration assumes that the load balancer configuration should not require manual intervention when replicas are added or removed. We will use a custom configuration script to describe instance topology, enumerate the available replicas, and reload HAProxy configuration automatically.
Initial setup
Notes and prerequisites
- Instructions involving compute instances were tested on Google Compute Engine using Debian GNU/Linux 10 buster operating system image. Software installation steps and config/log file locations may vary on different systems.
- Instructions involving Cloud SQL instances were tested using PostgreSQL 13, but should work with any modern PostgreSQL release.
We recommend that you launch GCE and Cloud SQL instances in the same region, VPC, and network to simplify the setup, and to allow instances to communicate with each other using private IP addresses. If you choose to use a more complex network layout (e.g. using multiple VPCs), make sure that the network and firewall configuration allows connections from the HAProxy instance to the Cloud SQL replicas using private IPs.
Setting up the Cloud SQL database
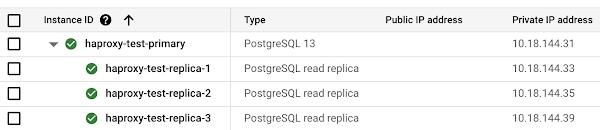
Launch a Cloud SQL for PostgreSQL instance with two read replicas. A single-zone setup with 1 vCPU, 3.75GB of memory, and 100GB of SSD storage will be sufficient for this demonstration. Make sure that the “Private IP” feature is enabled for all instances. You can disable the “Public IP” feature, we will not use it here.
Once launched, your initial setup will look similar to this:


Use any of the supported methods to create Cloud SQL database users:
haproxy_healthcheckuser to handle the health check queries from HAProxy.test_clientuser for client connections passing through HAProxy.
Make note of the user passwords, they will be required later.
You can confirm the successful creation of user accounts in the Google Cloud Console, under the “Users” section for the Cloud SQL primary instance. It should look like this:
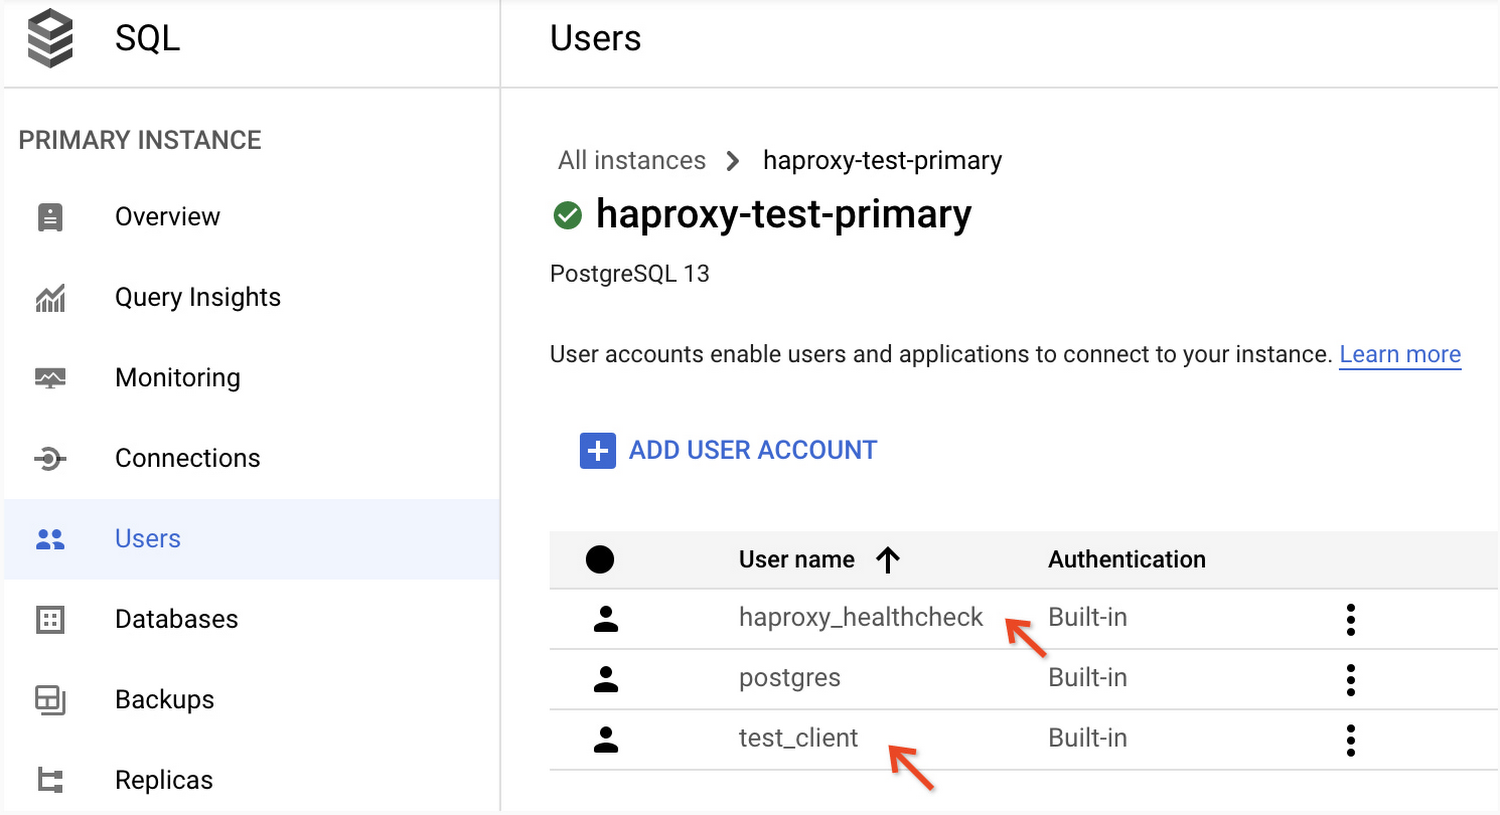

Note: The Cloud SQL database comes with a default user named postgres. This is a privileged account with sufficient permissions to handle both the health checks and the client connections. You may use that account to simplify the setup. Production deployments should follow the least privilege rule and use a separate unprivileged user account for health checks.
Setting up the HAProxy instance
Launch a GCE instance using Debian GNU/Linux 10 operating system image. An e2-medium machine type (2 vCPUs, 4GB of memory) will be sufficient for this demonstration. Connect to the instance via SSH to install the required software and verify basic database connectivity as described below.
Install the Postgres client/server programs and other required utilities:
apt-get install lsof jq socat wget gnupg2wget --quiet -O - https://www.postgresql.org/media/keys/ACCC4CF8.asc | sudo apt-key add -echo "deb http://apt.postgresql.org/pub/repos/apt/ `lsb_release -cs`-pgdg main" |sudo tee /etc/apt/sources.list.d/pgdg.listapt-get updateapt-get install postgresql-13 postgresql-client-13
Don’t worry about the installation of the PostgreSQL server package on the load balancer instance. We only need the pgbench tool included in the package, and we won’t use the server itself. The server might start automatically during installation, but you can safely stop it afterwards:
pg_ctlcluster 13 main stop
Install HAProxy:
apt-get install haproxy
Note: This example uses HAProxy version 1.8, which is the default version provided by the OS package manager. This simplifies setup and is sufficient to demonstrate the solution. Production deployments should consider using the latest stable HAProxy version instead. If using Debian, the haproxy.debian.net website provides instructions for installing the desired HAProxy version.
Choose one of the Cloud SQL read replicas created earlier, and use the psql tool to confirm that you can connect to the replica and run a SELECT 1 query as the health check user:
$ psql -d postgres -U haproxy_healthcheck -h REPLICA_PRIVATE_IP -c 'SELECT 1'Password for user haproxy_healthcheck: enter password?column?----------1(1 row)
The Google Cloud SDK comes pre-installed with the GCE’s default Debian OS image. You confirm that by running the gcloud command:
gcloud --version
The command should return a few lines describing the installed software versions. An error message such as gcloud: command not found indicates that the SDK is not installed. Follow the documentation to install it: Installing Cloud SDK.
Ensure that the SDK is initialized and authorized to call the gcloud sql instances describe API against the Cloud SQL instance created earlier. Consult the Cloud SDK documentation if needed: Initializing Cloud SDK.
With the SDK installed and authorized, you should be able to describe your Cloud SQL instance like so:
gcloud sql instances describeINSTANCE_NAME
For example, this command describes the primary Cloud SQL instance created earlier, and uses the jq JSON parsing tool to extract the list of read replicas from the replicaNames field:
$ gcloud sql instances describe haproxy-test-primary --format json |jq '.replicaNames'["haproxy-test-replica-1","haproxy-test-replica-2"]
Configuring HAProxy
Introduction
Our HAProxy configuration will consist of two components:
- Static settings, which are HAProxy configuration directives as well as frontend/backend directives that are not subject to frequent changes.
- Dynamic settings, which are the backend configuration directives that must be updated whenever there’s a change in read replica topology e.g. when replicas are added or removed from the Cloud SQL instance.
For example, the snippet below contains both static and dynamic settings. The directives highlighted in green are set by hand and we don’t expect to modify them often, if ever. Directives highlighted in blue require modification each time a read replica is added, removed, or modified in a way that changes the replica’s private IP address. Those settings are considered dynamic, and we don’t want to change them manually.
listen pg-read-onlybind *:5432option external-checkexternal-check command /var/lib/haproxy/haproxy_pgcheck.shbalance leastconnserver replica1 10.18.144.19:5432 checkserver replica2 10.18.144.21:5432 check
The HAProxy configuration will be managed as follows:
- Static settings will be stored in regular text files.
- Dynamic settings will be generated by a script, using replica information obtained via the
gcloud sql instances describeAPI. - Static and dynamic settings will be merged to produce a final configuration file. The HAProxy configuration will be reloaded in-place, without the need for a full shutdown and restart of the load balancer.
We will implement steps 2 and 3 through a shell script executed on a schedule using the cron system tool.
Configuration
Create the following files in HAProxy’s main directory (in our case, /var/lib/haproxy):
- pgcheck.sh: shell script used by HAProxy to run a health check query against read replicas.
- cfgupdate.sh: shell script responsible for describing instance topology, generating HAProxy backend settings, and reloading HAProxy with those settings.
- config_global.cfg, config_backend.cfg: files containing static HAProxy configuration.
The initial contents for each file are included below.
config_backend.cfg
listen pg-read-onlybind *:5432option external-checkexternal-check command /var/lib/haproxy/pgcheck.shbalance leastconn
config_global.cfg
globallog /dev/log local0 alertlog /dev/log local1 notice alertstats socket /run/haproxy/admin.sock mode 660 level admin expose-fd listenersstats timeout 30suser haproxygroup haproxydaemonexternal-checkdefaultslog globalmode tcpretries 2timeout client 5mtimeout server 5mtimeout connect 5stimeout check 5s
pgcheck.sh
#!/bin/bash## Begin configuration blockPG_PSQL_CMD="/usr/bin/psql"# Provide the username, database, and password for the health check userPG_CONN_USER="enter health check username here"PG_CONN_DB="postgres"PG_CONN_PASSWORD="enter health check user password here"## End configuration blockPG_CONN_HOST=$3PG_CONN_PORT=$4export PGPASSWORD=$PG_CONN_PASSWORDPG_NODE_RESPONSE="$($PG_PSQL_CMD -t -A -d $PG_CONN_DB -U $PG_CONN_USER -h $PG_CONN_HOST -p $PG_CONN_PORT -c 'select 1')"if [ "$PG_NODE_RESPONSE" == "1" ]; thenecho 'Health check succeeded'exit 0elseecho 'Health check failed'exit 1fi
cfgupdate.sh
#!/bin/bash## Begin configuration block# Editable configuration, use your own primary instance name herePG_PRIMARY_INSTANCE="Enter primary instance name here"# Optional configuration. Provide HAProxy config file location (if different)CFG_HAPROXY="/etc/haproxy/haproxy.cfg"# Non-editable configurationPG_REPLICAS_TMP_FILE="replicas.tmp"LOG_FILE="cfgupdate.lastlog"CFG_FILE_GLOBAL="config_global.cfg"CFG_FILE_BACKEND="config_backend.cfg"CFG_FILE_SERVERS="config_servers.cfg"CFG_FILE_MERGED="config_merged.cfg"## End configuration block## Begin logic blockecho "NOTICE: HAProxy configuration update at" `date` > $LOG_FILE# Describe the configured primary instance# Read the list of replica names into a file, put the replica count in a variablePG_REPLICA_COUNT=`gcloud sql instances describe $PG_PRIMARY_INSTANCE --format json 2>>$LOG_FILE |jq -r '.replicaNames | .[]' 2>>$LOG_FILE |tee $PG_REPLICAS_TMP_FILE |wc -l`# Exit if the replica count is zero# This is basic safety measure against e.g. transient API issuesif [ "$PG_REPLICA_COUNT" -eq "0" ]; thenecho "ERROR: Replica count was found to be zero" |tee -a $LOG_FILEecho "ERROR: Make sure that $0 is configured with a correct primary instance name, and there is at least one replica" |tee -a $LOG_FILEexit 1fi# Iterate over replica names and obtain private IP for each one# Write configuration into a temporary config file# Empty the temporary config file containg replica IPsecho -n "" > $CFG_FILE_SERVERSwhile read -r REPLICA_NAME; doREPLICA_IP=`gcloud sql instances describe $REPLICA_NAME --format json | jq -r '.ipAddresses[] |select(.type=="PRIVATE") | .ipAddress'`# Exit if private IP not foundif [ -z "$REPLICA_IP" ]; thenecho "ERROR: Private IP not found for $REPLICA_NAME" |tee -a $LOG_FILEecho "ERROR: Make sure that Private IPs are configured for all read replicas" |tee -a $LOG_FILEcontinuefiecho "NOTICE: Detected replica $REPLICA_NAME at $REPLICA_IP" |tee -a $LOG_FILEecho -e "\tserver $REPLICA_NAME $REPLICA_IP:5432 check" >> $CFG_FILE_SERVERSdone < $PG_REPLICAS_TMP_FILE# Merge the config files togethercat $CFG_FILE_GLOBAL $CFG_FILE_BACKEND $CFG_FILE_SERVERS > $CFG_FILE_MERGED# Replace the HAProxy config file with the newly generated configurationcp $CFG_FILE_MERGED $CFG_HAPROXY# Reload HAProxy or start if not already running# If the 1st script parameter is "dryrun", do nothingif [ "$1" == "dryrun" ]; thenecho "Dry run requested. Configuration file created in $CFG_FILE_MERGED but HAProxy config not updated."elseif [ `pidof haproxy |wc -l` -eq 0 ]; thenecho "Starting HAProxy"systemctl start haproxyelseecho "Reloading HAPRoxy"systemctl reload haproxyfifi## End logic block
After creating the files, make configuration adjustments:
- In pgcheck.sh: provide the connection configuration for the health check user i.e. username, database, and password.
- In cfgupdate.sh: provide the name of the primary Cloud SQL instance.
You shouldn’t need to modify static HAProxy settings to complete the demonstration, but production deployments may need to adjust health check timeout and retry settings to achieve the desired sensitivity. You can modify static settings in config_global.cfg and config_backend.cfg.
After providing the required configuration values in pgcheck.sh and cfgupdate.sh, execute the cfgupdate.sh script manually with a dryrun argument. In a dry run mode, the script will attempt to generate HAProxy configuration into a temporary file, but it will not restart/reload HAProxy or replace the main HAProxy configuration file. This lets you test the script and review the configuration before it’s actually applied:
./cfgupdate.sh dryrun
Any errors will be either printed out or written into the log file. For example, the error below indicates that the configured Cloud SQL instance name is incorrect e.g. it’s a replica instead of a primary, or a primary without replicas:
# ./cfgupdate.sh dryrunERROR: Replica count was found to be zeroERROR: Make sure that ./cfgupdate.sh is configured with a correct primary instance name, and there is at least one replica
A successful script execution will look similar to this, with a few notices but no errors in the output or the log file:
# ./cfgupdate.sh dryrunNOTICE: Detected replica haproxy-test-replica-1 at 10.18.144.33NOTICE: Detected replica haproxy-test-replica-2 at 10.18.144.35Dry run requested. Configuration file created in config_merged.cfg but HAProxy config not updated.# cat cfgupdate.lastlogNOTICE: HAProxy configuration update at ...NOTICE: Detected replica haproxy-test-replica-1 at 10.18.144.33NOTICE: Detected replica haproxy-test-replica-2 at 10.18.144.35
You can now find the auto-generated server directives at the bottom of the configuration file:
# cat config_merged.cfg...listen pg-read-onlybind *:5432option external-checkexternal-check command /var/lib/haproxy/pgcheck.shbalance leastconnserver haproxy-test-replica-1 10.18.144.33:5432 checkserver haproxy-test-replica-2 10.18.144.35:5432 check
Finally, we’re ready to run the script in regular mode to replace and reload HAProxy configuration. Depending on whether HAProxy is already running, the output will state “Starting HAProxy” or “Reloading HAProxy”:
# ./cfgupdate.shNOTICE: Detected replica haproxy-test-replica-1 at 10.18.144.33NOTICE: Detected replica haproxy-test-replica-2 at 10.18.144.35Starting HAProxy
HAProxy should now be running and listening on the Postgres port (5432). HAProxy stats should also show a backend with replicas marked “UP”, indicating a successful SQL health check:
# lsof -i -n |grep haproxyhaproxy 24093 haproxy 5u IPv4 153313 0t0 TCP *:postgresql (LISTEN)# echo "show stat" | socat - /run/haproxy/admin.sock | cut -d ',' -f 1,2,5,6,18| column -s, -t# pxname svname scur smax statuspg-read-only FRONTEND 0 0 OPENpg-read-only haproxy-test-replica-1 0 0 UPpg-read-only haproxy-test-replica-2 0 0 UPpg-read-only BACKEND 0 0 UP
If HAProxy is not running or not listing any servers with status “UP”, review the log file (typically /var/log/haproxy.log) for error messages and troubleshooting information.
With HAProxy running and replicas up, proceed to the next section.
Demonstration
Verifying basic connectivity
Connect to the HAProxy instance via SSH.
Use the psql tool to connect to the private IP of the load balancer instance. You can connect as the test_client user created earlier. A successful connection will greet you with a Postgres command line prompt:
$ psql -h HAPROXY_INSTANCE_PRIVATE_IP -U test_client -d postgresPassword for user test_client:psql (13.5 (Debian 13.5-1.pgdg100+1), server 13.4)SSL connection (protocol: TLSv1.3, cipher: TLS_AES_256_GCM_SHA384, bits: 256, compression: off)Type "help" for help.postgres=>
Now obtain HAProxy statistics. Notice how the scur field (current sessions) now reports a value of “1” for one of the replicas. This is the replica your psql client program is connected to via HAProxy:
# echo "show stat" | socat - /run/haproxy/admin.sock | cut -d ',' -f 1,2,5,6,18| column -s, -t# pxname svname scur smax statuspg-read-only FRONTEND 1 1 OPENpg-read-only haproxy-test-replica-1 0 1 UPpg-read-only haproxy-test-replica-2 1 1 UPpg-read-only BACKEND 1 1 UP
Opening one connection is not particularly exciting, so let’s try a slightly different approach by opening 20 simultaneous connections in the background. Each connection executes a pg_sleep function to keep the session active for 30 seconds:
$ export PGPASSWORD='client123'$ for i in `seq 1 20`; do \> psql -h HAPROXY_INSTANCE_PRIVATE_IP -U test_client -d postgres -c 'select pg_sleep(30)' & \> done;
Within 30 seconds of running the command, check HAProxy statistics again. This time, the session counters should show a total of 20 connections distributed between the two replicas:
# echo "show stat" | socat - /run/haproxy/admin.sock | cut -d ',' -f 1,2,5,6,18| column -s, -t# pxname svname scur smax statuspg-read-only FRONTEND 20 20 OPENpg-read-only haproxy-test-replica-1 10 10 UPpg-read-only haproxy-test-replica-2 10 10 UPpg-read-only BACKEND 20 20 UP
The current sessions counter (scur) should drop back to zero after the sleep functions expire and the client sessions are closed.
Testing load balancing with pgbench
Connect to the HAProxy instance via SSH.
Connect to the Cloud SQL primary instance and create the database objects needed for testing:
$ psql -h PRIMARY_PRIVATE_IP -U test_client -d postgrespostgres=> CREATE DATABASE test_database;CREATE DATABASEpostgres=> \c test_databaseYou are now connected to database "test_database" as user "test_client".test_database=> CREATE TABLE test_table (id INT, col1 VARCHAR(32));CREATE TABLE
Populate the test table with a random data sample:
test_database=> INSERT INTO test_table SELECT generate_series(1, 100000), md5(random()::text);INSERT 0 5000000test_database=> SELECT * FROM test_table LIMIT 1;id | col1----+----------------------------------1 | daa8c3afc8857cb04d8233bb191ec983(1 row)
We can now use a query such as this to simulate read-only workload. The query is relatively CPU-intensive, which helps demonstrate the effectiveness of read scaling through HAProxy:
test_database=> \timing onTiming is on.test_database=> SELECT col1 FROM test_table ORDER BY random() LIMIT 1;col1----------------------------------996ca87fef81361dd2d173da42b5b467(1 row)Time: 25.298 ms
Put the test query in a SQL script that pgbench will use:
$ echo 'SELECT col1 FROM test_table ORDER BY random() LIMIT 1;' > pgbench.sql
Run pgbench for 5 minutes (300 seconds) using 100 concurrent sessions. Each session will perform three steps in a loop: connect to the database via HAProxy, execute the query, disconnect,
$ pgbench -h HAPROXY_INSTANCE_PRIVATE_IP -U test_client -d test_database -f pgbench.sql -n -C --client 100 --jobs 4 --time 300
If you wish to run the benchmark with different settings, the pgbench documentation contains detailed descriptions of the available parameters.
While the test is running, you can observe HAProxy statistics as described in previous sections. The number of current HAProxy sessions will fluctuate as the clients connect and disconnect, but the traffic should be divided more or less equally between the two replicas:
# echo "show stat" | socat - /run/haproxy/admin.sock | cut -d ',' -f 1,2,5,6,18| column -s, -t# pxname svname scur smax statuspg-read-only FRONTEND 67 98 OPENpg-read-only haproxy-test-replica-1 33 49 UPpg-read-only haproxy-test-replica-2 34 49 UPpg-read-only BACKEND 67 98 UP
At the end of the run, pgbench will produce a summary similar to the one below. In this example, we’ve achieved ~52 transactions (queries) per second using the two replicas:
transaction type: pgbench.sqlscaling factor: 1query mode: simplenumber of clients: 100number of threads: 4duration: 300 snumber of transactions actually processed: 15052latency average = 1996.778 mstps = 50.080672 (including connections establishing)tps = 52.153714 (excluding connections establishing)
To confirm that both replicas were utilized, open the Google Cloud Console and select the replicas:
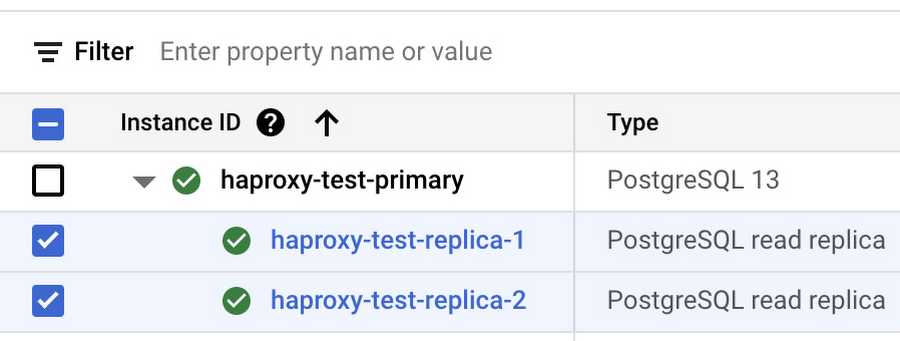

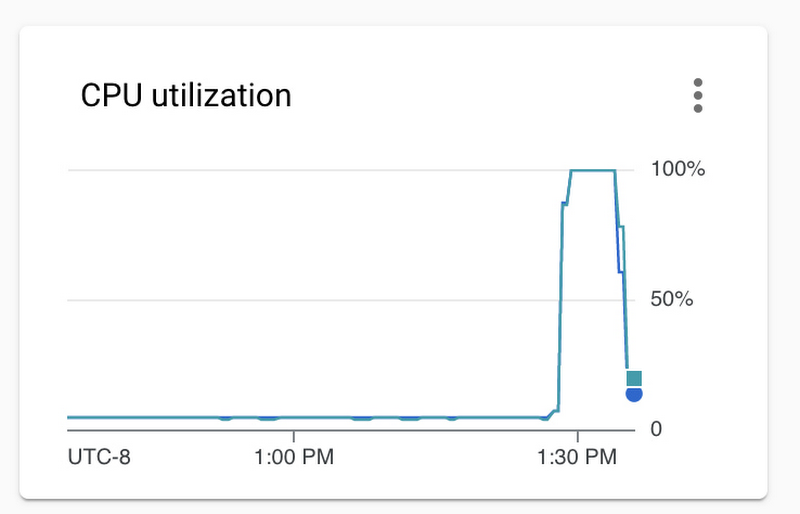
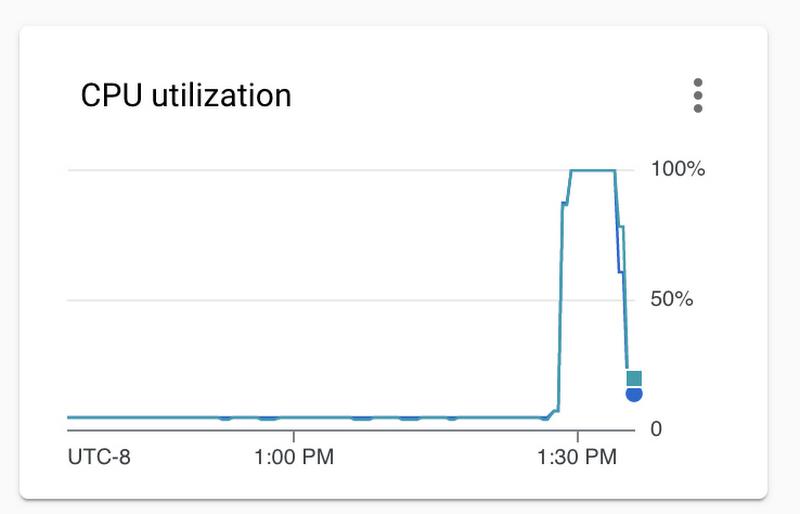
Once you select the replicas, several monitoring charts will appear in the information panel on the right hand side. Consult the “CPU utilization” and “Active connections” charts to confirm that both replicas were equally utilized during the test. Example:
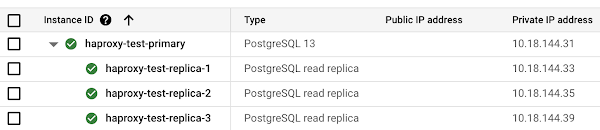
Now let’s spin up a third replica and wait for it to become available:
Use the cfgupdate.sh script to update HAProxy configuration:
root@haproxy-test:/var/lib/haproxy# ./cfgupdate.shNOTICE: Detected replica haproxy-test-replica-1 at 10.18.144.33NOTICE: Detected replica haproxy-test-replica-2 at 10.18.144.35NOTICE: Detected replica haproxy-test-replica-3 at 10.18.144.39Reloading HAPRoxy# echo "show stat" | socat - /run/haproxy/admin.sock | cut -d ',' -f 1,2,5,6,18| column -s, -t# pxname svname scur smax statuspg-read-only FRONTEND 0 0 OPENpg-read-only haproxy-test-replica-1 0 0 UPpg-read-only haproxy-test-replica-2 0 0 UPpg-read-only haproxy-test-replica-3 0 0 UPpg-read-only BACKEND 0 0 UP
Finally, run pgbench again and review the output. In this example, we’ve managed to reach ~74 queries per second with three replicas, compared to the earlier result of ~52 queries per second with two replicas:
transaction type: pgbench.sqlscaling factor: 1query mode: simplenumber of clients: 100number of threads: 4duration: 300 snumber of transactions actually processed: 21352latency average = 816.588 mslatency stddev = 523.839 mstps = 71.052713 (including connections establishing)tps = 73.987289 (excluding connections establishing)
The load distribution can be confirmed using Cloud SQL metrics and HAProxy statistics as described previously.
Enabling dynamic scaling with automatic HAProxy configuration updates
At this point, we have all the building blocks necessary to enable dynamic workload scaling using the HAProxy configuration script. We’ve already demonstrated that the script itself is capable of detecting changes in replica topology and reloading HAProxy configuration accordingly. All that’s left is to execute the script automatically on a schedule, so that replica changes are reflected in HAProxy configuration without having to run the script manually.
To begin, insert the following line into the HAProxy instance’s crontab (/etc/crontab) to run the script automatically every minute:
* * * * * root cd /var/lib/haproxy && ./cfgupdate.sh
You can check the timestamp in the script’s log file to confirm that the code is being executed at the top of each minute:
root@haproxy-test:/var/lib/haproxy# cat cfgupdate.lastlogNOTICE: HAProxy configuration update at Wed Dec 1 22:16:01 UTC 2021NOTICE: Detected replica haproxy-test-replica-1 at 10.18.144.33NOTICE: Detected replica haproxy-test-replica-2 at 10.18.144.35NOTICE: Detected replica haproxy-test-replica-3 at 10.18.144.39
With the script running on schedule, you can continue to run tests using pgbench. During your tests, remove one of the replicas e.g. haproxy-test-replica-3. As the replica is shut down, the HAProxy health check will start failing almost immediately, and the replica will be marked as “down”:
# echo "show stat" | socat - /run/haproxy/admin.sock | cut -d ',' -f 1,2,5,6,18| column -s, -t# pxname svname scur smax statuspg-read-only FRONTEND 68 100 OPENpg-read-only haproxy-test-replica-1 34 50 UPpg-read-only haproxy-test-replica-2 34 50 UPpg-read-only haproxy-test-replica-3 0 33 DOWNpg-read-only BACKEND 68 100 UP
The replica will eventually disappear from the configuration script log as well:
# cat cfgupdate.lastlogNOTICE: HAProxy configuration update at Wed Dec 1 22:51:01 UTC 2021NOTICE: Detected replica haproxy-test-replica-1 at 10.18.144.33NOTICE: Detected replica haproxy-test-replica-2 at 10.18.144.35
You can add the third replica back to the setup, and HAProxy will pick it up automatically within a few minutes:
root@haproxy-test:/var/lib/haproxy# cat cfgupdate.lastlogNOTICE: HAProxy configuration update at Wed Dec 1 23:00:01 UTC 2021NOTICE: Detected replica haproxy-test-replica-1 at 10.18.144.33NOTICE: Detected replica haproxy-test-replica-2 at 10.18.144.35NOTICE: Detected replica haproxy-test-replica-3-new at 10.18.144.41
You can continue the experiment and run additional tests while adding and removing replicas. You should be able to confirm that the changes are reflected in HAProxy configuration within a few minutes.
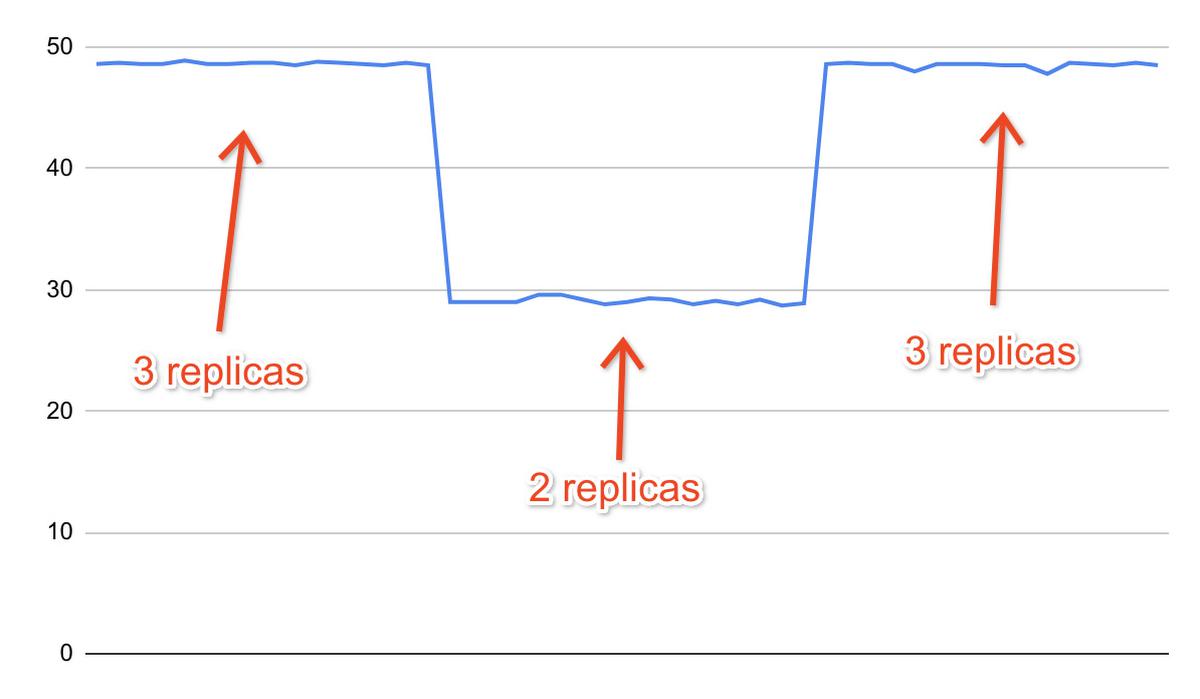
As an example, this is a record of the TPS (transactions per second) metric reported by pgbench during another test. The test was run with three replicas, then two replicas, then three replicas again. Workload scaling happened automatically thanks to the configuration script.

Advanced topics
Production deployments may consider implementing the following advanced features:
- Template-based deployment of load balancer instances. When managing a larger fleet of load balancers, you can create a common machine image used to provision HAProxy instances instead of configuring each instance manually. Instance-specific settings (e.g. the name of the primary instance to use in HAProxy configuration script) can be provided using Google Compute Engine features such as startup scripts and custom VM metadata.
- Advanced credential storage. The credentials of the health check user must be available on each HAProxy instance. You can use services such as the Secret Manager or Cloud SQL features such as IAM database authentication to avoid hard-coding user credentials inside the health check file.
- Advanced replica detection logic. The configuration script provided with this demonstration covers basic detection of read replicas under a single Cloud SQL primary instance. You can introduce advanced detection features based on replica characteristics such as instance names or labels. For example, you can modify the script to use instance labels to include or exclude certain replicas from HAProxy configuration.
- Support for multiple replica pools. The configuration script provided with this demonstration generates settings for a single HAProxy backend. You can extend the script to expose several HAProxy backends within a single HAProxy installation. By doing so, you can load balance traffic for multiple Cloud SQL databases with a single HAProxy instance.
- Connection pooling. The solution demonstrated here doesn’t provide connection pooling, and thus doesn’t reduce the total number of connections handled by read replica instances. This is acceptable when the workload is constrained by the database’s processing capacity, and not by the number of client connections. If the number of clients becomes so large that the replicas begin experiencing issues due to process contention, you might require an additional connection pooling component (such as PgBouncer) working in concert with HAProxy. Connection pooling software and HAProxy can be run on the same instance for efficiency reasons.
- Alternative solutions. HAProxy (optionally with PgBouncer) is one of the easiest ways to implement PostgreSQL load balancing (and connection pooling), but it’s not the only way to do so. Here are some of the examples of alternative solutions to consider:
- Pgpool-II for both pooling and load balancing. Pgpool-II can be a bit more complex to set up and manage compared with HAProxy and PgBouncer, but it can be a powerful tool in the hands of an advanced user.
- Pgpool-II (for load balancing) with PgBouncer (for pooling).
- HAProxy (for load balancing) with connection pooling provided by client-side drivers.
By: Szymon Komendera (Staff Database Engineer, Cloud SQL)
Source: Google Cloud Blog
For enquiries, product placements, sponsorships, and collaborations, connect with us at [email protected]. We'd love to hear from you!
Our humans need coffee too! Your support is highly appreciated, thank you!