aster.cloud aster.cloud
  • /
  • Platforms
    • Public Cloud
    • On-Premise
    • Hybrid Cloud
    • Data
  • Architecture
    • Design
    • Solutions
    • Enterprise
  • Engineering
    • Automation
    • Software Engineering
    • Project Management
    • DevOps
  • Programming
    • Learning
  • Tools
  • About
  • /
  • Platforms
    • Public Cloud
    • On-Premise
    • Hybrid Cloud
    • Data
  • Architecture
    • Design
    • Solutions
    • Enterprise
  • Engineering
    • Automation
    • Software Engineering
    • Project Management
    • DevOps
  • Programming
    • Learning
  • Tools
  • About
aster.cloud aster.cloud
  • /
  • Platforms
    • Public Cloud
    • On-Premise
    • Hybrid Cloud
    • Data
  • Architecture
    • Design
    • Solutions
    • Enterprise
  • Engineering
    • Automation
    • Software Engineering
    • Project Management
    • DevOps
  • Programming
    • Learning
  • Tools
  • About
  • Engineering
  • Software Engineering

Build A Chat Server With Cloud Run

  • aster.cloud
  • December 22, 2022
  • 5 minute read
With Cloud Run — the fully-managed serverless container platform on Google Cloud — you can quickly and easily deploy applications using standard containers. In this article, we will explain how to build a chat server with Cloud Run using Python as the development language. We will build it with the FastAPI framework, based on this FastAPI sample source code.[Note that this article does not provide detailed descriptions of each service. Refer to other articles for details like Cloud Run settings and the cloudbuild.yaml file format.]

Chat server architecture
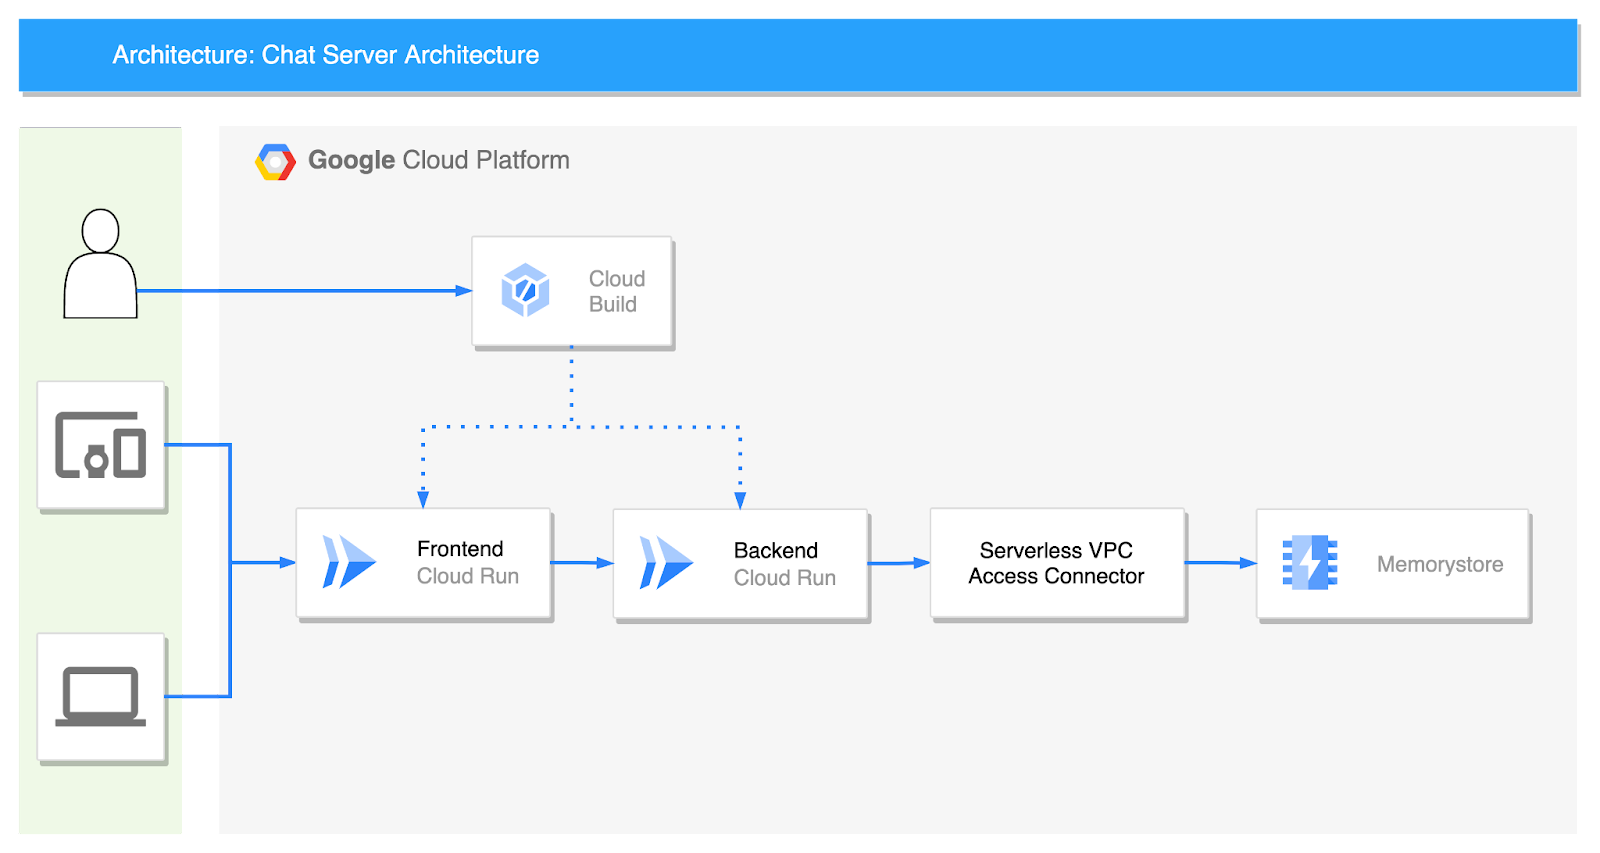
The chat server consists of two Cloud Run services: frontend and backend. Code management is done on GitHub. Cloud Build deploys the code, and chat messages are passed between users with Redis pub/sub and Memorystore.Set the “Authentication” option on the Cloud Run frontend service to “Allow all traffic” for frontend and backend. The two services communicate with a WebSocket, and backend and Memorystore can be connected using a serverless VPC access connector.Let’s take a look at each service one by one.

Frontend

index.html


Partner with aster.cloud
for your next big idea.
Let us know here.


From our partners:

CITI.IO :: Business. Institutions. Society. Global Political Economy.
CYBERPOGO.COM :: For the Arts, Sciences, and Technology.
DADAHACKS.COM :: Parenting For The Rest Of Us.
ZEDISTA.COM :: Entertainment. Sports. Culture. Escape.
TAKUMAKU.COM :: For The Hearth And Home.
ASTER.CLOUD :: From The Cloud And Beyond.
LIWAIWAI.COM :: Intelligence, Inside and Outside.
GLOBALCLOUDPLATFORMS.COM :: For The World's Computing Needs.
FIREGULAMAN.COM :: For The Fire In The Belly Of The Coder.
ASTERCASTER.COM :: Supra Astra. Beyond The Stars.
BARTDAY.COM :: Prosperity For Everyone.

The frontend service is written only in HTML. Only modify the WebSocket connection part with a URL of backend Cloud Run in the middle. This code is not perfect as it is just a sample to show the chat in action.

<!DOCTYPE html>
<html>
    <head>
        <title>Chat</title>
    </head>
    <body>
        <h1>Chat</h1>
        <h2>Room: <span id="room-id"></span><br> Your ID: <span id="client-id"></span></h2>
        <label>Room: <input type="text" id="channelId" autocomplete="off" value="foo"/></label>
        <button onclick="connect(event)">Connect</button>
        <hr>
        <form style="position: absolute; bottom:0" action="" onsubmit="sendMessage(event)">
            <input type="text" id="messageText" autocomplete="off"/>
            <button>Send</button>
        </form>
        <ul id='messages'>
        </ul>
        <script>
            var ws = null;
            function connect(event) {
                var client_id = Date.now()
                document.querySelector("#client-id").textContent = client_id;
                document.querySelector("#room-id").textContent = channelId.value;
                if (ws) ws.close()
                ws = new WebSocket(`wss://xxx-du.a.run.app/ws/${channelId.value}/${client_id}`);
                ws.onmessage = function(event) {
                    var messages = document.getElementById('messages')
                    var message = document.createElement('li')
                    var content = document.createTextNode(event.data)
                    message.appendChild(content)
                    messages.appendChild(message)
                };
                event.preventDefault()
            }
            function sendMessage(event) {
                var input = document.getElementById("messageText")
                ws.send(input.value)
                input.value = ''
                event.preventDefault()
                document.getElementById("messageText").focus()
            }
        </script>
    </body>
</html>

Read More  Jupiter Evolving: Reflecting On Google’s Data Center Network Transformation
Dockerfile
The Dockerfile is very simple. Because it is deployed as HTML, nginx:alpine is a good fit.
FROM nginx:alpine

COPY index.html /usr/share/nginx/html

cloudbuild.yaml
The last part of the frontend service is the cloudbuild.yaml file. You only need to edit the project_id and “frontend”.
steps:
 # Build the container image
 - name: 'gcr.io/cloud-builders/docker'
   args: ['build', '-t', 'gcr.io/project_id/frontend:$COMMIT_SHA', '.']
 # Push the container image to Container Registry
 - name: 'gcr.io/cloud-builders/docker'
   args: ['push', 'gcr.io/project_id/frontend:$COMMIT_SHA']
 # Deploy container image to Cloud Run
 - name: 'gcr.io/google.com/cloudsdktool/cloud-sdk'
   entrypoint: gcloud
   args:
   - 'run'
   - 'deploy'
   - 'frontend'
   - '--image'
   - 'gcr.io/project_id/frontend:$COMMIT_SHA'
   - '--region'
   - 'asia-northeast3'
   - '--port'
   - '80'
 images:
 - 'gcr.io/project_id/frontend:$COMMIT_SHA'

Backend Service

main.py

Let’s look at the server Python code first, starting with the core ChatServer class.

class RedisService:
    def __init__(self):
        self.redis_host = f"{os.environ.get('REDIS_HOST', 'redis://localhost')}"

    async def get_conn(self):
        return await aioredis.from_url(self.redis_host, encoding="utf-8", decode_responses=True)


class ChatServer(RedisService):
    def __init__(self, websocket, channel_id, client_id):
        super().__init__()
        self.ws: WebSocket = websocket
        self.channel_id = channel_id
        self.client_id = client_id
        self.redis = RedisService()

    async def publish_handler(self, conn: Redis):
        try:
            while True:
                message = await self.ws.receive_text()
                if message:
                    now = datetime.now()
                    date_time = now.strftime("%Y-%m-%d %H:%M:%S")
                    chat_message = ChatMessage(
                        channel_id=self.channel_id, client_id=self.client_id, time=date_time, message=message
                    )
                    await conn.publish(self.channel_id, json.dumps(asdict(chat_message)))
        except Exception as e:
            logger.error(e)

    async def subscribe_handler(self, pubsub: PubSub):
        await pubsub.subscribe(self.channel_id)
        try:
            while True:
                message = await pubsub.get_message(ignore_subscribe_messages=True)
                if message:
                    data = json.loads(message.get("data"))
                    chat_message = ChatMessage(**data)
                    await self.ws.send_text(f"[{chat_message.time}] {chat_message.message} ({chat_message.client_id})")
        except Exception as e:
            logger.error(e)

    async def run(self):
        conn: Redis = await self.redis.get_conn()
        pubsub: PubSub = conn.pubsub()

        tasks = [self.publish_handler(conn), self.subscribe_handler(pubsub)]
        results = await asyncio.gather(*tasks)

        logger.info(f"Done task: {results}")

This is a common chat server code. Inside the ChatServer class, there is a publish_handler method and a subscribe_handler method. publish_handler serves to publish a message to the chat room (Redis) when a message comes in through the WebSocket. subscribe_handler delivers a message from the chat room (redis) to the connected WebSocket. Both are coroutine methods. Connect redis in run method and run coroutine method.This brings us to the endpoint. When a request comes in, this code connects to the WebSocket and connects to the chat server. 
@app.websocket("/ws/{channel_id}/{client_id}")
async def websocket_endpoint(websocket: WebSocket, channel_id: str, client_id: int):
    await manager.connect(websocket)

    chat_server = ChatServer(websocket, channel_id, client_id)
    await chat_server.run()

Read More  Google Cloud Text-To-Speech API Now Supports Custom Voices
Here is the rest of the code. Combined, you get the whole code. 
import asyncio
import json
import logging
import os
from dataclasses import dataclass, asdict
from datetime import datetime
from typing import List

import aioredis
from aioredis.client import Redis, PubSub
from fastapi import FastAPI, WebSocket

logging.basicConfig(level=logging.INFO)
logger = logging.getLogger(__name__)

app = FastAPI()


class ConnectionManager:
    def __init__(self):
        self.active_connections: List[WebSocket] = []

    async def connect(self, websocket: WebSocket):
        await websocket.accept()
        self.active_connections.append(websocket)

    def disconnect(self, websocket: WebSocket):
        self.active_connections.remove(websocket)

    async def send_personal_message(self, message: str, websocket: WebSocket):
        await websocket.send_text(message)

    async def broadcast(self, message: dict):
        for connection in self.active_connections:
            await connection.send_json(message, mode="text")


manager = ConnectionManager()


@dataclass
class ChatMessage:
    channel_id: str
    client_id: int
    time: str
    message: str

Dockerfile
The following is the Dockerfile for the backend service. Run this application with Uvicorn.
FROM python:3.8-slim
WORKDIR /usr/src/app
COPY requirements.txt  ./
RUN pip install -r requirements.txt
COPY . .
CMD [ "uvicorn", "main:app", "--host", "0.0.0.0" ]

requirements.txt
Put the packages for FastAPI and Redis into requirements.txt.
aioredis==2.0.1
fastapi==0.85.0
uvicorn[standard]

cloudbuild.yaml
The last step is the cloudbuild.yaml file. Just like the frontend service, you can edit the part composed of project_id and backend, and add the IP of the memorystore created at the back into REDIS_HOST.
steps:
 # Build the container image
 - name: 'gcr.io/cloud-builders/docker'
   args: ['build', '-t', 'gcr.io/project_id/backend:$COMMIT_SHA', '.']
 # Push the container image to Container Registry
 - name: 'gcr.io/cloud-builders/docker'
   args: ['push', 'gcr.io/project_id/backend:$COMMIT_SHA']
 # Deploy container image to Cloud Run
 - name: 'gcr.io/google.com/cloudsdktool/cloud-sdk'
   entrypoint: gcloud
   args:
   - 'run'
   - 'deploy'
   - 'backend'
   - '--image'
   - 'gcr.io/project_id/backend:$COMMIT_SHA'
   - '--region'
   - 'asia-northeast3'
   - '--port'
   - '8000'
   - '--update-env-vars'
   - 'REDIS_HOST=redis://10.87.130.75'
 images:
 - 'gcr.io/project_id/backend:$COMMIT_SHA'

Cloud Build

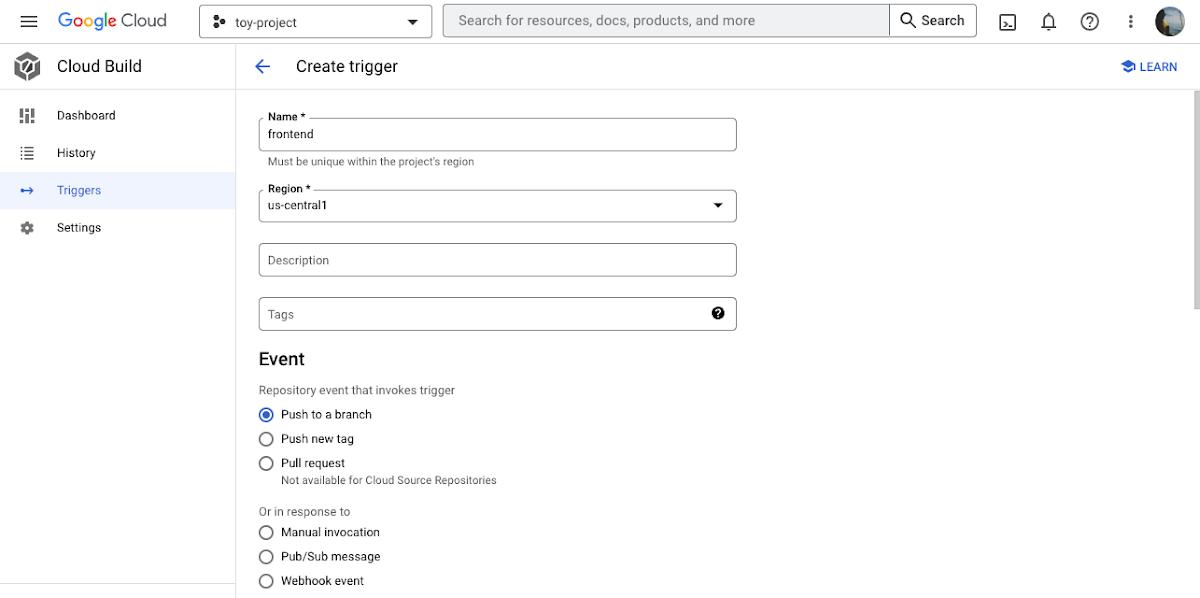
You can set Cloud Build to automatically build and deploy from Cloud Run when the source code is pushed to GitHub. Just select “Create trigger” and enter the required values. First, select “Push to a branch” for Event.
Read More  How Data And AI Can Help Media Companies Better Personalize; And What To Watch Out For
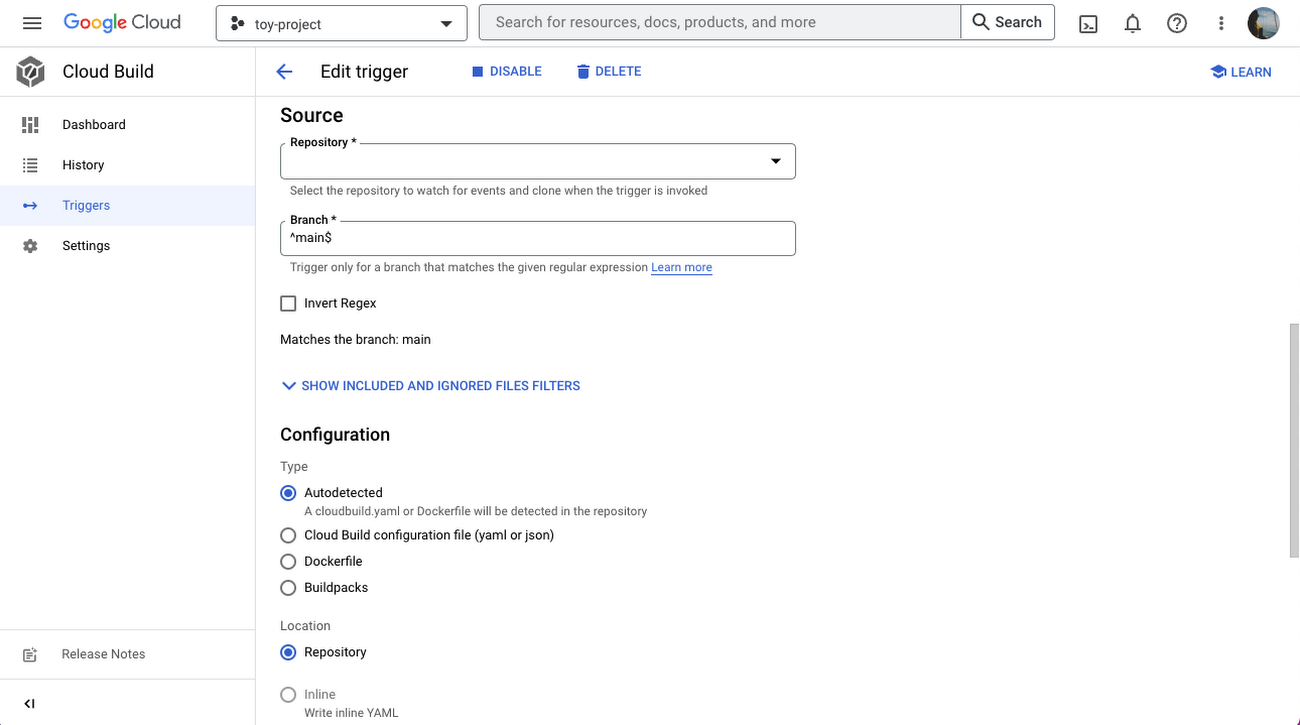
Next, go to the Source Repository. If this is your first time, you will need GitHub authentication. Our repository also has cloudbuild.yaml, so we also select the “Location” setting as the repository. 

Serverless VPC access connector

Since both the Frontend service and the Backend service currently exist in the Internet network, you’ll need a serverless VPC access connector to connect to the memorystore in the private band. You can do this by following this example code:

bash
gcloud compute networks vpc-access connectors create chat-connector \
--region=us-central1 \
--network=default \
--range=10.100.0.0/28 \
--min-instances=2 \
--max-instances=10 \
--machine-type=e2-micro

Create memorystore

To create the memorystore that will pass chat messages, use this code:

bash
gcloud redis instances create myinstance --size=2 --region=us-central1 \
    --redis-version=redis_6_X
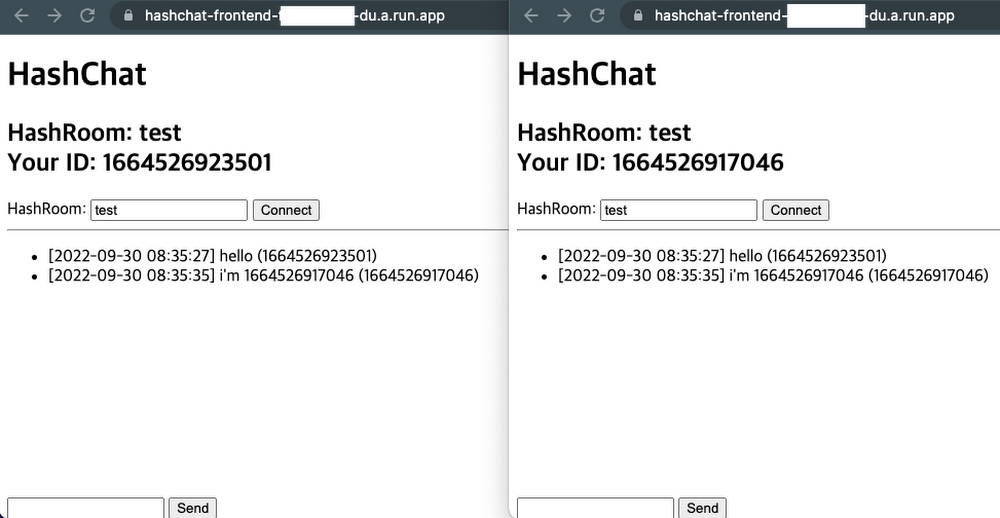
chat test
To demonstrate what you should see, we put two users into a conversation in a chat room called “test”. This will work regardless of how many users you have, and users will not see the conversations in other chat rooms until they join. 

Wrap-up

In this article, I built a serverless chat server using Cloud Run. By using Firestore instead of Memorystore, it is also possible to take the entire architecture serverless. Also, since the code is written on a container basis, it is easy to change to another environment such as GKE Autopilot, but Cloud Run is already a great platform for deploying microservices. Instances grow quickly and elastically according to the number of users connecting, so why would I need to choose another platform? Try it out now in the Cloud Console.


By: Jaeyeon Baek (Google Cloud Champion Innovator)
Source: Google Cloud Blog


For enquiries, product placements, sponsorships, and collaborations, connect with us at [email protected]. We'd love to hear from you!

Our humans need coffee too! Your support is highly appreciated, thank you!

aster.cloud

Related Topics
  • Cloud Build
  • Cloud Run
  • Coding
  • Google Cloud
  • Memorystore
  • Python
  • Serverless
  • Tutorials
You May Also Like
View Post
  • Engineering
  • Technology

Guide: Our top four AI Hypercomputer use cases, reference architectures and tutorials

  • March 9, 2025
View Post
  • Software Engineering
  • Technology

Claude 3.7 Sonnet and Claude Code

  • February 25, 2025
View Post
  • Computing
  • Engineering

Why a decades old architecture decision is impeding the power of AI computing

  • February 19, 2025
View Post
  • Engineering
  • Software Engineering

This Month in Julia World

  • January 17, 2025
View Post
  • Engineering
  • Software Engineering

Google Summer of Code 2025 is here!

  • January 17, 2025
View Post
  • Data
  • Engineering

Hiding in Plain Site: Attackers Sneaking Malware into Images on Websites

  • January 16, 2025
View Post
  • Computing
  • Design
  • Engineering
  • Technology

Here’s why it’s important to build long-term cryptographic resilience

  • December 24, 2024
IBM and Ferrari Premium Partner
View Post
  • Data
  • Engineering

IBM Selected as Official Fan Engagement and Data Analytics Partner for Scuderia Ferrari HP

  • November 7, 2024

Stay Connected!
LATEST
  • college-of-cardinals-2025 1
    The Definitive Who’s Who of the 2025 Papal Conclave
    • May 7, 2025
  • conclave-poster-black-smoke 2
    The World Is Revalidating Itself
    • May 6, 2025
  • 3
    Conclave: How A New Pope Is Chosen
    • April 25, 2025
  • Getting things done makes her feel amazing 4
    Nurturing Minds in the Digital Revolution
    • April 25, 2025
  • 5
    AI is automating our jobs – but values need to change if we are to be liberated by it
    • April 17, 2025
  • 6
    Canonical Releases Ubuntu 25.04 Plucky Puffin
    • April 17, 2025
  • 7
    United States Army Enterprise Cloud Management Agency Expands its Oracle Defense Cloud Services
    • April 15, 2025
  • 8
    Tokyo Electron and IBM Renew Collaboration for Advanced Semiconductor Technology
    • April 2, 2025
  • 9
    IBM Accelerates Momentum in the as a Service Space with Growing Portfolio of Tools Simplifying Infrastructure Management
    • March 27, 2025
  • 10
    Tariffs, Trump, and Other Things That Start With T – They’re Not The Problem, It’s How We Use Them
    • March 25, 2025
about
Hello World!

We are aster.cloud. We’re created by programmers for programmers.

Our site aims to provide guides, programming tips, reviews, and interesting materials for tech people and those who want to learn in general.

We would like to hear from you.

If you have any feedback, enquiries, or sponsorship request, kindly reach out to us at:

[email protected]
Most Popular
  • 1
    IBM contributes key open-source projects to Linux Foundation to advance AI community participation
    • March 22, 2025
  • 2
    Co-op mode: New partners driving the future of gaming with AI
    • March 22, 2025
  • 3
    Mitsubishi Motors Canada Launches AI-Powered “Intelligent Companion” to Transform the 2025 Outlander Buying Experience
    • March 10, 2025
  • PiPiPi 4
    The Unexpected Pi-Fect Deals This March 14
    • March 13, 2025
  • Nintendo Switch Deals on Amazon 5
    10 Physical Nintendo Switch Game Deals on MAR10 Day!
    • March 9, 2025
  • /
  • Technology
  • Tools
  • About
  • Contact Us

Input your search keywords and press Enter.