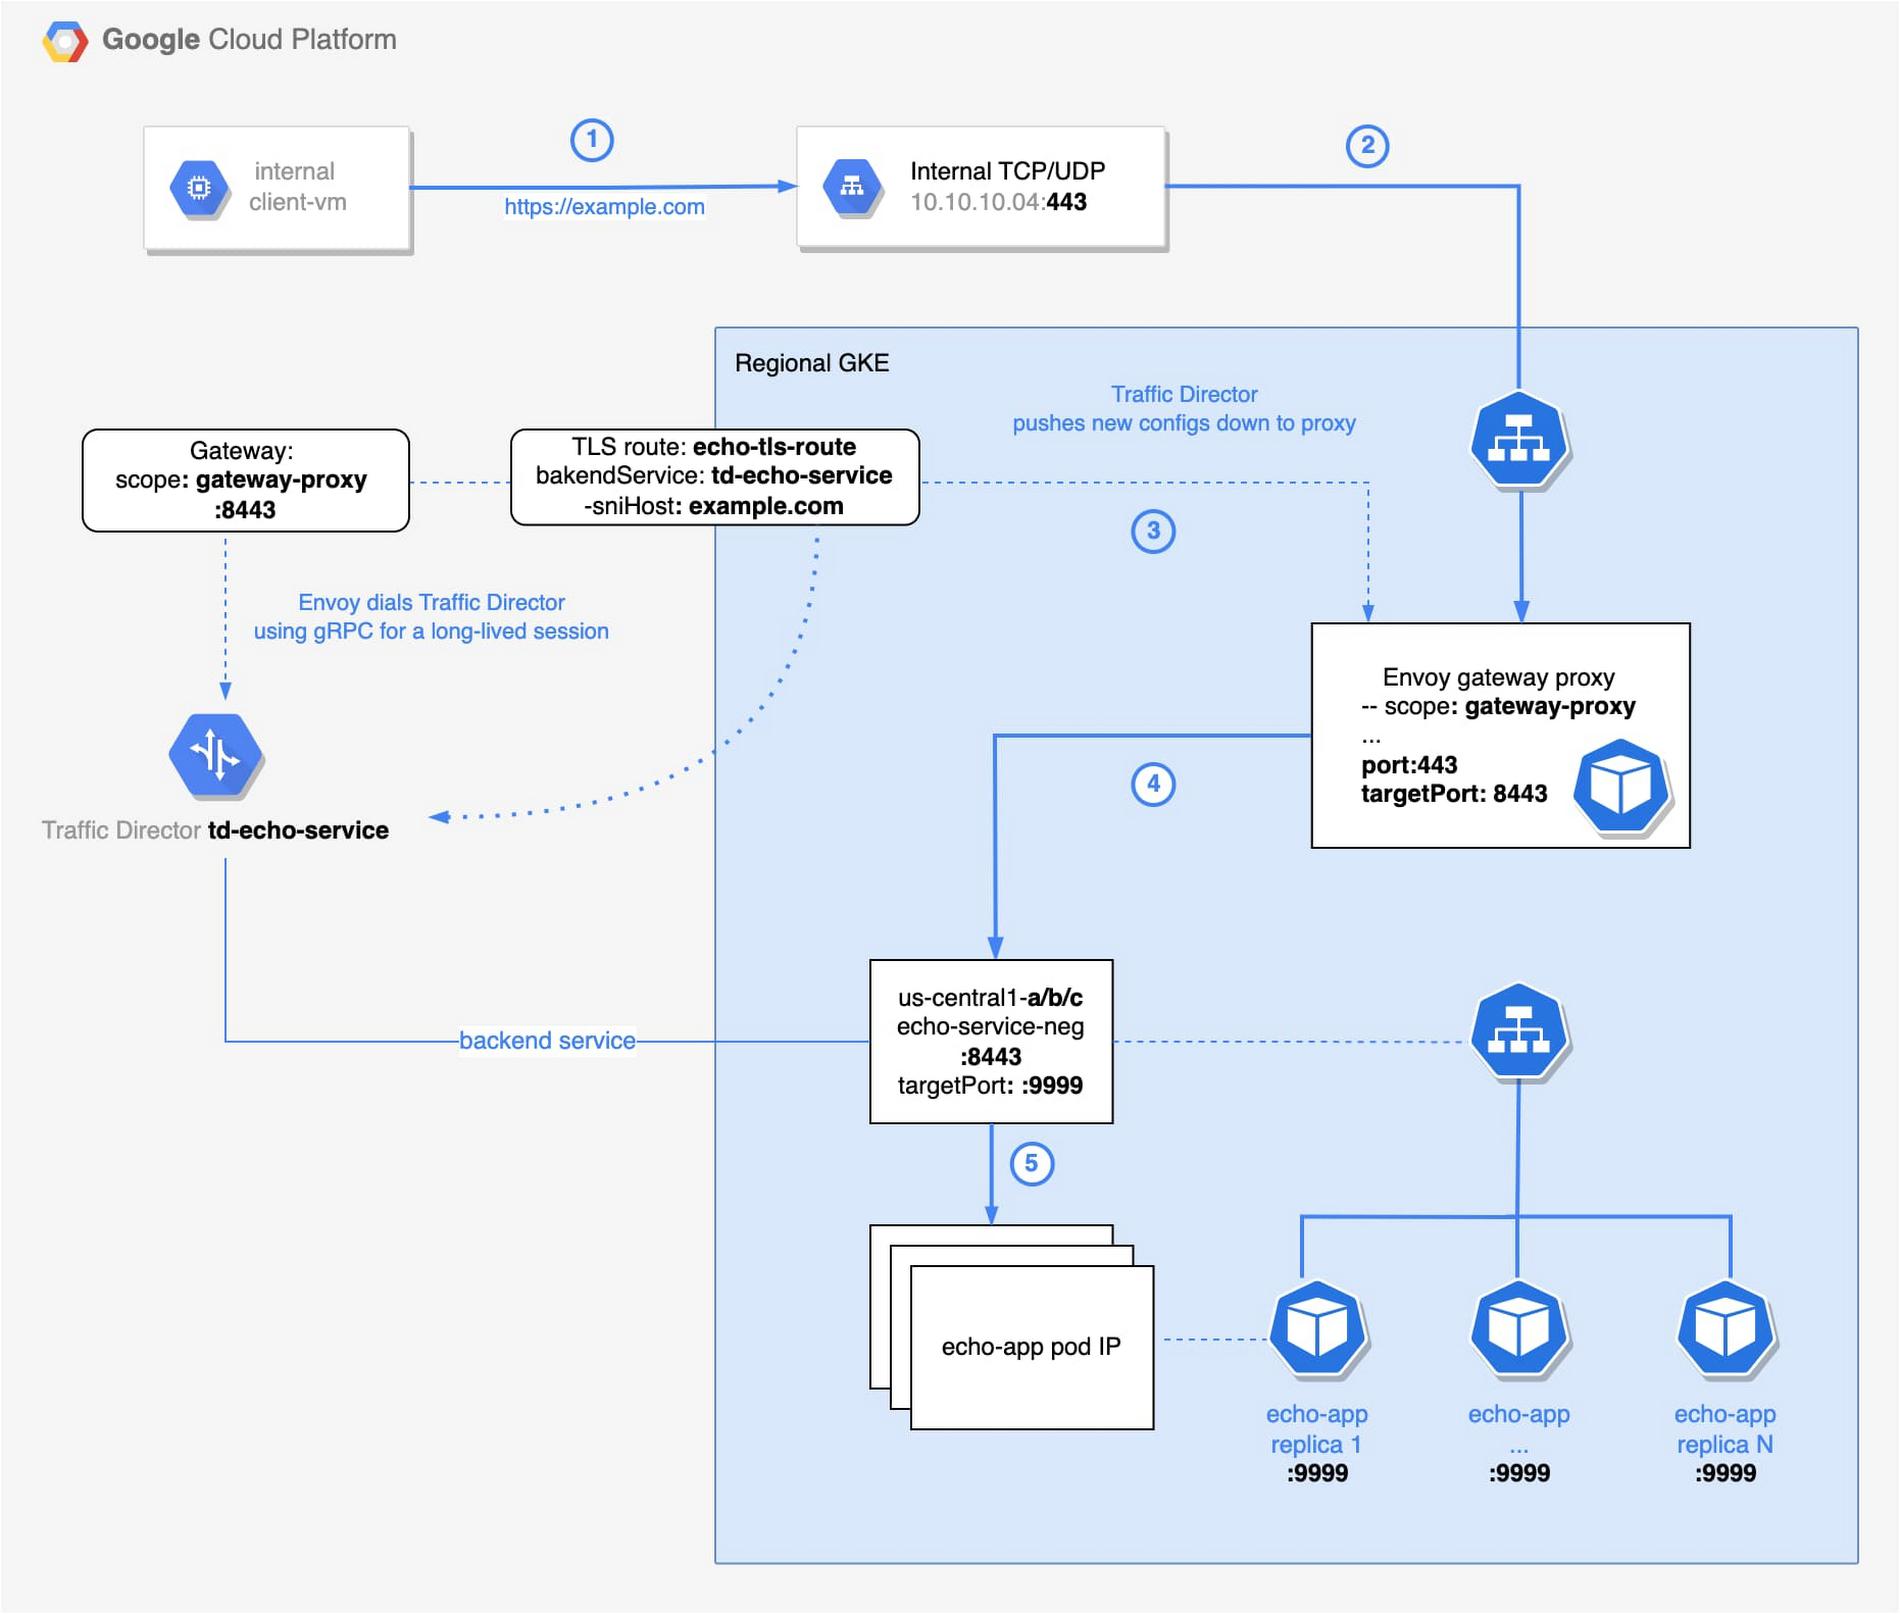
1. An internal client will make a request to a sample application (e.g. https://www.example.com) and the request will be forwarded to an internal load balancer.
From our partners:
2. All requests to the internal load balancer are forwarded to pods containing Envoy proxies, running as a deployment of gateway proxies on a GKE cluster.
3. These Envoy proxies receive their configuration from the Traffic Director, as their control plane.
4. Based on the routing configuration received from the Traffic Director, the proxies will then route the incoming requests to the appropriate backend service for the target application.
5. The request will be handled by any of the pods associated with the backend service.
Backend service
In this section, we show how to deploy our target application and create the backend service, i.e. echo-service-neg that will be mapped with that application as depicted on the diagram above. First, let’s deploy the echo service. Notice the following annotation:
cloud.google.com/neg: '{"exposed_ports":{"8443":{"name": "echo-server-neg"}}}'
scope_name and port 8443, Envoy gateway proxy routes requests to the correct NEG (step 5 on the architecture diagram). We use mendhak/http-https-echo:23 image as our backend. You can find a license for it here.apiVersion: v1
kind: Service
metadata:
name: echo-server
annotations:
cloud.google.com/neg: '{"exposed_ports":{"8443":{"name": "echo-server-neg"}}}'
networking.gke.io/max-rate-per-endpoint: "1000"
spec:
ports:
- port: 8443
name: https-port
protocol: TCP
targetPort: 9999
run: echo-app
type: ClusterIP
--
apiVersion: apps/v1
kind: Deployment
metadata:
labels:
run: echo-app
name: echo-app
spec:
replicas: 3
selector:
matchLabels:
run: echo-app
template:
metadata:
labels:
run: echo-app
spec:
containers:
- image: mendhak/http-https-echo:23
name: echo-app
env:
- name: HTTPS_PORT
value: "9999"
ports:
- protocol: TCP
containerPort: 9999
Ingress Gateway
Traffic enters the service mesh through the ingress gateway (step 2). The Envoy proxy acts as such a gateway. The ingress gateway uses the SNI information in the request to perform routing. We will apply the Traffic Director configurations before deploying the ingress gateway pods. Although not a hard requirement, it does provide for a better user experience, i.e. you will see less corresponding errors in the Envoy logs.
Below are sample gcloud commands to deploy the health check and backend for Traffic Director. Take note of the name: td-tls-echo-service.
# Enable APIs
gcloud services enable \
  trafficdirector.googleapis.com \
  networkservices.googleapis.com

# This health check is associated with the Traffic Director
gcloud compute health-checks create https td-https-health-check \
  --enable-logging \
  --use-serving-port

# Create Backend Service
gcloud compute backend-services create td-tls-echo-service \
 --global \
 --load-balancing-scheme=INTERNAL_SELF_MANAGED \
 --port-name=https \
 --health-checks td-https-health-check
# Add our NEGs as backends to the Traffic Director backend service
# Because we have created 1 NEG per each zone of the regional cluster, we add 3 NEGs (1 per zone).
BACKEND_SERVICE=td-tls-echo-service
ECHO_NEG_NAME=echo-server-neg
MAX_RATE_PER_ENDPOINT=10

gcloud compute backend-services add-backend $BACKEND_SERVICE \
  --global \
  --network-endpoint-group $ECHO_NEG_NAME \
  --network-endpoint-group-zone us-central1-b \
  --balancing-mode RATE \
  --max-rate-per-endpoint $MAX_RATE_PER_ENDPOINT

gcloud compute backend-services add-backend $BACKEND_SERVICE \
  --global \
  --network-endpoint-group $ECHO_NEG_NAME \
  --network-endpoint-group-zone us-central1-a \
  --balancing-mode RATE \
  --max-rate-per-endpoint $MAX_RATE_PER_ENDPOINT

gcloud compute backend-services add-backend $BACKEND_SERVICE \
  --global \
  --network-endpoint-group $ECHO_NEG_NAME \
  --network-endpoint-group-zone us-central1-c \
  --balancing-mode RATE \
  --max-rate-per-endpoint $MAX_RATE_PER_ENDPOINT
--scope_name=gateway-proxy. As we will see later, scope_name associates our gateway with the service routing Gateway resource.apiVersion: apps/v1
kind: Deployment
metadata:
name: ecom-envoy-gw
spec:
replicas: 1
selector:
matchLabels:
app: ecom-gw-envoy
template:
metadata:
labels:
app: ecom-gw-envoy
spec:
containers:
- env:
- name: ENVOY_UID
value: '1337'
image: envoyproxy/envoy:v1.21.2
imagePullPolicy: Always
name: envoy
resources:
limits:
memory: 1Gi
cpu: '2'
requests:
memory: 512Mi
cpu: 500m
volumeMounts:
- mountPath: /etc/envoy
name: envoy-bootstrap
initContainers:
- args:
- --project_number=112233445566
- --scope_name=gateway-proxy
- --bootstrap_file_output_path=/etc/envoy/envoy.yaml
- --traffic_director_url=trafficdirector.googleapis.com:443
image: gcr.io/trafficdirector-prod/xds-client-bootstrap-generator:v0.1.0
imagePullPolicy: Always
name: td-bootstrap-writer
volumeMounts:
- mountPath: /etc/envoy
name: envoy-bootstrap
volumes:
- emptyDir: {}
name: envoy-bootstrap
Gateway resource; notice the scope: gateway-proxy. Its value matches the one we specified in the YAML file above. Additionally, we set our target port to 8443. Essentially, we are handling the north-south traffic as shown here. We will talk more about routing in the next section.Traffic Director, as a control plane, generates the corresponding configuration and pushes it to the Envoy (step 3), which is our data plane.# gateway that is listening for traffic on port 8443
name: gateway8443
scope: gateway-proxy
ports:
- 8443
type: OPEN_MESH
gateway8443.yaml and import it using the following command.# Import gateway resource
gcloud network-services gateways import gateway8443 \
--source=gateway8443.yaml \
--location=global
logName="projects/<project-id>/logs/trafficdirector.googleapis.com%2Fevents"
jsonPayload.@type="type.googleapis.com/google.networking.trafficdirector.type.TrafficDirectorLogEntry"
jsonPayload.description="Client connected successfully."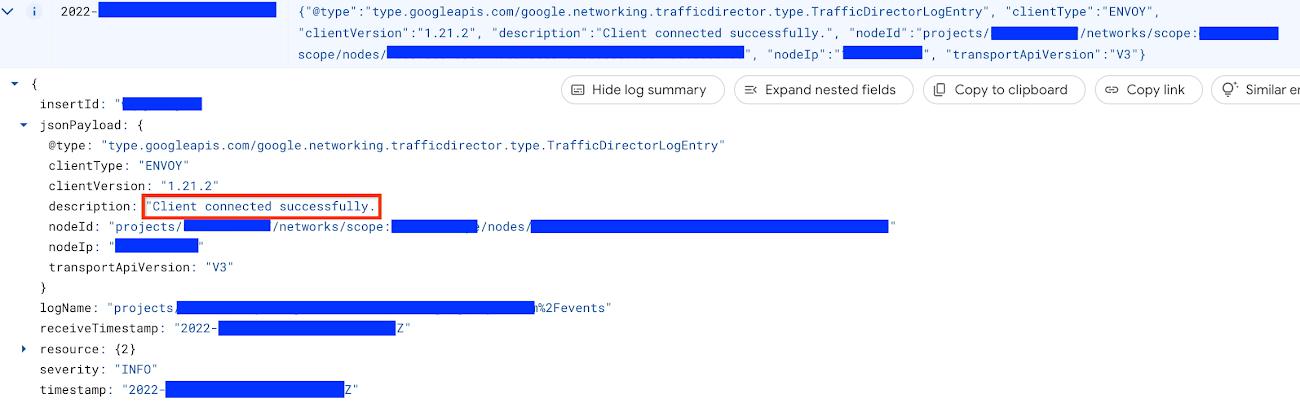
Forwarding from 127.0.0.1:15000 -> 15000
Forwarding from [::1]:15000 -> 15000
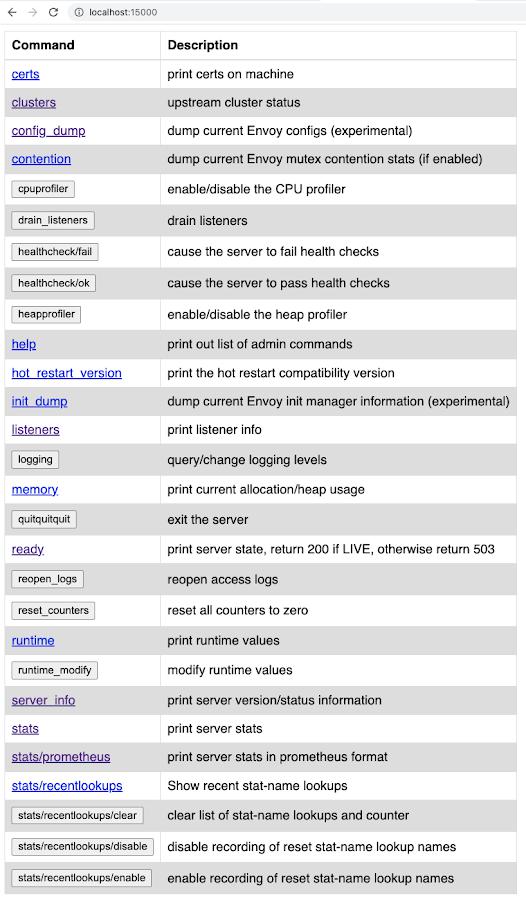
listeners link to see names of the listeners, and ports they are listening on, that were received from the Traffic Director. The config_dump link is useful to inspect the configuration that was pushed to this proxy from the Traffic Director. The stats link outputs endpoint statistics information that could be useful for debugging purposes. Explore this public documentation to learn more about Envoy administrative interface.
Routing
Let’s configure the routing. If you are not familiar with the Traffic Director service routing API, we recommend you read the Traffic Director service routing APIs overview to familiarize yourself with this API before you continue reading.
To use the service routing API in this tutorial, we need two resources, namely the Gateway resource and the TLSRoute resource. In the previous section we defined the Gateway resource. Below is the definition for TLSRoute resource.
name: echo-tls-route
gateways:
- projects/112233445566/locations/global/gateways/gateway8443
rules:
- matches:
  - sniHost:
    - example.com
    alpn:
    - h2
  action:
    destinations:
    - serviceName: projects/112233445566/locations/global/backendServices/td-tls-echo-service
gateway8443 in the gateways section. It matches the name of the gateway resource we defined in the Ingress Gateway section. Also notice the value of serviceName. This is the name of our Traffic Director backend service that was also created earlier.Note that in the TLSRoute, host header matching is based on the SNI header of incoming requests. The sniHost value matches the domain, i.e. example.com. Additionally, the value h2 inside the alpn section, allows HTTP2 request matching only. Lastly, it will route all such requests to the backend specified with the service name – the Traffic Director (step 4 on the architecture diagram) we created.Save the definition above in echo-tls-route.yaml file and import it using the following command.gcloud network-services tls-routes import ecom-echo-tls-route \
--source=echo-tls-route.yaml \
--location=global
Internal Load Balancer
The client connects to the internal load balancer (step 1 on the diagram). That is a regional Internal TCP/UDP Load Balancer. The load balancer (step 2) sends traffic to the Envoy proxy that acts as an ingress gateway. The load balancer is a passthrough one, making it possible to terminate the traffic in your backends.
The load balancer listens for incoming traffic on the port 443, routing requests to the GKE service. Notice the service definition below and pay attention to the ports config block. Next, the service directs requests from port 443 to port 8443 – a port exposed by our Envoy gateway deployment.
We have created the load balancer on Google Kubernetes Engine (GKE). See the tutorial for more details.
apiVersion: v1
kind: Service
metadata:
 annotations:
   networking.gke.io/load-balancer-type: Internal
 labels:
   app: ecom-gw-envoy
 name: ecom-ilb
spec:
 type: LoadBalancer
 externalTrafficPolicy: Local
 ports:
 - name: https
   port: 443
   protocol: TCP
   targetPort: 8443
 selector:
   app: ecom-gw-envoy
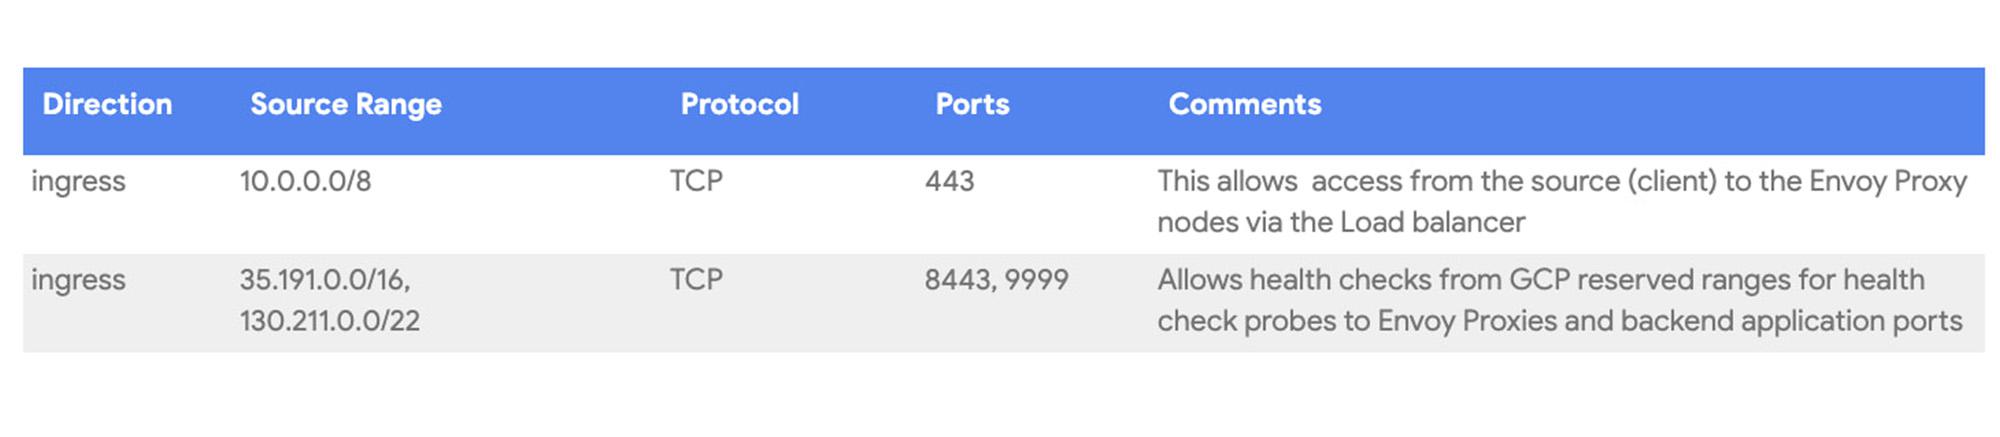
Firewall
To allow for network flow shown in the architecture diagram, you will need to configure following firewall rules. It is important to allow ingress from GKE nodes that terminate SSL workloads to the client-vm. Google’s Network Connectivity Center helped us to troubleshoot the connection and configure corresponding firewall rules.
In addition to the two firewall rules below that we created explicitly, please note that an automatically created GKE firewall rule is instrumental in allowing the Envoy pods to communicate with the application pods. If you would like to reproduce this deployment with pods sitting in different clusters, you will need to ensure that a firewall rule exists to allow pod to pod traffic across those clusters.
Validate the deployment
In this section, we will verify if we are able to communicate successfully to our backend service via Traffic Director. We create another VM (client-vm as depicted in diagram above) in a network that has connectivity in place with the internal load balancer that was created in section Create the Envoy gateway . Next, we run a simple curl command against our URL to verify connectivity:
# Grab and store IP of the load balancer.
IP=$(gcloud compute forwarding-rules list --format="value(IP_ADDRESS.scope())")

# -k is to disable SSL validation.
curl https://example.com --resolve example.com:443:$IP -k
IP address in the variable above. See “Filtering and formatting with gcloud” blog for details. 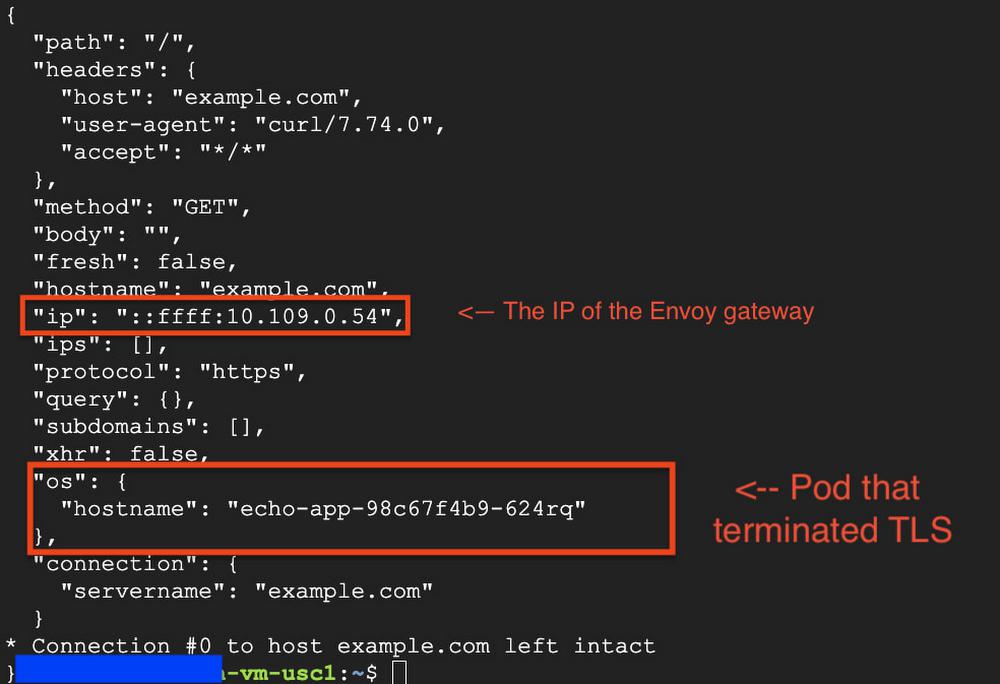
kubectl get pods -o wide, you will be able to verify that the ip above matches the one of the Envoy gateway pod and the hostname of your echo pod matches the one shown on the screenshot.
Next Steps
Please refer to Traffic Director Service Routing setup guides to learn more about how to configure other types of routes apart from TLS routes.
By: Sanmay Mishra (Cloud Infrastructure Consultant) and Ilya Zelker (Strategic Cloud Engineer)
Source: Google Cloud Blog
For enquiries, product placements, sponsorships, and collaborations, connect with us at [email protected]. We'd love to hear from you!
Our humans need coffee too! Your support is highly appreciated, thank you!