Preprocessing and transforming raw data into features is a critical but time consuming step in the ML process. This is especially true when a data scientist or data engineer has to move data across different platforms to do MLOps. In this blogpost, we describe how we streamline this process by adding two feature engineering capabilities in BigQuery ML.
Our previous blog outlines the data to AI journey with BigQuery ML, highlighting two powerful features that simplify MLOps – data preprocessing functions for feature engineering and the ability to export BigQuery ML TRANSFORM statement as part of the model artifact. In this blog post, we share how to use these features for creating a seamless experience from BigQuery ML to Vertex AI.
From our partners:
Data Preprocessing Functions
Preprocessing and transforming raw data into features is a critical but time consuming step when operationalizing ML. We recently announced the public preview of advanced feature engineering functions in BigQuery ML. These functions help you impute, normalize or encode data. When this is done inside the database, BigQuery, the entire process becomes easier, faster, and more secure to preprocess data.
Here is a list of the new functions we are introducing in this release. The full list of preprocessing functions can be found here.
- ML.MAX_ABS_SCALER
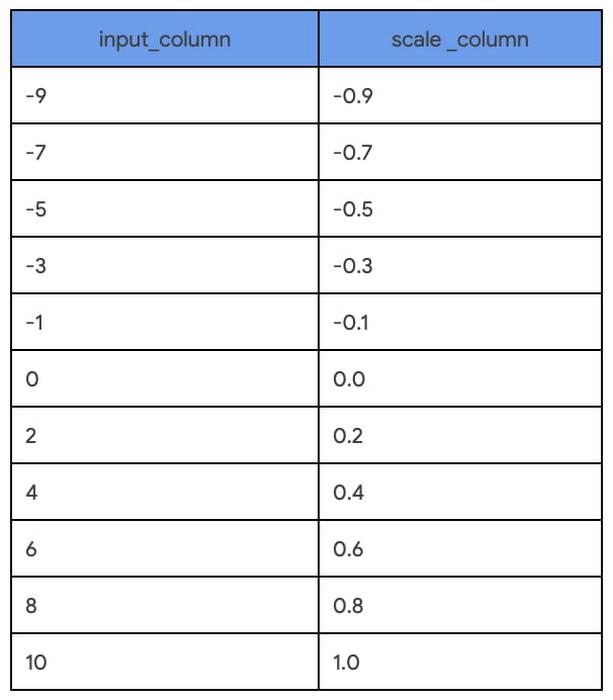
Scale a numerical column to the range [-1, 1] without centering by dividing by the maximum absolute value. - ML.ROBUST_SCALER
Scale a numerical column by centering with the median (optional) and dividing by the quantile range of choice ([25, 75] by default). - ML.NORMALIZER
Turn an input numerical array into a unit norm array for any p-norm: 0, 1, >1, +inf. The default is 2 resulting in a normalized array where the sum of squares is 1.
¨C15C¨C16C¨C17C¨C18C¨C19C¨C20C¨C21C¨C22C¨C23C¨C24C¨C25C¨C26C¨C27C¨C28C
Loading…
SELECT
  input_column,
  ML.MAX_ABS_SCALER (input_column) OVER() AS scale_column
FROM
  UNNEST([0, -1, 2, -3, 4, -5, 6, -7, 8, -9, 10]) as input_column
ORDER BY input_column

Once the input columns for an ML model are identified and the feature transformations are chosen, it is enticing to apply the transformation and save the output as a view. But this has an impact on our predictions later on because these same transformations will need to be applied before requesting predictions. Step 2 shows how to prevent this separation of processing and model training.
Step 2: Iterate through multiple models with inline TRANSFORM functions
Building on the preprocessing explorations in Step 1, the chosen transformations are applied inline with model training using the TRANSFORM statement. This interlocks the model iteration with the preprocessing explorations while making any candidate ready for serving with BigQuery or beyond. This means you can immediately try multiple model types without any delayed impact of feature transformations on predictions. In this step, two models, linear regression and boosted tree, are trained side-by-side with identical TRANSFORM statements:
Training with linear regression – Model a
Loading…
CREATE OR REPLACE MODEL `statmike-mlops-349915.feature_engineering.03_feature_engineering_2a`
TRANSFORM (
    JUDGE_A,

    ML.MIN_MAX_SCALER(flourAmt) OVER() as scale_flourAmt,
    ML.ROBUST_SCALER(saltAmt) OVER() as scale_saltAmt,
    ML.MAX_ABS_SCALER(yeastAmt) OVER() as scale_yeastAmt,
    ML.STANDARD_SCALER(water1Amt) OVER() as scale_water1Amt,
    ML.STANDARD_SCALER(water2Amt) OVER() as scale_water2Amt,

    ML.STANDARD_SCALER(waterTemp) OVER() as scale_waterTemp,
    ML.ROBUST_SCALER(bakeTemp) OVER() as scale_bakeTemp,
    ML.MIN_MAX_SCALER(ambTemp) OVER() as scale_ambTemp,
    ML.MAX_ABS_SCALER(ambHumidity) OVER() as scale_ambHumidity,

    ML.ROBUST_SCALER(mix1Time) OVER() as scale_mix1Time,
    ML.ROBUST_SCALER(mix2Time) OVER() as scale_mix2Time,
    ML.ROBUST_SCALER(mix1Speed) OVER() as scale_mix1Speed,
    ML.ROBUST_SCALER(mix2Speed) OVER() as scale_mix2Speed,
    ML.STANDARD_SCALER(proveTime) OVER() as scale_proveTime,
    ML.MAX_ABS_SCALER(restTime) OVER() as scale_restTime,
    ML.MAX_ABS_SCALER(bakeTime) OVER() as scale_bakeTime
)
OPTIONS (
        model_type = 'LINEAR_REG',
        input_label_cols = ['JUDGE_A'],
        enable_global_explain = TRUE,
        data_split_method = 'AUTO_SPLIT',
        MODEL_REGISTRY = 'VERTEX_AI',
        VERTEX_AI_MODEL_ID = 'bqml_03_feature_engineering_2a',
        VERTEX_AI_MODEL_VERSION_ALIASES = ['run-20230112234821']
    ) AS
SELECT * EXCEPT(Recipe, JUDGE_B)
FROM `statmike-mlops-349915.feature_engineering.bread`
Training with boosted tree – Model b
Loading…
CREATE OR REPLACE MODEL `statmike-mlops-349915.feature_engineering.03_feature_engineering_2b`
TRANSFORM (
    JUDGE_A,

    ML.MIN_MAX_SCALER(flourAmt) OVER() as scale_flourAmt,
    ML.ROBUST_SCALER(saltAmt) OVER() as scale_saltAmt,
    ML.MAX_ABS_SCALER(yeastAmt) OVER() as scale_yeastAmt,
    ML.STANDARD_SCALER(water1Amt) OVER() as scale_water1Amt,
    ML.STANDARD_SCALER(water2Amt) OVER() as scale_water2Amt,

    ML.STANDARD_SCALER(waterTemp) OVER() as scale_waterTemp,
    ML.ROBUST_SCALER(bakeTemp) OVER() as scale_bakeTemp,
    ML.MIN_MAX_SCALER(ambTemp) OVER() as scale_ambTemp,
    ML.MAX_ABS_SCALER(ambHumidity) OVER() as scale_ambHumidity,

    ML.ROBUST_SCALER(mix1Time) OVER() as scale_mix1Time,
    ML.ROBUST_SCALER(mix2Time) OVER() as scale_mix2Time,
    ML.ROBUST_SCALER(mix1Speed) OVER() as scale_mix1Speed,
    ML.ROBUST_SCALER(mix2Speed) OVER() as scale_mix2Speed,
    ML.STANDARD_SCALER(proveTime) OVER() as scale_proveTime,
    ML.MAX_ABS_SCALER(restTime) OVER() as scale_restTime,
    ML.MAX_ABS_SCALER(bakeTime) OVER() as scale_bakeTime
)
OPTIONS (
        model_type = 'BOOSTED_TREE_REGRESSOR',
        booster_type = 'GBTREE',
        num_parallel_tree = 1,
        max_iterations = 30,
        early_stop = TRUE,
        min_rel_progress = 0.01,
        tree_method = 'HIST',
        subsample = 0.85,
        input_label_cols = ['JUDGE_A'],
        enable_global_explain = TRUE,
        data_split_method = 'AUTO_SPLIT',
        l1_reg = 10,
        l2_reg = 10,
        MODEL_REGISTRY = 'VERTEX_AI',
        VERTEX_AI_MODEL_ID = 'bqml_03_feature_engineering_2b',
        VERTEX_AI_MODEL_VERSION_ALIASES = ['run-20230112234926']
    ) AS
SELECT * EXCEPT(Recipe, JUDGE_B)
FROM `statmike-mlops-349915.feature_engineering.bread`
Identical input columns that have the same preprocessing means you can easily compare the accuracy of the models. Using the BigQuery ML function ML.EVALUATE makes this comparison as simple as a single SQL query that stacks these outcomes with the UNION ALL set operator:
Loading…
SELECT 'Manual Feature Engineering - 2A' as Approach, mean_squared_error, r2_score
FROM ML.EVALUATE(MODEL `statmike-mlops-349915.feature_engineering.03_feature_engineering_2a`)
UNION ALL
SELECT 'Manual Feature Engineering - 2B' as Approach, mean_squared_error, r2_score
FROM ML.EVALUATE(MODEL `statmike-mlops-349915.feature_engineering.03_feature_engineering_2b`)
The results of the evaluation comparison show that using the boosted tree model results in a much better model than linear regression with drastically lower mean squared error and higher r2.

Both models are ready to serve predictions, but the clear choice is the boosted tree regressor. Once we decide which model to use, you can predict directly within BigQuery ML using the ML.PREDICT function. In the rest of the tutorial, we show how to export the model outside of BigQuery ML and predict using Google Cloud Vertex AI.
Using BigQuery Models for Inference Outside of BigQuery
Once your model is trained, if you want to do online inference for low latency responses in your application for online prediction, you have to deploy the model outside of BigQuery. The following steps demonstrate how to deploy the models to Vertex AI Prediction endpoints.
This can be accomplished in one of two ways:
- Manually export the model from BigQuery ML and set up a Vertex AI Prediction Endpoint. To do this, you need to do steps 3 and 4 first.
- Register the model and deploy from Vertex AI Model Registry automatically. The capability is not available yet but will be available in a forthcoming release. Once it’s available steps 3 and 4 can be skipped.
Step 3. Manually export models from BigQuery
BigQuery ML supports an EXPORT MODEL statement to deploy models outside of BigQuery. A manual export includes two models – a preprocessing model that reflects the TRANSFORM statement and a prediction model. Both models are exported with a single export statement in BigQuery ML.
Loading…
EXPORT MODEL `statmike-mlops-349915.feature_engineering.03_feature_engineering_2b`
        OPTIONS (URI = 'gs://statmike-mlops-349915-us-central1-bqml-exports/03/2b/model')
The preprocessing model that captures the TRANSFORM statement is exported as a TensorFlow SavedModel file. In this example it is exported to a GCS bucket located at ‘gs://statmike-mlops-349915-us-central1-bqml-exports/03/2b/model/transform’.
The prediction models are saved in portable formats that match the frameworks in which they were trained by BigQuery ML. The linear regression model is exported as a TensorFlow SavedModel and the boosted tree regressor is exported as Booster file (XGBoost). In this example, the boost tree model is exported to a GCS bucket located at ‘gs://statmike-mlops-349915-us-central1-bqml-exports/03/2b/model’
These export files are in a standard open format of the native model types making them completely portable to be deployed anywhere – they can be deployed to Vertex AI (Steps 4-7 below), on your own infrastructure, or even in edge applications.
Steps 4 through 7 show how to register and deploy a model to Vertex AI Prediction endpoint. These steps need to be repeated separately for the preprocessing models and the prediction models.
Step 4. Register models to Vertex AI Model Registry
To deploy the models in Vertex AI Prediction, they first need to be registered with the Vertex AI Model Registry To do this two inputs are needed – the links to the model files and a URI to a pre-built container. Go to Step 4 in the tutorial to see how exactly it’s done.
The registration can be done with the Vertex AI console or programmatically with one of the clients. In the example below, the Python client for Vertex AI is used to register the models like this:
Loading…
vertex_model = aiplatform.Model.upload(
    display_name = 'gcs_03_feature_engineering_2b',
    serving_container_image_uri = 'us-docker.pkg.dev/vertex-ai/prediction/xgboost-cpu.1-1:latest',
    artifact_uri = "gs://statmike-mlops-349915-us-central1-bqml-exports/03/2b/model"
)
Step 5. Create Vertex AI Prediction endpoints
Vertex AI includes a service for hosting models for online predictions. To host a model on a Vertex AI Prediction endpoint you first create an endpoint. This can also be done directly from the Vertex AI Model Registry console or programmatically with one of the clients. In the example below, the Python client for Vertex AI is used to create the endpoint like this:
Loading…
vertex_endpoint = aiplatform.Endpoint.create (
    display_name = ‘03_feature_engineering_manual_2b’
)
Step 6. Deploy models to endpoints
Deploying a model from the Vertex AI Model Registry (Step 4) to a Vertex AI Prediction endpoint (Step 5) is done in a single deployment action where the model definition is supplied to the endpoint along with the type of machine to utilize. Vertex AI Prediction endpoints can automatically scale up or down to handle prediction traffic needs by providing the number of replicas to utilize (default is 1 for min and max). In the example below, the Python client for Vertex AI is being used with the deploy method for the endpoint (Step 5) using the models (Step 4):
Loading…
vertex_endpoint.deploy(
    model = vertex_model,
    deployed_model_display_name = vertex_model.display_name,
    traffic_percentage = 100,
    machine_type = 'n1-standard-2',
    min_replica_count = 1,
    max_replica_count = 1
)
Step 7. Request predictions from endpoints
Once the model is deployed to a Vertex AI Prediction endpoint (Step 6) it can serve predictions. Rows of data, called instances, are passed to the endpoint and results are returned that include the processed information: preprocessing result or prediction. Getting prediction results from Vertex AI Prediction endpoints can be done with any of the Vertex AI API interfaces (REST, gRPC, gcloud, Python, Java, Node.js). Here, the request is demonstrated directly with the predict method of the endpoint (Step 6) using the Python client for Vertex AI as follows:
Loading…
results = vertex_endpoint.predict(instances = [
{'flourAmt': 511.21695405324624,
 'saltAmt': 9,
 'yeastAmt': 11,
 'mix1Time': 6,
 'mix1Speed': 4,
 'mix2Time': 5,
 'mix2Speed': 4,
 'water1Amt': 338.3989183746999,
 'water2Amt': 105.43955159464981,
 'waterTemp': 48,
 'proveTime': 92.27755071811586,
 'restTime': 43,
 'bakeTime': 29,
 'bakeTemp': 462.14028505497805,
 'ambTemp': 38.20572852497746,
 'ambHumidity': 63.77836403396154}])
The result of an endpoint with a preprocessing model will be identical to applying the TRANSFORM statement from BigQuery ML. The results can then be pipelined to an endpoint with the prediction model to serve predictions that match the results of the ML.PREDICT function in BigQuery ML. The results of both methods, Vertex AI Prediction endpoints and BigQuery ML with ML.PREDICT are shown side-by-side in the tutorial to show that the results of the model are replicated. Now the model can be used for online serving with extremely low latency. This even includes using private endpoints for even lower latency and secure connections with VPC Network Peering.
Conclusion
With the new preprocessing functions, you can simplify data exploration and feature preprocessing. Further, by embedding preprocessing within model training using the TRANSFORM statement, the serving process is simplified by using prepped models without needing additional steps. In other words, predictions are done right inside BigQuery or alternatively the models can be exported to any location outside of BigQuery such as Vertex AI Prediction for online serving. The tutorial demonstrated how BigQuery ML works with Vertex AI Model Registry and Prediction to create a seamless end-to-end ML experience. In the future you can expect to see more capabilities that bring BigQuery, BigQuery ML and Vertex AI together.
Click here to access the tutorial or check out the documentation to learn more about BigQuery ML
Thanks to Ian Zhao, Abhinav Khushraj, Yan Sun, Amir Hormati, Mingge Deng and Firat Tekiner from the BigQuery ML team
By: Mike Henderson (Customer Engineer) and Jiashang Liu (Software Engineer)
Source: Google Cloud Blog
For enquiries, product placements, sponsorships, and collaborations, connect with us at [email protected]. We'd love to hear from you!
Our humans need coffee too! Your support is highly appreciated, thank you!


