aster.cloud aster.cloud
  • /
  • Platforms
    • Public Cloud
    • On-Premise
    • Hybrid Cloud
    • Data
  • Architecture
    • Design
    • Solutions
    • Enterprise
  • Engineering
    • Automation
    • Software Engineering
    • Project Management
    • DevOps
  • Programming
    • Learning
  • Tools
  • About
  • /
  • Platforms
    • Public Cloud
    • On-Premise
    • Hybrid Cloud
    • Data
  • Architecture
    • Design
    • Solutions
    • Enterprise
  • Engineering
    • Automation
    • Software Engineering
    • Project Management
    • DevOps
  • Programming
    • Learning
  • Tools
  • About
aster.cloud aster.cloud
  • /
  • Platforms
    • Public Cloud
    • On-Premise
    • Hybrid Cloud
    • Data
  • Architecture
    • Design
    • Solutions
    • Enterprise
  • Engineering
    • Automation
    • Software Engineering
    • Project Management
    • DevOps
  • Programming
    • Learning
  • Tools
  • About
  • DevOps
  • Programming

How To Install And Configure MongoDB In Ubuntu

  • root
  • May 6, 2019
  • 3 minute read

Overview

  • MongoDB is a document-oriented database
  • Shines with document-based design. Supporting sub-documents as values instead of the usual data types, it can be perfect for retrieving a record and a sub-detail or list of records in one query.


Prerequisites

  • Operating System: Ubuntu 18
    • For production environments use from the following : Amazon Linux, Debian 8, RHEL / CentOS 6.2 +, SLES, Ubuntu LTS 16.04 and Windows Server 2012 R2
  • Command Line Interface or Terminal


Partner with aster.cloud
for your next big idea.
Let us know here.


From our partners:

CITI.IO :: Business. Institutions. Society. Global Political Economy.
CYBERPOGO.COM :: For the Arts, Sciences, and Technology.
DADAHACKS.COM :: Parenting For The Rest Of Us.
ZEDISTA.COM :: Entertainment. Sports. Culture. Escape.
TAKUMAKU.COM :: For The Hearth And Home.
ASTER.CLOUD :: From The Cloud And Beyond.
LIWAIWAI.COM :: Intelligence, Inside and Outside.
GLOBALCLOUDPLATFORMS.COM :: For The World's Computing Needs.
FIREGULAMAN.COM :: For The Fire In The Belly Of The Coder.
ASTERCASTER.COM :: Supra Astra. Beyond The Stars.
BARTDAY.COM :: Prosperity For Everyone.

Installation

01. Open a terminal window


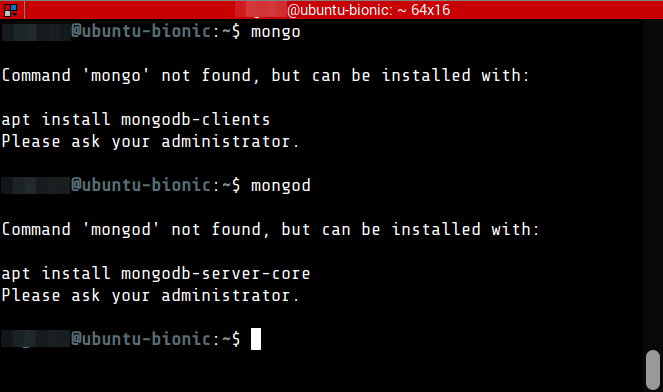
02. Check if MongoDB is already installed. Execute the following to determine.

$ mongo

# and

$ mongod


It should show some suggestion on how to install MongoDB.


03. At the CLI, import the public key used by the package management system. This will install an official version of MongoDB.

$ sudo apt-key adv --keyserver hkp://keyserver.ubuntu.com:80 --recv 9DA31620334BD75D9DCB49F368818C72E52529D4


04. Create a list file for MongoDB

$ echo "deb [ arch=amd64 ] https://repo.mongodb.org/apt/ubuntu bionic/mongodb-org/4.0 multiverse" | sudo tee /etc/apt/sources.list.d/mongodb-org-4.0.list


05. Reload local package database.

$ sudo apt update


06. Install the MongoDB packages.

$ sudo apt install mongodb-org -y


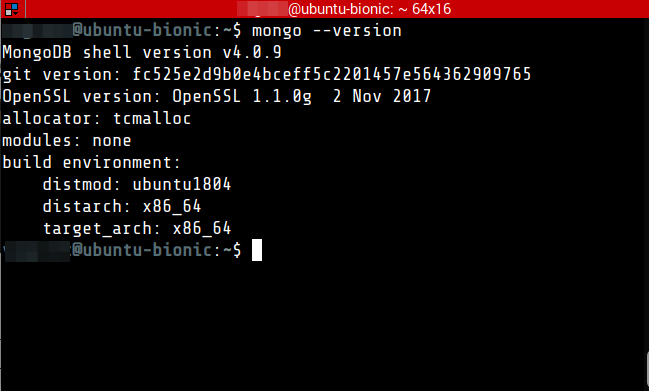
07. Check the version. If the version is returned, this means that MongoDB has been installed correctly.

$ mongod --version

# or

$ mongo --version


08. Configure MongoDB to start on system boot.

$ sudo systemctl enable mongod.service


09. Connect to the Mongo shell.

$ mongo


If you are unable to connect to the mongo shell. Try restarting the mongod service.

$ sudo service mongod restart


Changing the MongoDB Port

Changing the default port of MongoDB provides a first line of defense against unwanted intruders. While it isn’t a sure-way for deferring against bots that sweep through ports that tries to access database, it prevents them trying to access the database using the default port. For security it is better to enable other mechanisms such as creating database users that have specific roles and access to database with credentials.

Read More  Introducing Ruby On Google Cloud Functions

01. Edit the MongoDB configuration file

$ sudo nano /etc/mongod.conf


02. While on the nano interface, press Ctrl+W (or command for Mac)  to search for the text, network interfaces. Then press Enter.

In this example change the port to 29999. After changing the port, Press Ctrl+O (or command for Mac), then Enter. Ctrl+X to exit the nano editor.


03. Restart MongoDB service to apply the changes

$ sudo service mongod restart


04. After restart, you cannot connect to the MongoDB using the default mongod command. Instead you have to identify the port.

$ mongo --port 29999


Adding Security and Authentication

While for development purpose the current setup will suffice. But for production it is recommended to enable authentication and add user with password for security.

01. Edit the MongoDB configuration file

$ sudo nano /etc/mongod.conf


02. While on the nano interface, press Ctrl+W (or command for Mac)  to search for the text, “security”. Then press Enter.


03. Add the following lines after the #security comment.

# security:
security:
  authorization: enabled


04. Restart the MongoDB service.

$ sudo service mongod restart


05. Access the MongoDB shell

$ mongo

# or if port has been changed

$ mongo --port


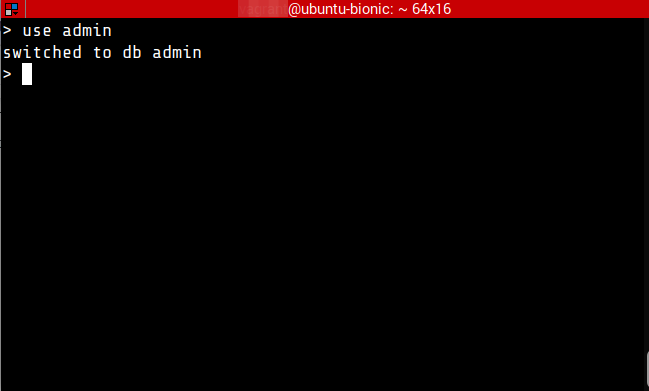
06. Switch to the admin database

> use admin


07. Create a Root user account. On the MongoDB shell, execute the following. Replace the dotlah and dotlah-password with your preferred credentials.

Note that roles here should be configured as needed. In this example, we are using the root role. For the list of roles see the following link : https://docs.mongodb.com/manual/reference/built-in-roles/

db.createUser(
  {
    user: "dotlah",
    pwd: "dotlah-password",
    roles: [ 
      { role: "root", db: "admin" } 
    ]
  }
)

It should show something similar. This shows that the user has been added.

Read More  Privacera Connects To Dremio’s Data Lakehouse To Aid Data Governance


08. Restart the MongoDB instance with access control

> db.adminCommand({shutdown:1})


09. Exit from the MongoDB shell.

> exit


10. Test the new user by using the following authentication command.

$ mongo --port 27017 --username dotlah --password dotlah-password --authenticationDatabase admin


Appendix

01. Start MongoDB service

$ sudo service mongod start


02. Restart MongoDB service

$ sudo service mongod restart


03. Stop MongoDB service

$ sudo service mongod stop


References

For production deployment see the following resource

— https://docs.mongodb.com/manual/administration/production-notes


For enquiries, product placements, sponsorships, and collaborations, connect with us at [email protected]. We'd love to hear from you!

Our humans need coffee too! Your support is highly appreciated, thank you!

root

Related Topics
  • Database
  • How To
  • Installation
  • MongoDB
  • NoSQL
  • Ubuntu
You May Also Like
View Post
  • DevOps
  • Engineering
  • Platforms

How To Fail At Platform Engineering

  • March 11, 2024
View Post
  • Computing
  • DevOps
  • Platforms

The IBM Approach To Reliable Quantum Computing

  • November 28, 2023
DevOps artifact management
View Post
  • Design
  • DevOps
  • Engineering

10 Awesome Benefits Of Artifact Management And Why You Need It

  • August 2, 2023
Automation | Gears
View Post
  • Automation
  • DevOps
  • Engineering

Automating CI/CD With GitHub Actions

  • June 13, 2023
View Post
  • Architecture
  • Data
  • Engineering
  • People
  • Programming
  • Software Engineering
  • Technology
  • Work & Jobs

Predictions: Top 25 Careers Likely In High Demand In The Future

  • June 6, 2023
View Post
  • DevOps
  • People

What’s The Future Of DevOps? You Tell Us. Take The 2023 Accelerate State Of DevOps Survey

  • June 2, 2023
View Post
  • Programming
  • Software Engineering
  • Technology

Build a Python App to Alert You When Asteroids Are Close to Earth

  • May 22, 2023
View Post
  • Programming

Illuminating Interactions: Visual State In Jetpack Compose

  • May 20, 2023

Stay Connected!
LATEST
  • college-of-cardinals-2025 1
    The Definitive Who’s Who of the 2025 Papal Conclave
    • May 7, 2025
  • conclave-poster-black-smoke 2
    The World Is Revalidating Itself
    • May 6, 2025
  • 3
    Conclave: How A New Pope Is Chosen
    • April 25, 2025
  • Getting things done makes her feel amazing 4
    Nurturing Minds in the Digital Revolution
    • April 25, 2025
  • 5
    AI is automating our jobs – but values need to change if we are to be liberated by it
    • April 17, 2025
  • 6
    Canonical Releases Ubuntu 25.04 Plucky Puffin
    • April 17, 2025
  • 7
    United States Army Enterprise Cloud Management Agency Expands its Oracle Defense Cloud Services
    • April 15, 2025
  • 8
    Tokyo Electron and IBM Renew Collaboration for Advanced Semiconductor Technology
    • April 2, 2025
  • 9
    IBM Accelerates Momentum in the as a Service Space with Growing Portfolio of Tools Simplifying Infrastructure Management
    • March 27, 2025
  • 10
    Tariffs, Trump, and Other Things That Start With T – They’re Not The Problem, It’s How We Use Them
    • March 25, 2025
about
Hello World!

We are aster.cloud. We’re created by programmers for programmers.

Our site aims to provide guides, programming tips, reviews, and interesting materials for tech people and those who want to learn in general.

We would like to hear from you.

If you have any feedback, enquiries, or sponsorship request, kindly reach out to us at:

[email protected]
Most Popular
  • 1
    IBM contributes key open-source projects to Linux Foundation to advance AI community participation
    • March 22, 2025
  • 2
    Co-op mode: New partners driving the future of gaming with AI
    • March 22, 2025
  • 3
    Mitsubishi Motors Canada Launches AI-Powered “Intelligent Companion” to Transform the 2025 Outlander Buying Experience
    • March 10, 2025
  • PiPiPi 4
    The Unexpected Pi-Fect Deals This March 14
    • March 13, 2025
  • Nintendo Switch Deals on Amazon 5
    10 Physical Nintendo Switch Game Deals on MAR10 Day!
    • March 9, 2025
  • /
  • Technology
  • Tools
  • About
  • Contact Us

Input your search keywords and press Enter.