
<a class="cm gh hz ia ib ic" href="https://developer.android.com/reference/kotlin/androidx/recyclerview/widget/RecyclerView" target="_blank" rel="noopener nofollow noreferrer">RecyclerView</a> is a powerful UI widget that allows you to display a list of data in a flexible manner. When I was learning about RecyclerView, I found there were a lot of resources on how to create a complex one but not that many about creating a simple one. While the pieces that make up RecyclerView may seem confusing at first, they are fairly straightforward once you understand them.
This blog post goes through the steps of creating a simple RecyclerView that displays the names of different types of flowers. Along the way, I will also break down the different pieces that a RecyclerView needs so you can try it in your own apps.
From our partners:
RecyclerView? What? Why?
A RecyclerView is a container used to display a list or grid of data, like text or photos.
When a list scrolls, only a handful of views are actually displayed on the screen. When a view scrolls off screen, RecyclerView reuses it and fills it with new data. This makes your app more efficient both in time and space, because it recycles existing structures instead of constantly creating new ones.
Why should you use RecyclerView?
RecyclerViewuses theViewHolderpattern which improves performance by allowing access to item views without frequent calls tofindViewById().RecyclerView, uses<a class="cm gh hz ia ib ic" href="https://developer.android.com/reference/androidx/recyclerview/widget/RecyclerView.LayoutManager" target="_blank" rel="noopener nofollow noreferrer">LayoutManager</a>swhich support lists that can scroll vertically and horizontally, staggered lists, and grids. CustomLayoutManagersare also possible to create.RecyclerViewprovides default item animations and a way to customize them.
Overall, RecyclerView is a powerful tool because it allows for flexibility and customization.
Implementing RecyclerView
This blog post will show how to implement a simple RecyclerView that displays the names of different types of flowers. The code below will be written in Kotlin but RecyclerView can also be used in Java.
To get started, create a project with the Empty Activity template in Android Studio. Give it a creative name and choose Kotlin as the project’s language.
Next, import the most current dependency for RecyclerView into the app level build.gradle file.
<!-- Copyright 2019 Google LLC.
   SPDX-License-Identifier: Apache-2.0 -->

implementation 'androidx.recyclerview:recyclerview:1.1.0'
RecyclerView Data
One of the most important parts of RecyclerView is the data that is displayed. In a more complex app, data would be retrieved from a database or from the network, but for simplicity this app uses strings from a resource file in this app.
In the strings.xml file, create a string array with the flowers to be displayed.
<!-- Copyright 2019 Google LLC.
   SPDX-License-Identifier: Apache-2.0 -->

<resources>
    <string name="app_name">RecyclerView Sample</string>

    <string-array name="flower_array">
        <item>Lily</item>
        <item>Poppy</item>
        <item>Sunflower</item>
        <item>Freesia</item>
        <item>Daisy</item>
        <item>Rose</item>
        <item>Daffodil</item>
        <item>Lavender</item>
        <item>Peony</item>
        <item>Lilac</item>
        <item>Dahlia</item>
        <item>Tulip</item>
        <item>Dandelion</item>
    </string-array>
</resources>
Next, create a class called Datasource and have it take in context. Create a function called getFlowerList() that returns the array of flower names.
<!-- Copyright 2019 Google LLC.
   SPDX-License-Identifier: Apache-2.0 -->

class Datasource(val context: Context) {
    fun getFlowerList(): Array<String> {
        return context.resources.getStringArray(R.array.flower_array)
    }
}
In MainActivity.onCreate(), create a val called flowerList and set it equal to getFlowerList().
<!-- Copyright 2019 Google LLC.
   SPDX-License-Identifier: Apache-2.0 -->

override fun onCreate(savedInstanceState: Bundle?) {
  super.onCreate(savedInstanceState)
  setContentView(R.layout.activity_main)
  val flowerList = Datasource(this).getFlowerList()
}
RecyclerView Layout
Next, replace the default TextView in the activity_main layout resource file with a RecyclerView and set the layoutManager as LinearLayoutManager. Using LinearLayoutManager means that the data is presented in a vertical or horizontal list (it is vertical by default).
<!-- Copyright 2019 Google LLC.
   SPDX-License-Identifier: Apache-2.0 -->

<FrameLayout xmlns:android="http://schemas.android.com/apk/res/android"
   android:layout_width="match_parent"
   android:layout_height="match_parent"
   xmlns:app="http://schemas.android.com/apk/res-auto">

   <androidx.recyclerview.widget.RecyclerView
       android:id="@+id/recycler_view"
       android:layout_width="match_parent"
       android:layout_height="match_parent"
       app:layoutManager="LinearLayoutManager"/>
</FrameLayout>
Item Layout
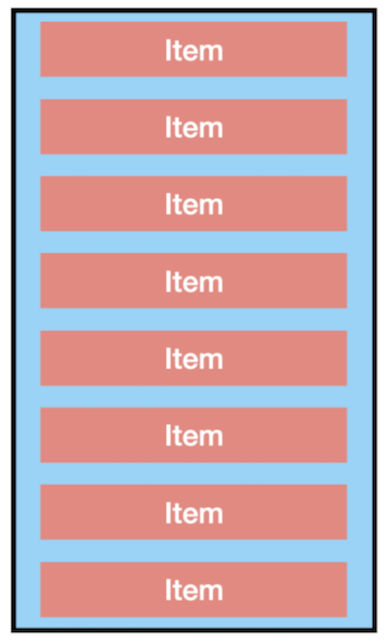
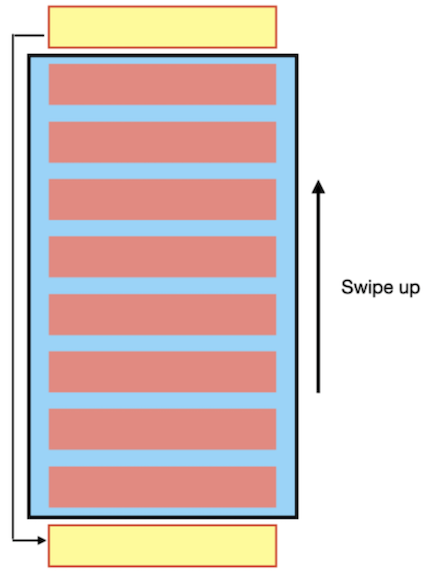
The diagram above shows a RecyclerView which is made up of items that display data. In this case, the items that make up the RecyclerView contain names of flowers.
Create a new layout file named flower_item, which describes how an item in the list should be displayed. This layout is responsible for displaying a single flower name, so all that is needed is a TextView.
<!-- Copyright 2019 Google LLC.
   SPDX-License-Identifier: Apache-2.0 -->

<FrameLayout xmlns:android="http://schemas.android.com/apk/res/android"
android:layout_width="match_parent"
android:layout_height="wrap_content">

   <TextView
       android:id="@+id/flower_text"
       android:layout_width="wrap_content"
       android:layout_height="wrap_content"
       android:textSize="50dp" />
</FrameLayout>
Breaking down the adapter class
Next up is the real meat of RecyclerView, the <a class="cm gh hz ia ib ic" href="https://developer.android.com/reference/androidx/recyclerview/widget/RecyclerView.ViewHolder" target="_blank" rel="noopener nofollow noreferrer">ViewHolder</a> and <a class="cm gh hz ia ib ic" href="https://developer.android.com/reference/androidx/recyclerview/widget/RecyclerView.Adapter" target="_blank" rel="noopener nofollow noreferrer">Adapter</a> class. A <a class="cm gh hz ia ib ic" href="https://developer.android.com/reference/androidx/recyclerview/widget/RecyclerView.ViewHolder" target="_blank" rel="noopener nofollow noreferrer">ViewHolder</a> stores information about a single item view in the RecyclerView. The RecyclerView creates only as many ViewHolders as are needed to display on screen plus a few extra in a cache. The ViewHolders are “recycled” (repopulated with new data) as the user scrolls; existing items disappear on one end and new items appear on the other end. The Adapter class gets data from the datasource and passes it into the ViewHolder which updates the views it is holding. The graphic below shows how the RecyclerView, Adapter, ViewHolder and data all work together.
Creating an Adapter
Create a class called FlowerAdapter that takes two arguments in its constructor: a list of data to display and the context for the activity in which it is displayed.
<!-- Copyright 2019 Google LLC.
   SPDX-License-Identifier: Apache-2.0 -->

class FlowerAdapter(val flowerList: Array<String>) {

}
Creating a ViewHolder
Create an inner class called FlowerViewHolder that takes in an itemView. In the ViewHolder, create a val to represent the TextView and connect it with the view in the cell layout.
Then create a bind() function which connects the data for the flower name (String) and the UI that holds that data (flowerTextView) that takes a string. The bind() function takes the string passed in and assigns it as the text of flowerTextView.
<!-- Copyright 2019 Google LLC.
   SPDX-License-Identifier: Apache-2.0 -->

class FlowerViewHolder(itemView: View) : RecyclerView.ViewHolder(itemView){
  private val flowerTextView:TextView = itemView.findViewById(R.id.flower_text)
  fun bind(word: String){
    flowerTextView.text = word
  }
}
Extending RecyclerView.Adapter
Update the FlowerAdapter class signature to extend the RecyclerView.Adapter class and pass the FlowerViewHolder in.
<!-- Copyright 2019 Google LLC.
   SPDX-License-Identifier: Apache-2.0 -->

class FlowerAdapter(val flowerList: Array<String>) :
    RecyclerView.Adapter<FlowerAdapter.FlowerViewHolder>() {

}
Classes that override RecyclerView.Adapter need to override three methods: onCreateViewHolder(), onBindViewHolder(), and getItemCount().
Overriding onCreateViewHolder()
This method is called when the ViewHolder is created. It initializes and inflates the view for the item in the RecyclerView. This view uses the item layout created earlier which displays text.
<!-- Copyright 2019 Google LLC.
   SPDX-License-Identifier: Apache-2.0 -->

override fun onCreateViewHolder(parent: ViewGroup, viewType: Int): FlowerViewHolder {
  val view = LayoutInflater.from(parent.context)
  .inflate(R.layout.flower_item, parent, false)
  return FlowerViewHolder(view)
}
Overriding onBindViewHolder()
onBindViewHolder() is called with the ViewHolder and a “position,” which denotes the item’s position in the flowerList that is being bound. This position can be used to extract the underlying data for the cell and pass that into the ViewHolder to bind the data to that holder’s UI.
<!-- Copyright 2019 Google LLC.
   SPDX-License-Identifier: Apache-2.0 -->

override fun onBindViewHolder(holder: FlowerViewHolder, position: Int) {
  holder.bind(flowerList[position])
}
Overriding getItemCount()
The RecyclerView displays a list, so it needs to know how many items are in the list. Since flowerList is the dataset, return its size.
<!-- Copyright 2019 Google LLC.
   SPDX-License-Identifier: Apache-2.0 -->

override fun getItemCount(): Int {
  return flowerList.size
}
Complete Adapter code
<!-- Copyright 2019 Google LLC.
   SPDX-License-Identifier: Apache-2.0 -->

class FlowerAdapter(val flowerList: Array<String>) :
    RecyclerView.Adapter<FlowerAdapter.FlowerViewHolder>() {

    // Describes an item view and its place within the RecyclerView
    class FlowerViewHolder(itemView: View) : RecyclerView.ViewHolder(itemView) {
        private val flowerTextView: TextView = itemView.findViewById(R.id.flower_text)

        fun bind(word: String) {
            flowerTextView.text = word
        }
    }

    // Returns a new ViewHolder
    override fun onCreateViewHolder(parent: ViewGroup, viewType: Int): FlowerViewHolder {
        val view = LayoutInflater.from(parent.context)
            .inflate(R.layout.flower_item, parent, false)

        return FlowerViewHolder(view)
    }

    // Returns size of data list
    override fun getItemCount(): Int {
        return flowerList.size
    }

    // Displays data at a certain position
    override fun onBindViewHolder(holder: FlowerViewHolder, position: Int) {
        holder.bind(flowerList[position])
    }
}
Connecting to the MainActivity
The layout, data list, and adapter are all created! Now, just add the RecyclerView to the MainActivity and assign the Adapter to it.
Define a val called recyclerView and set it equal to the RecyclerView container in activity_main. Assign FlowerAdapter as your recyclerView’s adapter.
<!-- Copyright 2019 Google LLC.
   SPDX-License-Identifier: Apache-2.0 -->

class MainActivity : AppCompatActivity() {
  override fun onCreate(savedInstanceState: Bundle?) {
    super.onCreate(savedInstanceState)
    setContentView(R.layout.activity_main)
    val flowerList = Datasource().loadFlowers()
    val recyclerView: RecyclerView = findViewById(R.id.recycler_view)
    recyclerView.adapter = FlowerAdapter(flowerList)
  }
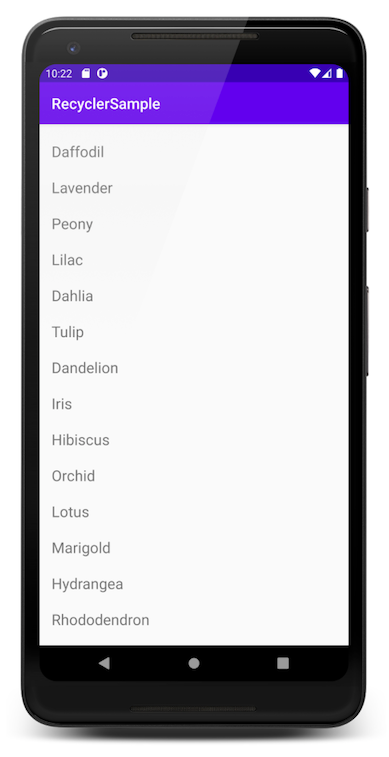
Now run the app and see it in action:
Next Steps
The full code is posted here.
This example shows how to implement the basic pieces of RecyclerView to display simple text items. Of course, RecyclerView can handle more interesting and complex items as well, which I will investigate in future articles and samples. Until then check out these resources:
- RecyclerView Sample — Kotlin
- RecyclerView Sample — Java
- RecyclerView Documentation
- Create a List with RecyclerView
Let me know in the comments what topics you would be interested in learning more about!
By Meghan Mehta
For enquiries, product placements, sponsorships, and collaborations, connect with us at [email protected]. We'd love to hear from you!
Our humans need coffee too! Your support is highly appreciated, thank you!