There are several ways to get started with Python 3 on macOS, but one way is better than the others.
I’ve been dipping my toe back into Python development as I get ready to head to PyCon US. (If you’re headed there as well and want to share your Python story, let me know!) When I installed a module to tinker around with, I got a reminder that I needed to install Python 3 soon.
From our partners:
DEPRECATION: Python 2.7 will reach the end of its life on January 1st, 2020. Please upgrade your Python as Python 2.7 won‘t be maintained after that date. A future version of pip will drop support for Python 2.7.
So, I did what any of us would do and googled around looking for a guide to update my development environment, which runs on Mac (the macOS operating system, formerly known as OS X). To my surprise, I found only a handful of StackOverflow posts, and they pointed me to partial solutions. Here’s the full story of how to set up your environment without breaking anything built into the macOS operating system.
1. Install pyenv
Moshe Zadka cautions that doing this wrong could result in an unreliable idea of which Python is running that depends too closely on shells loading aliases. I knew Moshe was familiar with Python, but what I didn’t know is that he is an author of many Python tutorials as well as an upcoming book on Python development on macOS. He helped 40 colleagues develop Python safely and consistently on macOS systems following one core principle:
“The basic premise of all Python development is to never use the system Python. You do not want the Mac OS X ‘default Python’ to be ‘python3.’ You want to never care about default Python.”
How do we stop caring about the default? Moshe recommends using pyenv to manage Python environments. This tool manages multiple versions of Python and is described as “simple, unobtrusive, and follows the Unix tradition of single-purpose tools that do one thing well.”
While other installation options are available, the easiest way to get started is with Homebrew:
? /usr/local/Cellar/pyenv/1.2.10: 634 files, 2.4MB
2. Install Python
Now let’s install the latest Python version (3.7.3 as of this writing):
python-build: use openssl 1.0 from homebrew
python-build: use readline from homebrew
Downloading Python-3.7.3.tar.xz…
–> https://www.python.org/ftp/python/3.7.3/Python-3.7.3.tar.xz
Installing Python-3.7.3…
## further output not included ##
3. Set your global default
Now that Python 3 is installed through pyenv, we want to set it as our global default version for pyenv environments:
# and verify it worked
$ pyenv version
3.7.3 (set by /Users/mbbroberg/.pyenv/version)
The power of pyenv comes from its control over our shell’s path. In order for it to work correctly, we need to add the following to our configuration file (.zshrc for me, possibly .bash_profile for you):
$ echo -e 'if command -v pyenv 1>/dev/null 2>&1; then\n eval "$(pyenv init -)"\nfi' >> ~/.zshrcAfter that command, our dotfile (.zshrc for zsh or .bash_profile for Bash) should include these lines:
eval “$(pyenv init -)“
fi
Now we know for certain that we’re using Python 3.7.3 and pip will update alongside it without any manual aliasing between versions. Using Moshe’s recommendation to use a version manager (pyenv) enables us to easily accept future upgrades without getting confused about which Python we are running at a given time.
Success
As you get comfortable with this workflow, you can use pyenv to manage multiple versions of Python. It’s also essential, for dependency management, to use virtual environments. I mention how to use the built in venv library in the article, and Moshe recommends virtualenvwrapper for managing virtual environments.
Understanding Python runtimes
Now that you have your Python versions fixed, it’s safe to explore why this problem confuses so many people.
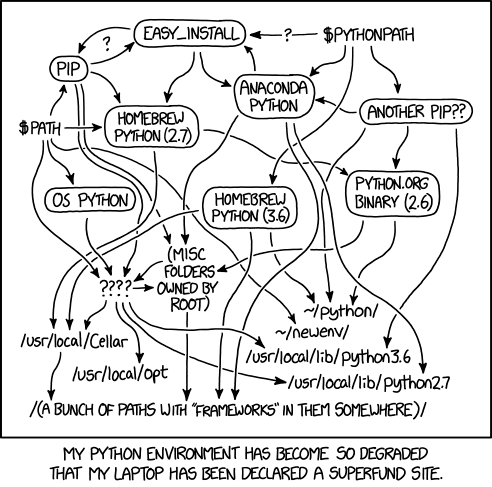
The version of Python that ships with macOS is well out of date from what Python recommends using for development. Pondering Python runtimes can be comically challenging at times, as noted by XKCD.
Many users have dozens of Python interpreters on their computer already, but have no idea how to manage them effectively. Too often, people just download the latest Python release, move it to their path, and call it a day (or use brew install python3, which would do something similar). This can cause breakages down the line in frustrating ways that can be difficult to troubleshoot.
What NOT to do
My first idea on how to make Python 3 the default Python on my system was to move the old version and add the new one:
# first, I’ll find my python binary
$ which python
/usr/bin/python
# next, I’ll move it to an unused name
$ sudo mv /usr/bin/python /usr/bin/python2
# lastly, I’ll move the new binary to the previous path
$ sudo mv $PATHTOBINARY/python3 /usr/bin/python
The pattern followed what /usr/bin/ usually does between major releases of Python, but I quickly learned it was the wrong move:
mv: rename /usr/bin/python to /usr/bin/python2: Operation not permitted
Thankfully, macOS protected me from breaking something I don’t fully understand. Further research proves this is exactly what we shouldn’t do.
Another thing not to try
Now that we know what not to do, let’s look at what we could do. There are a couple options when we think about common installation patterns for applications on macOS.
Use Python 3 as the macOS default
Python’s website has a macOS Python 3 installer we can download and use. If we use the package installation, a python3 fill will be available in /usr/local/bin/.
Aliasing is a must since the Python binary stored in /usr/bin/ can’t be changed. What’s nice about an alias is that it’s specific to our command-line shell. Since I use zsh by default, I put the following into the .zshrc file:
<span class="co4">$ </span><span class="kw3">echo</span> <span class="st0">"alias python=/usr/local/bin/python3.7"</span> <span class="sy0">>></span> ~<span class="sy0">/</span>.zshrcIf you are using the default Bash shell, you can append this same text to your .bashrc:
<span class="co4">$ </span><span class="kw3">echo</span> <span class="st0">"alias python=/usr/local/bin/python3.7"</span> <span class="sy0">>></span> ~<span class="sy0">/</span>.bashrcThis strategy works, but it isn’t ideal for making future updates to Python. It means we have to remember to check the website and download the new files since Python doesn’t include a command-line way to update.
Have Homebrew manage Python 3
The Homebrew project provides a free and open source package manager for macOS that many people rely on. It gives Apple users a power similar to apt-get or yum. If you are a Homebrew user, you may already have Python installed. To quickly check, run:
python
If Python shows up under the command, it’s installed. What version is it? Let’s check:
python: stable 3.7.3 (bottled), HEAD
Interpreted, interactive, object-oriented programming language
https://www.python.org/
/usr/local/Cellar/python/3.7.2_1 (8,437 files, 118MB) *
## further output not included ##
Okay, great! The Homebrew maintainers have updated the default Python bottle to point to the latest release. Since the Homebrew maintainers are more dependable at updating the release than most of us, we can use Homebrew’s version of Python 3 with the following command:
<span class="co4">$ </span>brew update <span class="sy0">&&</span> brew upgrade pythonNow we want to point our alias (from above) to the copy of Python that Homebrew manages:
alias python=/usr/local/bin/python3
To make sure the path above points to where Homebrew installed Python in our environment, we can run brew info python and look for the path information.
This method, of using Homebrew to manage our Python environment, is a good starting place, and it made sense to me at the time.
What if we still need Python 2?
It makes sense for anyone new to Python to begin with Python 3. But those of us who still need Python 2—for example, to contribute to a Python project that’s only available in Python 2—can continue to use the default macOS Python binary available in /usr/bin/python:
>>> print(“This runtime still works!”)
This runtime still works!
Homebrew is so wonderful, it even offers a different formula for Python 2:
$ brew install python@2
At any time, we can remove the aliases from our shell’s configuration file to go back to using the default copy of Python on the system.
Don’t forget to update pip to pip3!
The pip command is the default package manager specifically for Python packages. Although we changed our default Python command to be version 3, we have to alias our pip command separately if it’s on the previous version. First, we need to check what version we’re on:
$ pip -V
pip 19.0.3 from /Library/Python/2.7/site-packages/pip-19.0.3-py2.7.egg/pip (python 2.7)
To ensure we’re installing packages compatible with our new version of Python, we’ll use another alias to point to the compatible version of pip. Since we’re using Homebrew as our package manager in this situation, we know it installed pip3 when we installed Python 3. The default path should be the same as Python 3, but we can confirm this by asking the shell to find it:
/usr/local/bin/pip3
Now that we know the location, we will add it to our shell configuration file, as we did before:
# or for Bash
$ echo “alias pip=/usr/local/bin/pip3” >> ~/.bashrc
Last, we can confirm that running pip points to pip3 by opening a new shell or by resetting our current shell and seeing what we point to:
# Alternatively, exit the shell and start a new one
$ exec $0
# Now we can look to see where pip points us
$ which pip
pip: aliased to /usr/local/bin/pip3
We can avoid using Homebrew to update pip, but that requires a much longer tutorial from the Python documentation.
Do it right from the start
If you are just getting started with Python development on a macOS, do the necessary configurations to make sure you’re using the right version of Python from the start. Installing Python 3, with or without Homebrew, and using alias will let you start coding, but it’s not a good strategy for the long run. Using pyenv as a simple version management solution to get you off to a good start.
This feature is originally appeared in opensource.com
For enquiries, product placements, sponsorships, and collaborations, connect with us at [email protected]. We'd love to hear from you!
Our humans need coffee too! Your support is highly appreciated, thank you!


