I love following inspiring people on the internet and seeing what they make — one such person is Cassie Codes, she makes incredible animations for the web. One of her inspiring examples is this cute animated Jellyfish.
After seeing this and obsessing over it for a while, I kept thinking to myself that this cute little creature needs to come to life in Compose too. So this blog post describes how I went about making this in Jetpack Compose, the final code can be found here. The techniques in here are not only relevant for jellyfish of course… any other fish will do too! Just kidding — this blog post will cover:
From our partners:
- Custom ImageVectors
- Animating ImageVector Paths or Groups
- Applying a distortion noise effect on a Composable with AGSL RenderEffect.
Let’s dive in! 🤿
Analyzing the SVG
To implement this jellyfish, we need to see what the SVG is made up of first — and try to replicate the different parts of it. The best way to figure out what an SVG is drawing, is to comment out various parts of it and see the visual result of what each section of the svg renders. To do this, you can either change it in the codepen linked above, or download and open an SVG in a text editor (it’s a text readable format).
So let’s take an overview look at this SVG:
<!--
    Jellyfish SVG, path data removed for brevity
-->
<svg xmlns="http://www.w3.org/2000/svg" viewBox="0 0 530.46 563.1">
  <defs>
  <filter id="turbulence" filterUnits="objectBoundingBox" x="0" y="0" width="100%" height="100%">
    <feTurbulence data-filterId="3" baseFrequency="0.02 0.03" result="turbulence" id="feturbulence" type="fractalNoise" numOctaves="1" seed="1"></feTurbulence>
    <feDisplacementMap id="displacement" xChannelSelector="R" yChannelSelector="G" in="SourceGraphic" in2="turbulence" scale="13" />
  </filter>
  </defs>
  <g class="jellyfish" filter="url(#turbulence)">
    <path class="tentacle"/>
    <path class="tentacle"/>
    <path class="tentacle" />
    <path class="tentacle" />
    <path class="tentacle"/>
    <path class="tentacle"/>
    <path class="tentacle"/>
    <path class="tentacle"/>
    <path class="tentacle"/>
    <path class="face" />
    <path class="outerJelly"/>
    <path id="freckle" />
    <path id="freckle"/>
    <path id="freckle-4"/>
  </g>
  <g id="bubbles" fill="#fff">
    <path class="bubble"/>
    <path class="bubble"/>
    <path class="bubble" />
    <path class="bubble"/>
    <path class="bubble"/>
    <path class="bubble"/>
    <path class="bubble" />
  </g>
  <g class="jellyfish face">
    <path class="eye lefteye"  fill="#b4bebf" d=""/>
    <path class="eye righteye" fill="#b4bebf" d=""/>
    <path class="mouth" fill="#d3d3d3" opacity=".72"/>
  </g>
</svg>
The SVG consists of the following elements:
- Paths and Groups of paths that make up the SVG:
- Tentacles
- Face — blob and outer jelly
- Eyes — the animate open and closed
- Bubbles — animate randomly around the the jellyfish — the size and alpha animates
2. Overall the jelly fish body also has feTurbulence (noise) applied as a feDisplacementMap, this gives the wobbly look to it.
Now that we understand what this SVG is made up of, let’s go about rendering the static version in Compose.
Creating custom ImageVector
Compose has a concept of an ImageVector, where you can build up a vector programmatically — similar to SVG. For vectors/SVGs that you just want to render without changing, you can also load up a VectorDrawable using painterResource(R.drawable.vector_image). This will take care of converting it into an ImageVector that Compose will render.
Now you might be asking yourself — why not just import the jellyfish as an SVG into an xml file and load it up using painterResource(R.drawable.jelly_fish)?
That is a great question — and it is possible to load up the jellyfish in this way, removing the turbulence aspect of the SVG and the image will render with an XML loaded up (as explained in the documentation here). But we want to do a bit more with the individual parts of the path, such as animating parts on click and applying a noise effect to the body, so we will build up our ImageVector programmatically.
In order to render this jellyfish in Compose, we can copy the path data (or the “d” tag on the path) that make up the fish, for example, the first tentacle has the following path data:
M226.31 258.64c.77 8.68 2.71 16.48 1.55 25.15-.78 8.24-5 15.18-7.37 23-3.1 10.84-4.65 22.55 1.17 32.52 4.65 7.37 7.75 11.71 5.81 21.25-2.33 8.67-7.37 16.91-2.71 26 4.26 8.68 7.75 4.34 8.14-3 .39-12.14 0-24.28.77-36 .78-16.91-12-27.75-2.71-44.23 7-12.15 11.24-33 7.76-46.83z
If you are new to paths / vectors / SVGs, the above might be a bit overwhelming. But don’t worry, these are just commands that specify mathematical instructions on how to draw something. For instance, M is an command to move the virtual cursor to a new position without drawing, and L is a command to draw a line to the specified position, there are a few other commands such as:
- M, m: Move to
- L, l, H, h, V, v: Line to
- C, c, S, s: Cubic Bézier curve to
- Q, q, T, t: Quadratic Bézier curve to
- A, a: Elliptical arc curve to
- Z, z — Close the path
The commands are case sensitive, an uppercase letter indicates absolute coordinates in the viewport space, whereas lowercase letter indicates that the command is relative to the current position.
Now you are probably thinking — do I have to draw in my head and know all the positions and commands by hand? No — not at all. You can create a vector in most design programs — such as Figma or Inkscape, and export the result of your drawing to an SVG to get this information for yourself. Whew! 😅
To create the vector in Compose: we call rememberVectorPainter, which creates an ImageVector, and we create a Group called jellyfish, then another Group called tentacles and we place the first Path inside it for the first tentacle. We also set a RadialGradient as the background for the whole jellyfish.
/* Copyright 2022 Google LLC.
   SPDX-License-Identifier: Apache-2.0 */
object JellyFishPaths {
    val tentaclePath = PathParser().parsePathString(
        "M226.31 258.64c.77 8.68 2.71 16.48 1.55 25 .15-.78 8.24-5 15.18-7.37 23-3.1 10.84-4.65 22.55 1.17 32.52 4.65 7.37 7.75 11.71 5.81 21.25-2.33 8.67-7.37 16.91-2.71 26 4.26 8.68 7.75 4.34 8.14-3 .39-12.14 0-24.28.77-36 .78-16.91-12-27.75-2.71-44.23 7-12.15 11.24-33 7.76-46.83z"
    ).toNodes()
}

@Preview
@Composable
fun JellyfishAnimation() {
    val vectorPainter = rememberVectorPainter(
        defaultWidth = 530.46f.dp,
        defaultHeight = 563.1f.dp,
        viewportWidth = 530.46f,
        viewportHeight = 563.1f,
        autoMirror = true,
    ) { _, _ ->
        Group(
            name = "jellyfish"
        ) {
            Group("tentacles") {
                Path(
                    pathData = tentaclePath,
                    fill = SolidColor(Color.White),
                    fillAlpha = 0.49f
                )
            }
        }
    }

    Image(
        vectorPainter,
        contentDescription = "Jellyfish",
        modifier = Modifier
            .fillMaxSize()
            .background(largeRadialGradient)
    )
}

// create a custom gradient background that has a radius that is the size of the biggest dimension of the drawing area, this creates a better looking radial gradient in this case.
val largeRadialGradient = object : ShaderBrush() {
    override fun createShader(size: Size): Shader {
        val biggerDimension = maxOf(size.height, size.width)
        return RadialGradientShader(
            colors = listOf(Color(0xFF2be4dc), Color(0xFF243484)),
            center = size.center,
            radius = biggerDimension / 2f,
            colorStops = listOf(0f, 0.95f)
        )
    }
}
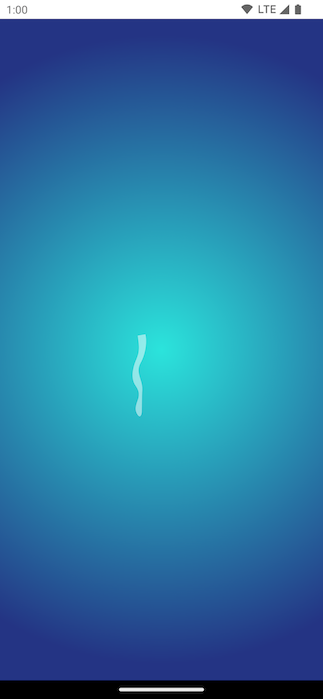
And the result of the following is a small tentacle drawn on screen with a radial gradient background!
We repeat this process for all the elements of the SVG — taking the bits of the path from the SVG file and applying the color and alpha to the path that will be drawn, we also logically group the paths into the tentacles, the face, the bubbles etc:
/* Copyright 2022 Google LLC.
   SPDX-License-Identifier: Apache-2.0 */
val vectorPainter = rememberVectorPainter(
        defaultWidth = 530.46f.dp,
        defaultHeight = 563.1f.dp,
        viewportHeight = 563.1f,
        viewportWidth = 530.46f,
        autoMirror = true,
    ) { _, _ ->
        Group(name = "jellyfish") {
            Group(name = "tentacles") {
                // tentacle paths shown above
            }

            Group(name = "body") {
                // inner and outer jelly paths
            }
            Group(name = "freckles") {
                // freckle paths

            }
            Group(name = "face") {
                // face paths
            }
        }
        Group(name = "bubbles") {
            // bubbles around the jellyfish
        }
    }

    Image(
        vectorPainter,
        contentDescription = "Jellyfish",
        modifier = Modifier
            .fillMaxSize()
            .background(largeRadialGradient)
    )
We now have our entire jellyfish rendering with the above ImageVector:

Animating ImageVector Paths and Groups
We want to animate parts of this vector:
- The jellyfish should move up and down slowly
- The eyes should blink on click of the jellyfish
- The jellyfish body should have a wobbly/noise effect applied to it.
Doing this with a XML file is difficult: it’s tricky to animate, we need to work with XML and we can’t apply other effects to parts inside the file without converting it to an AnimatedVectorDrawable. For example, we want to introduce an interaction where the eyes blink on click of the jellyfish. We are able to get finer grain control of our elements and create custom animations programmatically.
So let’s see how we can animate individual bits of the ImageVector.
Moving the jellyfish up and down
Looking at the codepen, we can see that the jellyfish is moving with a translation up and down (y translation). To do this in compose, we create an infinite transition and a translationY that’ll be animated over 3000 millis, we then set the group containing the jellyfish, and the face to have a translationY, this will produce the up and down animation.
/* Copyright 2022 Google LLC.
   SPDX-License-Identifier: Apache-2.0 */
val vectorPainter = rememberVectorPainter(
        defaultWidth = 530.46f.dp,
        defaultHeight = 563.1f.dp,
        viewportHeight = 563.1f,
        viewportWidth = 530.46f,
        autoMirror = true,
    ) { viewPortWidth, viewPortHeight ->
        val duration = 3000
        val transition = rememberInfiniteTransition()
        val translationY by transition.animateFloat(
            initialValue = 0f,
            targetValue = -30f,
            animationSpec = infiniteRepeatable(
                tween(duration, easing = EaseInOut),
                repeatMode = RepeatMode.Reverse
            )
        )
        Group(name = "jellyfish", translationY = translationY) {
            Group(name = "tentacles") {
            }
            Group(name = "body") {
            }
            Group(name = "freckles") {
            }
        }
        Group(name = "bubbles") {

        }
        Group(name = "face", translationY = translationY) {
        }
    }

Great — part of the ImageVector is now animating up and down, you will notice that the bubbles remain in the same position.
Blinking Eyes 👁️
Looking at the codepen, we can see that there is a scaleY and opacity animation on each of the eyes. Let’s create these two variables and apply the scale to the Group and the alpha on the Path. We will also only apply these on click of the jellyfish, to make this a more interactive animation.
We create two Animatables which will hold the animation state, and a suspend function that we will call on click on the jellyfish — we animate these properties to scale and fade the eyes.
We now have a cute blinking animation on click — and our jellyfish is almost complete!
Applying a distortion/noise effect 📯
So we’ve got most of the things we want to have animated — the movement up and down, and the blinking. Let’s look at how the jellyfish’s body has that wobbly effect applied to it, the body and tentacles are moving with noise applied to them to give it a sense of movement on it.

Looking at the SVG and the animation code, we can see that it uses feTurbulence to generate noise that is then applied to the SVG as a feDisplacementMap.
 <filter id="turbulence" filterUnits="objectBoundingBox" x="0" y="0" width="100%" height="100%">
    <feTurbulence data-filterId="3" baseFrequency="0.02 0.03" result="turbulence" id="feturbulence" type="fractalNoise" numOctaves="1" seed="1"></feTurbulence>
    <feDisplacementMap id="displacement" xChannelSelector="R" yChannelSelector="G" in="SourceGraphic" in2="turbulence" scale="13" />
  </filter>
  </defs>
  <g class="jellyfish" filter="url(#turbulence)">
Unfortunately these primitives are not supported in Android at the moment (see this open bug), but we do have other tools up our sleeve that can help with this. feTurbulence is generating noise that is then used as a displacement map to move the SVG around.
We can use AGSL shaders to achieve this, it’s worth noting that this is only supported on Tiramisu and up (API 33+). First we need to create a shader that’ll act as a wobble, we won’t use noise at first — just a mapping function instead for simplicity.
The way the shaders work is that they act on individual pixels — we get a coordinate (fragCoord) and we are expected to produce a color result that’ll be rendered at that coordinate. Below is the initial shader we will use for transforming the composable:
In our case, the input that we will be using is our currently rendered pixels on screen. We get access to this via the uniform shader contents; variable that we will send as input. We take the input coord (fragCoord), and we apply some transformations on this coordinate — moving it with time and generally performing some math on it to move it around.
This produces a new coordinate, so instead of returning the exact color at the fragCoord position, we shift where we get the input pixel from. For example, if we had return contents.eval(fragCoord), it would produce no change — it would be a pass-through. We now get the pixel color from a different point of the composable — which will create a wobbly distortion effect on the content of the composable.
To use this on our composable, we can apply this shader as a RenderEffect to the contents of the composable:
/* Copyright 2022 Google LLC.
   SPDX-License-Identifier: Apache-2.0 */
val time by produceState(0f) {
   while (true) {
       withInfiniteAnimationFrameMillis {
           value = it / 1000f
       }
   }
}

val shader = RuntimeShader(WOBBLE_SHADER)

Image(
   vectorPainter, contentDescription = "",
   modifier = Modifier
       .fillMaxSize()
       .background(largeRadialGradient)
       .onSizeChanged { size ->
           shader.setFloatUniform(
               "resolution",
               size.width.toFloat(),
               size.height.toFloat()
           )
       }
       .graphicsLayer {
           shader.setFloatUniform("time", time)
           renderEffect = android.graphics.RenderEffect
               .createRuntimeShaderEffect(
                   shader,
                   "contents"
               )
               .asComposeRenderEffect()
       }
)
We use <a class="au le" href="https://developer.android.com/reference/android/graphics/RenderEffect#createRuntimeShaderEffect(android.graphics.RuntimeShader,%20java.lang.String)" target="_blank" rel="noopener ugc nofollow">createRuntimeShaderEffect</a>, passing in the WOBBLE_SHADER as input. This takes the current contents of the composable, and provides it as input into the shader, with the parameter name “contents”. We then query the contents inside the WOBBLE_SHADER. The time variable changes the wobble over time (creating the animation).
Running this, we can see the whole Image is now distorted and looks a bit more wobbly — just like a jellyfish.

If we wanted to not have the effect apply to the face and bubbles, we can extract those into separate ImageVectors, and skip out on applying the render effect to those vectors:
Applying Noise Effect 🙉
The shader we specified above isn’t using a noise function to apply a displacement to the content of the composable. Noise is a way to apply a displacement, with a more structured random function. One such type of noise is Perlin noise (which is what feTurbulence uses under the hood), this is what it would look like if we render the result of running the Perlin noise function:

We use the noise value for each coordinate in the space, and use it to query a new coordinate in the “contents” shader.
Let’s update our shader to use a Perlin noise function (adapted from this Github repo). We will then use it to determine the coordinate mapping from input coordinate to output coordinate (i.e. a displacement map).
Applying this noise function, we get a much better result! The jellyfish looks as if it is moving inside the water.

But why would I use this?
At this point you might be wondering, this is cool — but very niche in its use case, Rebecca. Sure — maybe you aren’t making an animated jellyfish every day at work (we can dream right?). But RenderEffects can be applied to any composable tree — allowing you to apply effects to just about anything you want.
For example, why wouldn’t you want your gradient text or whole composable screen to have a noise effect or any other AGSL effect your heart desires?

Wrap up 🌯
So we’ve covered many interesting concepts in this blog post — creating custom ImageVectors from SVGs, animating parts of an ImageVector and applying AGSL shaders as RenderEffects to our UI in Compose.
For the full code of the Jellyfish — check out the full gist here. For more information on AGSL RenderEffects — check out the documentation, or the JetLagged Sample for another example usage of it.
If you have any questions — feel free to reach out on Mastodon androiddev.social/@riggaroo or Twitter.
Thanks to Jolanda Verhoef, Nick Butcher, Florina Muntenescu, Romain Guy, Nader Jawad for the valuable feedback on this post.
By Rebecca Franks
Source Android
For enquiries, product placements, sponsorships, and collaborations, connect with us at [email protected]. We'd love to hear from you!
Our humans need coffee too! Your support is highly appreciated, thank you!