aster.cloud aster.cloud
  • /
  • Platforms
    • Public Cloud
    • On-Premise
    • Hybrid Cloud
    • Data
  • Architecture
    • Design
    • Solutions
    • Enterprise
  • Engineering
    • Automation
    • Software Engineering
    • Project Management
    • DevOps
  • Programming
  • Tools
  • About
  • /
  • Platforms
    • Public Cloud
    • On-Premise
    • Hybrid Cloud
    • Data
  • Architecture
    • Design
    • Solutions
    • Enterprise
  • Engineering
    • Automation
    • Software Engineering
    • Project Management
    • DevOps
  • Programming
  • Tools
  • About
aster.cloud aster.cloud
  • /
  • Platforms
    • Public Cloud
    • On-Premise
    • Hybrid Cloud
    • Data
  • Architecture
    • Design
    • Solutions
    • Enterprise
  • Engineering
    • Automation
    • Software Engineering
    • Project Management
    • DevOps
  • Programming
  • Tools
  • About
  • DevOps
  • Programming

How To: Create A Flask/API Project In Ubuntu

  • root
  • April 6, 2019
  • 2 minute read

Prerequisites

  • Operating System: Ubuntu 16 or Ubuntu 18
  • Python 3.X is installed
  • Python Pip is installed
  • Python Virtual Environment is installed (Optional)


Structure Overview

|__ dotlah_flask_api
    |__ api
        |__ res
            |__ __init__.py
            |__ application_res.py
        |__ __init__.py
    |__ app_wsgi.py
    |__ runserver.py
    |__ requirements.txt
    |__ README.md

Replace the dotlah_flask_api directory with the project name of your choice.


Partner with aster.cloud
for your next big idea.
Let us know here.


cyberpogo

Steps

01. Create the necessary directories and files. You can use the following shell script to create it, or manually enter them in the terminal, or create them from another way.

$ cd ~ 
$ nano setup-flask-api.sh 


#!/bin/bash
mkdir $1
mkdir -p $1/api/res

touch $1/api/res/__init__.py
touch $1/api/res/application_res.py
touch $1/app_wsgi.py
touch $1/runserver.py
touch $1/requirements.txt
touch $1/README.md


02.  Run the setup script.

# FORMAT
$ sh setup-flask-api.sh <project-name-without-space> 

# SAMPLE 
$ sh setup-flask-api.sh dotlah_flask_api 


While it is totally safe to create a Project with spaces, it is more of a standard in this case.


03. Navigate to the Project directory

# FORMAT 
$ cd <project-name-without-space> 

# SAMPLE 
$ cd dotlah_flask_api 


04. Update the necessary Python library/packages by setting the value of the requirements.txt

$ nano requirements.txt 


Set the value:

flask 


05. (Optional but recommended). Create a virtual environment dedicated to the Flask/API project.

For instructions on how to install and configure virtual environment. See this guide.

# FORMAT 

# SAMPLE 
$ cd dotlah_flask_api 
$ python3 -m venv project-venv 


06. Activate the Virtual Environment.

$ source project-venv/bin/activate  


07. Install the flask library via Pip using the requirements.txt

(project-venv) $ pip install -r requirements.txt 


08. Update the content of runserver.py.

(project-venv) $ nano runserver.py 


# -*- coding: utf-8 -*-

# Start Flask with default web server
from api import application

application.run(host='127.0.0.1', port=8888, debug=True)


Read More  Jetpack Compose — When Should I Use DerivedStateOf?

09.  Update the dunder python file.

(project-venv) $ nano api/__init__.py 


This imports the res python module, the endpoints will be located at the application_res or other res (Resource) python file.

from flask import Flask 

application = Flask(__name__) 

import api.res.application_res 


10.  Update the application_res.py.

(project-venv) $ nano api/res/application_res.py 


# -*- coding: utf-8 -*-

from flask import jsonify
from api import application

@application.route('/', methods=['GET'])
def get_app_properties():
name = 'dotlah-flask-api'
version = '0.0.1'

app_properties = \
{
  'name' : name
  , 'version' : version
}

return jsonify(app_properties)


Above will create a GET endpoint accessible by the root path, (/).

11. Run the application

(project-venv) $ python runsever.py 


It should show something similar

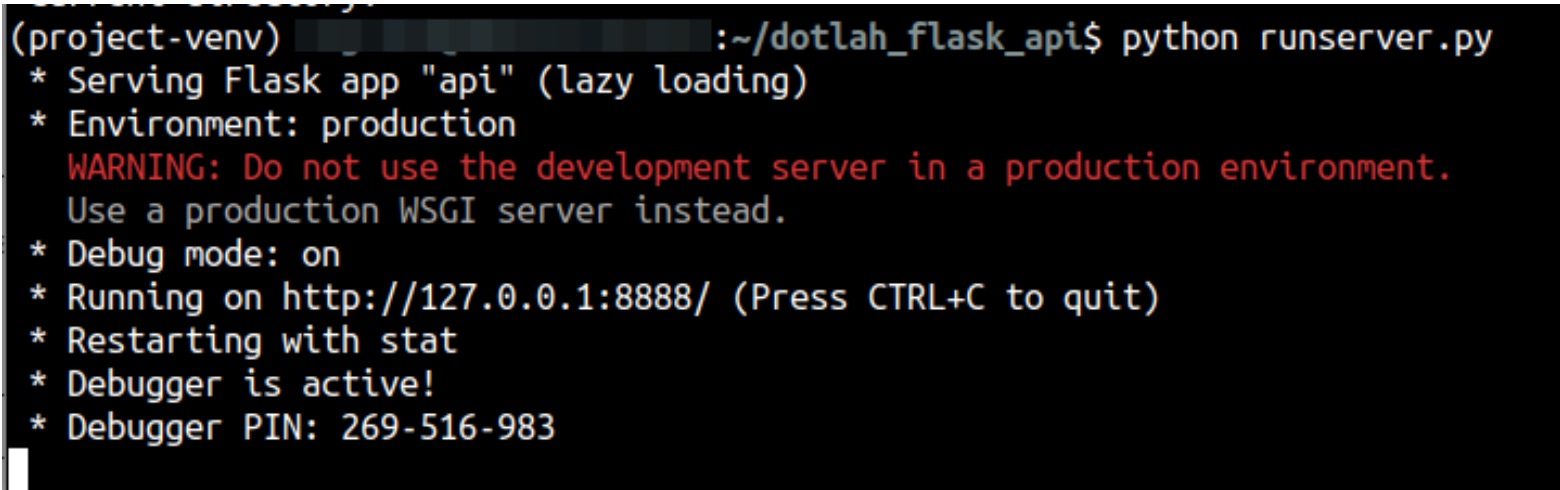
Note that running the application via this way (runserver.py) should only be used on local development. If needed to deploy on a Web Application server, a middleware or WSGI server should be used instead.


12. Test the application on the browser or via CURL.

Via Curl (open another terminal session)

$ curl http://localhost:8888


Via Browser

http://localhost:8888

Our humans need coffee too! Your support is highly appreciated, thank you!

root

Related Topics
  • API
  • Flask
  • How To
  • Python
  • Ubuntu
You May Also Like
View Post
  • Architecture
  • Data
  • Engineering
  • People
  • Programming
  • Software Engineering
  • Technology

Predictions: Top 25 Careers Likely In High Demand In The Future

  • June 6, 2023
View Post
  • DevOps
  • People

What’s The Future Of DevOps? You Tell Us. Take The 2023 Accelerate State Of DevOps Survey

  • June 2, 2023
View Post
  • Programming
  • Software Engineering
  • Technology

Build a Python App to Alert You When Asteroids Are Close to Earth

  • May 22, 2023
View Post
  • Programming

Illuminating Interactions: Visual State In Jetpack Compose

  • May 20, 2023
View Post
  • Computing
  • Data
  • Programming
  • Software
  • Software Engineering

The Top 10 Data Interchange Or Data Exchange Format Used Today

  • May 11, 2023
View Post
  • Cloud-Native
  • DevOps
  • Software

7 Ways To Turn Developer Experience Into A Competitive Edge

  • May 10, 2023
View Post
  • Architecture
  • Programming
  • Public Cloud

From Receipts To Riches: Save Money W/ Google Cloud & Supermarket Bills – Part 1

  • May 8, 2023
View Post
  • Programming
  • Public Cloud

3 New Ways To Authorize Users To Your Private Workloads On Cloud Run

  • May 4, 2023

Stay Connected!
LATEST
  • 1
    Microsoft Offers Azure ML Data Import CLI, SDK For Snowflake, Other Databases
    • June 8, 2023
  • 2
    Why Are Humans Afraid Of AI?
    • June 7, 2023
  • 3
    The Technical Architecture And Components Of A.I. Systems
    • June 7, 2023
  • 4
    Nature Already Inspired A.I. Than Most Realise
    • June 7, 2023
  • 5
    “A Field Guide To AI: For Business, Institutions, Society & Political Economy” — Your Essential Companion In Navigating the World of Artificial Intelligence.
    • June 7, 2023
  • 6
    Predictions: Top 25 Careers Likely In High Demand In The Future
    • June 6, 2023
  • 7
    A S.W.O.T. Analysis Of Current A.I. Systems
    • June 6, 2023
  • Apple-WWCD23-Vision-Pro-glass-230605 8
    Introducing Apple Vision Pro: Apple’s first spatial compute
    • June 5, 2023
  • 9
    Apple Unveils New Mac Studio And Brings Apple Silicon To Mac Pro
    • June 5, 2023
  • 10
    Apple Introduces M2 Ultra
    • June 5, 2023
about
Hello World!

We are aster.cloud. We’re created by programmers for programmers.

Our site aims to provide guides, programming tips, reviews, and interesting materials for tech people and those who want to learn in general.

We would like to hear from you.

If you have any feedback, enquiries, or sponsorship request, kindly reach out to us at:

[email protected]
Most Popular
  • 1
    tvOS 17 Brings FaceTime And Video Conferencing To The Biggest Screen In The Home
    • June 5, 2023
  • 2
    Apple Introduces The 15‑Inch MacBook Air
    • June 5, 2023
  • 3
    Huawei ICT Competition 2022-2023 Global Final Held In Shenzhen — 146 Teams From 36 Countries And Regions Win Awards
    • May 27, 2023
  • 4
    Building A Kubernetes Platform: How And Why To Apply Governance And Policy
    • June 4, 2023
  • 5
    Leave, This “United” “Kingdom”, This “Great” “Britain”
    • June 4, 2023
  • /
  • Technology
  • Tools
  • About
  • Contact Us

Input your search keywords and press Enter.