aster.cloud aster.cloud
  • /
  • Platforms
    • Public Cloud
    • On-Premise
    • Hybrid Cloud
    • Data
  • Architecture
    • Design
    • Solutions
    • Enterprise
  • Engineering
    • Automation
    • Software Engineering
    • Project Management
    • DevOps
  • Programming
  • Tools
  • About
  • /
  • Platforms
    • Public Cloud
    • On-Premise
    • Hybrid Cloud
    • Data
  • Architecture
    • Design
    • Solutions
    • Enterprise
  • Engineering
    • Automation
    • Software Engineering
    • Project Management
    • DevOps
  • Programming
  • Tools
  • About
aster.cloud aster.cloud
  • /
  • Platforms
    • Public Cloud
    • On-Premise
    • Hybrid Cloud
    • Data
  • Architecture
    • Design
    • Solutions
    • Enterprise
  • Engineering
    • Automation
    • Software Engineering
    • Project Management
    • DevOps
  • Programming
  • Tools
  • About
  • Programming

How To Use Flask Project As A Python API Application

  • root
  • October 28, 2019
  • 2 minute read

Overview

This guide shows how to use the Flask Project as a Python API application. But it can also be used as Web App which is covered in a different tutorial. It shows how to perform GET and POST operations. The code contains a preview setup, it can be further enhanced to call a database or external service.


Partner with aster.cloud
for your next big idea.
Let us know here.


cyberpogo

Prerequisites

  • Python, Virtual Environment, Pip and Flask has been installed.
  • Refer to this guide on how to install the requirements.


Application Structure

geek_flask_api

├── api

│   ├── __init__.py

│   └── res

│       ├── __init__.py

│       └── sample_res.py

├── venv

├── requirements.txt

└── runserver.py


Steps

Note that you can also perform this steps using an IDE of your choice. An example would be PyCharm.

01. Create the application directory and create the flask project.

mkdir geek_flask_api


02. Create the “geek_flask_api/runserver.py” which will be the root or main entry point of the API application.

geek_flask_api/runserver.py

# -*- coding: utf-8 -*-
# Start Flask with default web server

from api import application
application.run(host='127.0.0.1', port=8080, debug=True)


03. Create the Python file, “geek_flask_api/api/__init__.py” and set the content as follows. This will create the root Flask application.

geek_flask_api/api/__init__.py

# -*- coding: utf-8 -*-
from flask import Flask
application = Flask(__name__)

import api.res.sample_res


Note that the sample_res is not yet created.


04. Create the “res” directory which will contain the REST endpoints. Create the following python script, “geek_flask_api/api/res/__init__py” and “geek_flask_api/api/res/sample_res.py”
geek_flask_api/res/api/__init__.py

# Empty


geek_flask_api/res/api/sample_res.py

# -*- coding: utf-8 -*-

import datetime
from api            import application
from flask          import jsonify, request


@application.route('/system-info', methods=['GET'])
def get_system_info():
  info = \
    {
      'name'        : 'geek-flask-api'
      , 'version'   : '1.0.0.'
      , 'date_time' : datetime.datetime.now()
    }

  return jsonify(info)


@application.route('/users/add', methods=['POST'])
def add_user():
  username = request.form.get('username')
  password = request.form.get('password')

  print("Form parameters, username={username} and password={password}".format(username=username, password=password))

  # TODO Call service layer function to add the user

  response = \
    {
      'success': True
      , 'input' :
      {
        'username'    : username
        , 'password'  : password
      }
    }

  return jsonify(response)


@application.route('/users/<user_id>', methods=['POST'])
def update_user_info(user_id):
  json_content = request.get_json()

  print("Path param : user_id={user_id}".format(user_id=user_id))
  print("JSON content as dictionary : {json_content}".format(json_content=json_content))

  # TODO Call service layer function to update the user

  response = \
    {
      'success' : True
      , 'input' :
        {
          'user_id'         : user_id
          , 'json_content'  : json_content
        }
    }

  return jsonify(response)


05. In the “sample_res.py” there are 3 path that can be accessed.

[GET] /system-info

— Description   : Retrieve a JSON content with some static info and date-timestamp

— Request       : –NONE–

— Response      : JSON

[POST] /users/add

— Description    : A sample endpoint to submit form parameters to add a User

— Request (Form) :

—- FORM parameter : username

—- FORM parameter : password

— Response    : JSON

[POST] /users/<user_id>

— Description    : A sample endpoint to update the User info using a JSON content

— Request (JSON) :

{

first_name  : “”

, last_name : “”

}

— Response       : JSON


How To Run and Test

01. Activate the Virtual Environment. Optional if not using a Virtual Environment

$ cd geek_flask_api
$ source venv/bin/activate 


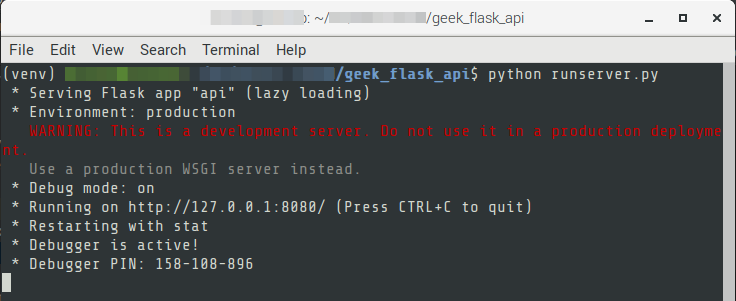
02. Run the Flask api

$ python runserver.py


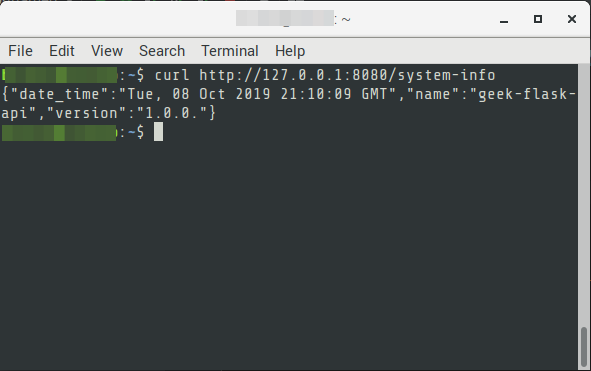
03. Test by calling the “system-info” endpoint.

via cURL

$ curl http://127.0.0.1:8080/system-info


via Browser


04. The other endpoints can be tested by using cURL or any REST client like Postman.


Read More  Built With The Google Maps Platform Gaming Solution

Our humans need coffee too! Your support is highly appreciated, thank you!

root

Related Topics
  • API
  • Flask
  • GET
  • post
  • Python
You May Also Like
View Post
  • Programming
  • Software Engineering
  • Technology

Build a Python App to Alert You When Asteroids Are Close to Earth

  • May 22, 2023
View Post
  • Programming

Illuminating Interactions: Visual State In Jetpack Compose

  • May 20, 2023
View Post
  • Computing
  • Data
  • Programming
  • Software
  • Software Engineering

The Top 10 Data Interchange Or Data Exchange Format Used Today

  • May 11, 2023
View Post
  • Architecture
  • Programming
  • Public Cloud

From Receipts To Riches: Save Money W/ Google Cloud & Supermarket Bills – Part 1

  • May 8, 2023
View Post
  • Programming
  • Public Cloud

3 New Ways To Authorize Users To Your Private Workloads On Cloud Run

  • May 4, 2023
View Post
  • Programming
  • Public Cloud

Buffer HTTP Requests With Cloud Tasks

  • May 4, 2023
View Post
  • Programming
  • Public Cloud
  • Software
  • Software Engineering

Learn About Google Cloud’s Updated Renderer For The Maps SDK For Android

  • May 4, 2023
View Post
  • Computing
  • Programming

From The Field: A Programming Requirement for Structural Analysis Computations. To Java or To Javascript.

  • May 2, 2023

Stay Connected!
LATEST
  • 1
    Amazing Federated Multicloud Apps
    • June 2, 2023
  • 2
    What’s The Future Of DevOps? You Tell Us. Take The 2023 Accelerate State Of DevOps Survey
    • June 2, 2023
  • 3
    Resolving Deployment Issues With Ts-node And Azure Development Pipelines
    • June 1, 2023
  • 4
    What To Expect From Apple’s WWDC 2023
    • June 1, 2023
  • 5
    What Is Platform Engineering And Why Adopt It In Your Company?
    • June 1, 2023
  • 6
    Four Steps To Managing Your Cloud Logging Costs On A Budget
    • May 31, 2023
  • 7
    Red Hat Puts Podman Container Management On The Desktop
    • May 30, 2023
  • 8
    The Agile Mindset: A Path to Personal Fulfillment and Growth
    • May 30, 2023
  • 9
    G7 2023: The Real Threat To The World Order Is Hypocrisy.
    • May 27, 2023
  • 10
    Build Next-Generation, AI-Powered Applications On Microsoft Azure
    • May 26, 2023
about
Hello World!

We are aster.cloud. We’re created by programmers for programmers.

Our site aims to provide guides, programming tips, reviews, and interesting materials for tech people and those who want to learn in general.

We would like to hear from you.

If you have any feedback, enquiries, or sponsorship request, kindly reach out to us at:

[email protected]
Most Popular
  • 1
    Huawei OceanStor Pacific Scale-Out Storage Tops IO500 Rankings
    • May 26, 2023
  • 2
    MongoDB And Alibaba Cloud Extend Global Partnership
    • May 25, 2023
  • 3
    Tricentis Launches Quality Engineering Community ShiftSync
    • May 23, 2023
  • 4
    Oracle Cloud Infrastructure Adds To Growing List Of Government Approved Cloud Services
    • May 22, 2023
  • 5
    Huawei And Partners Announce Yucatan Wildlife Conservation Findings
    • May 18, 2023
  • /
  • Technology
  • Tools
  • About
  • Contact Us

Input your search keywords and press Enter.